Fader
Switch
INSTALLATION
Subwoofer fader level is available when FADER is ON, and the rear
outputs of your
head
unit are connected to the
Rear Inputs.
APPLICATIONS
Source Head Unit
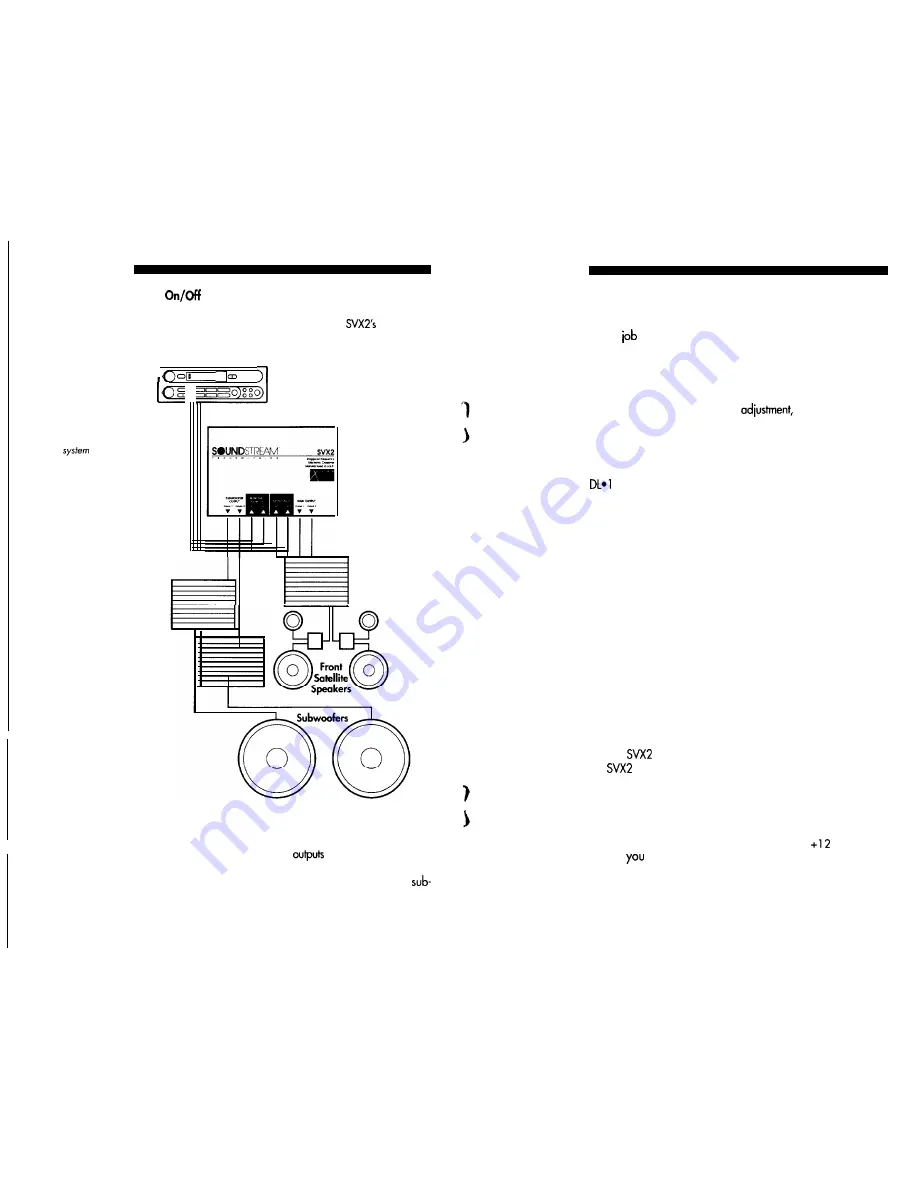
Figure 3.
An example
using on
SVX2
configured
for front ond rear
operation.
Rear
output
Front Output
s v x 2
Electronic
Crossover
Amplifiers
Figure 3 shows a typical system that uses satellite speakers for front
sound staging and a pair of subwoofers for rear bass fill. Audio
signals from the HIGH OUTPUTS d rive a stereo front amplifier.
Passive crossovers on the amplifier’s
further divide the ampli-
fied signals to the satellites’ mid-bass and tweeter speakers. The
SUBWOOFER OUTPUTS drive a pair of mono amplifiers and
woofer speakers.
4
Automotive sound system installations can be tricky, especially for
first-timers. For this reason, we recommend using a professional
installer, who has the tools and, more importantly, the experience to
do the
right. If you decide to install the equipment yourself, we
hope this manual will serve as a helpful guide.
Before attempting an installation, study the application shown in
Figure 3. Use this proven design as a “blueprint” for your system
installation, or as a starting point for creating your own custom sys-
tem. With proper installation and
the SVX2 will reward
you with reliable operation and optimum performance.
Recommended
Signal Cables
The SVX2 uses gold-plated RCA type lacks for all audio connec-
tions. For best signal transfer, we recommend using Soundstream
Audio Cable, Streamline Audio Cable, or an equivalent pre-
mium cable.
Wiring layout
Determine how your vehicle’s wiring is laid out, and plan to run
your new wiring along the same routes. Be sure to keep power wires
away from all audio signal wires. (NOTE: Wires containing audio
signals can cross a power wire, but not run alongside it.)
You can route the new wires under the carpeting, but make sure
they do not interfere with the vehicle’s normal operation.
Keep
all
wires inside the vehicle, hidden from passengers. An exposed wire
can inadvertently be pulled out, and may cause disconnection or
shorting.
Location and Mounting
The SVX2 is compact in size and it generates virtually no heat. It
can be located almost anywhere within the passenger compartment,
trunk, or storage area. However, do not install the SVX2 in the
engine compartment, or in any outside location exposed to dirt and
moisture.
Use the
as a template to mark drill holes. Before mounting
the
to your vehicle’s chassis, inspect the site for any hidden
brake or gas lines, wires, or cables.
For New Installations
If you are installing the SVX2 as part of new system, we suggest
“bench testing” your entire system prior to mounting any compo-
nents. By connecting the system to an external
V dc power
source,
can test the components outside the vehicle to verify
your installation scheme. Otherwise, try connecting the system com-
ponents to your vehicle’s electrical system before actually mounting
each component.
5


