background image

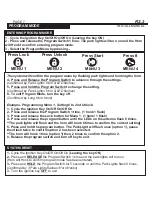
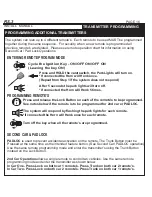
 PROGRAMMING ADDITIONAL TRANSMITTERS

SECOND CAR & PADLOCK

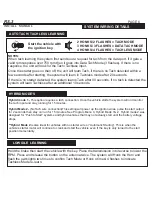
Press and HOLD the valet switch, the Park Lights will turn on.
*If connected the Horn will Honk once. 
(Repeat from Step 1 if the system does not respond)

Cycle the Ignition Key - ON/OFF ON/OFF ON
(Leaving the key ON)

The system can lean up to 4 different remote’s.  Each remote to be used MUST be programmed 
together during the same sequence.  For security, when a new remote is programmed all 
previous remote’s are deleted.  Please see remote operation chart for information on using 
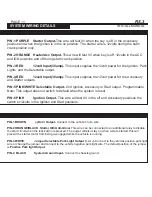
Second Car / Pad Lock Operations

.

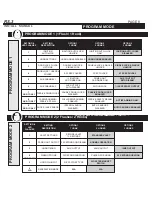
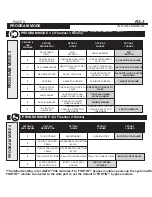
SYSTEM PROGRAMMING - 

Menu 1

PAGE 16

INSTALL  MANUAL

 TRANSMITTER PROGRAMMING

SYSTEM PROGRAMMING - 

Menu 1

PAGE 17

INSTALL MANUAL

 DIAGNOSTICS

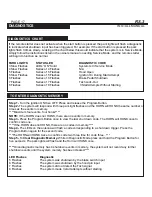
 DIAGNOSTICS CHART


  TO ENTER DIAGNOSTIC MEMORY 

If the remote starter does not activate when the start button is pressed the park lights will flash a diagnostic 
to indicate what shutdown input has been triggered. For example: If the start


button is pressed the park 

lights flash 3 times slowly. Looking at the chart below this would indicate that the system is in Service Mode, 
simply follow the instructions listed in the owners manual on exiting Service Mode  and the remote starter 
will begin to function as normal.   

PARK LIGHTS          STATUS LED                  

DIAGNOSTIC CODE

3 Slow Flashes          LEDs “ON” Solid              

System Is In Service Mode

4 Slow Flashes          Series of 4 Flashes          

N/A

5 Flashes                   Series of 5 Flashes          

Hood Open            

5 Slow Flashes          Series of 5 Flashes          

Ignition On During Start Attempt

6 Flashes                   Series of 6 Flashes          

Brake Pedal Shutdown

7 Flashes                   Series of 7 Flashes          

Tach Lock-Out

8 Flashes

Series of 8 Flashes

                   3 Start Attempts Without Starting

Step 1- 

Turn the ignition ON then OFF. Press and release the Program Button. 

Step 2-

 The system will respond with three park light flashes and the HORN will HONK the same number of 

times as the events in memory.
****Maximum four events, four honks****

NOTE: 

If the HORN does not HONK, there are no events in memory. 

Step 3- 

Press the Program Button once to view the last shut down code. The HORN will HONK once to 

confirm code one. 
****If the HORN does not HONK, there are no codes in memory.****

Step 4- 

The LEDs on the antenna will flash a code corresponding to a shut down trigger. Press the 

Program Button again for the second code. 
***The HORN will HONK twice to confirm code two three time for code three...***

Step 5- 

To 

Clear Diagnostic Memory.

 While in Diagnostic Mode press and hold the Program Button for 

five seconds. The park lights will flash and the Horn will HONK once.

****

Once diagnostic memory has 4 shutdown events in memory, the system will not record any further 

shutdown events until the system memory has been cleared.****

LED Flashes                 Diagnostic

5 Flashes                       The system was shutdown by the brake switch input
6 Flashes                       The system was shutdown by the hood pin input
7 Flashes                       The system did not detect the Tach signal.
8 Flashes                       The system made 3 start attempts without starting

RS.3

RS.3

After 5 seconds the park lights will turn off. 
*If connected the Horn will Honk 5 times.
 

Press and release the Lock Button on each of the remote’s to be programmed.
See notes below if the remote is to be programmed for 2nd car or PADLOC.
 
The system will respond by flashing the park lights for each remote.
*If connected the Horn will Honk once for each remote.
 
Turn off the key when all the remote’s are programmed.
 

PADLOC

 is used to prevent accidental activation on the remote. The Trunk Button must be 

Pressed at the same time as the intended feature button. (See Second Car/ PADLOC operation)
Use the same remote programming mode and enter the transmitter’s using the Trunk Button 
instead on the Lock Button.

2nd Car Operation

 allows a single remote to control two vehicles. Use the same remote 

programming mode and enter the transmitter as shown below.

In Car One- Press Lock on both car 1 remote’s. Press Trunk on both car 2 remote’s. 
In Car Two- Press Lock on both car 2 remote’s. Press Trunk on both car 1 remote’s.
 

PROGRAMMING REMOTE’S

ENTERING REMOTE PROGRAM MODE

Summary of Contents for TARANTULA RS.3

Page 1: ...terference and 2 This device must accept any interference received including interference that may cause undesired operation CAUTION Changes or modifications not expressly approved by the part respons...

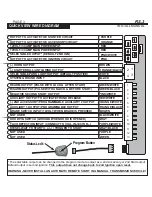
Page 2: ...Tach Tachless Learn Hybrid Mode QUICK VIEW PROGRAMMING 7 9 Enter Program Mode System Reset Menu 1 2 3 4 SYSTEM WIRING DETAILS 10 14 Connector Views Wiring Description INSTALLER NOTES 15 Page for Inst...

Page 3: ...D START OUTPUT DISARM OUTPUT PULSE WITH UNLOCK BEFORE START NOT USED DIESEL WAIT TO START or TRIGGER TO START TACH DETECTION INPUT CONNECT TO COIL INJECTOR BRAKE SWITCH INPUT 12VOLT WHEN BRAKE IS PRES...

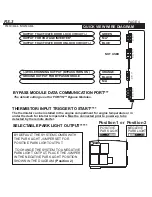
Page 4: ...CK ORANGE 1 2 3 4 SELECTABLE PARK LIGHT OUTPUT OUTPUT TO ACTIVATE DOOR LOCK CIRCUIT OUTPUT TO ACTIVATE DOOR UNLOCK CIRCUIT OUTPUT FOR VOLTAGE INVERTER GROUND OUTPUT FOR BYPASS MODULE WHILE RUNNING OUT...

Page 5: ...MODULES USING THE DATA TO DATA TYPE CONNECTION THERE ARE 2 SELECTION TYPES THE DEFAULT SETTING IS FOR FORTIN MODULES THE SECOND IS FOR IDATA BYPASS MODULES IF THE BYPASS KIT IS A FORTIN PRODUCT SIMPLY...

Page 6: ...ybrid mode 1 This option requires a tach connection Once the vehicle starts the system will not monitor the tach input and stay running for 15 minutes Hybrid Mode 2 No Tach wire connection This settin...

Page 7: ...ss and Release the Program Switch to advance through the settings Confirmed by Park Lights Horn LED flashes 5 Press and hold the Program Switch to change the setting Confirmed by Park Lights Horn LED...

Page 8: ...DOOR LOCKS ENABLED 8 ARS 1 ONLY PASSIVE ARMING PASSIVE ST KILL FULL PASSIVE ARMING ENABLED PASSIVE SAFETY REARM ENABLED 9 ARS 1 ONLY SHOCK AUX SENSOR INTERNAL SHOCK DISABLED BOTH SENSORS DISABLED BOT...

Page 9: ...4 Flashes 4 Honks SYSTEM PROGRAMMING Menu 1 SYSTEM PROGRAMMING Menu 1 7 LEDS FLASH WHEN LOCKED ARMED LED FLASHES LEDS DO NOT FLASH WHEN LOCKED ARMED AUTO TACH TACHLESS SETTING LED FLASHES SETTING DESC...

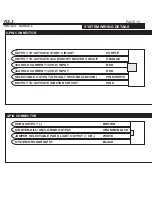
Page 10: ...ER KILL ANTI GRIND OUTPUT PINK OUTPUT TO ACTIVATE IGNITION CIRCUIT PINK WHITE SELECTABLE OUTPUT DEFAULT SECOND IGNITION RED 30A HIGH CURRENT 12VOLT INPUT PURPLE OUTPUT TO ACTIVATE START CIRCUIT RED 30...

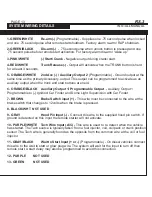
Page 11: ...essory or Start output Programmable Note This output does not switch to default when the system is reset PIN 6 PINK Ignition Output This wire will test 0V in the off and Accessory positions the switch...

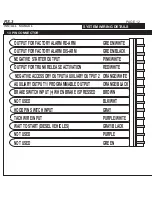
Page 12: ...PURPLE WHITE GRAY BLACK PURPLE GREEN OUTPUT FOR FACTORYALARM RE ARM OUTPUT FOR FACTORYALARM DIS ARM NEGATIVE STARTER OUTPUT OUTPUT FOR TRUNK RELEASEACTIVATION NEGATIVEACCESSORYOUTPUT AUXILIARYOUTPUT...

Page 13: ...nder and Dome Light Supervision with Car Finder 7 BROWN Brake Switch input This wire must be connected to the wire at the brake switch that changes to 12volts when the brake is pressed 8 BLACK WHT NOT...

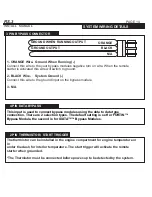
Page 14: ...ct bypass modules using the data to data type connection There are 2 selection types The default setting is set for FORTIN Bypass Module the second is for IDATA Bypass Modules 4 PIN DATA BYPASS The Th...

Page 15: ...SYSTEM PROGRAMMING Menu 1 PAGE 15 INSTALL MANUAL INSTALLER NOTES RS 3...

Page 16: ...ock Button on each of the remote s to be programmed See notes below if the remote is to be programmed for 2nd car or PADLOC The system will respond by flashing the park lights for each remote If conne...

Page 17: ...ress and release the Program Button Step 2 The system will respond with three park light flashes and the HORN will HONK the same number of times as the events in memory Maximum four events four honks...

Page 18: ...12volts 87 86 85 87a 30 87 86 85 87a 30 Alarm and or Starter Module Door lock Output Blue Green Vehicle s Lock Unlock Switch USE SPDT 12v Relay POSITIVE DOOR LOCK LOW CURRENT 12volts 12volts 87 86 85...

Page 19: ...or lock Output Blue Green Unlock Resistor Lock Resistor Lock Unlock Switch USE SPDT 12v Relay REVERSE POLARITY DOOR LOCK SYSTEM 12volts 12volts Alarm and or Starter Module Door lock Output Blue Green...

Page 20: ...website www security soundstream com tech support tech support soundstream com...

Reviews: