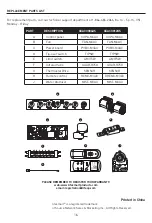
background image

9

PREPARATION 

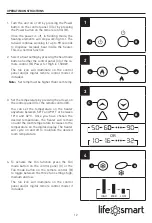
Place the unit on a firm, level surface and plug into a grounded 120 V, 60 Hz power outlet . Only operate 

the unit in upright position .
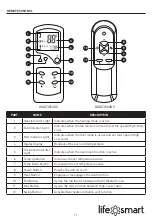
Insert two AAA batteries into the remote control before using (batteries not included) . *(Not all products 

will include a remote control .)

Please note that infrared heaters do not heat like a traditional space heater . You should not expect infrared 

heaters  to  blow  hot  air  like  a  traditional  space  heater .  Infrared  heaters  heat  objects  not  air .  Infrared 

heaters  are  intended  to  supplement  an  already  heated,  insulated  room .  Square  footage  specifications 

assume a single enclosed room not an entire home . Infrared heaters do not heat through walls, floors, and 

are not intended to replace a main heat source . Infrared heat can take at least 24 hours to warm a room 

but operate much more efficiently to maintain the desired temperature . Infrared heaters will not work 

well in uninsulated unheated spaces like screened in porches, RV’s, garages, unheated basements, etc .
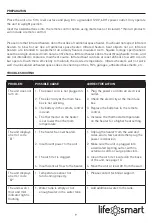
TROUBLESHOOTING

PROBLEM

POSSIBLE CAUSE

CORRECTIVE ACTION

The unit does not 

turn on .

1 .  The power cord is not plugged in . 

2 .  The electricity at the main fuse 

box is not working .

3 .  The battery in the remote control 

is dead .

4 .  The thermostat on the heater 

is set lower than the room 

temperature .

1 .  Plug the power cord into an electrical 

outlet .

2 .  Check the electricity at the main fuse 

box .

3 .  Replace the batteries in the remote 

control .

4 .  Increase the thermostat temperature 

on the heater for a higher heat setting .

The unit displays 

an error code 

“E1”

1 .  The heater has overheated . 


2 .  Insufficient power to the unit 


3 .  The air filter is clogged . 

4 .  Insufficient air flow to the heater .

1 .  Unplug the heater from the wall and 

sides, wait a few seconds then plug the 

power cord back in .

2 .  Make sure the unit is plugged into 

a dedicated 3-prong outlet, with no 

extension cords or surge protectors .

3 .  Clean the air filter located on the back 

of the unit . see page 13 .

4 .  Move the unit at least 3ft from the wall .

The unit displays 

an error code 

“E2”

1 .  Temperature sensor not 

functioning properly .

1 .  Please contact technical support .

The units won’t 

mist and mist 

indicator light is 

flashing

1 .  Water tank is empty or not 

enough water in the water tank

1 .  Add additional water to the tank .

Summary of Contents for life smart XXAC3004US

Page 1: ...tproducts com Please have your model and serial number ready 1 ATTACH YOUR RECEIPT HERE Purchase Date ____________Serial Number located on back of unit __________________ lifesmart is a registered trademark of Source Network Sales Marketing Inc All Rights Reserved REV1 022217 INFRARED QUARTZ HEATER MULTIFUNCTION TOWER Customer number XXAC3004US XXAC3012US ...

Page 2: ...ontents 3 Safety Information 4 Frequently Asked Questions 6 Preparation 9 Troubleshooting 9 Control Panel 10 Remote Control 11 Operating Instructions 12 Care and Maintenance 14 One Year Limited Warranty 15 Replacement Parts List 16 ...

Page 3: ...ntrol 1 C Control Panel preassembled to Infrared Heater A 1 D Easy Carry Handle preassembled to Infrared Heater A 2 E Filter Cover preassembled to Infrared Heater A 1 F Humidifier Chamber preassembled to Infrared Heater A 1 G LED Mode Indicator Light preassembled to Infrared Heater A model XXAC3012US only 1 ...

Page 4: ...cturer for resolution options Do not use outdoors Exposure to outdoor elements such as rain snow sun wind or extreme temperatures may cause the heater to become a safety hazard This heater is not intended for use in bathrooms laundry areas and similar indoor locations nor any locations that use GFCI outlets Never place the heater where it may fall into a bathtub or other water receptacles Do not r...

Page 5: ...s heater has a voltage rating of 120 volts The cord has a three blade grounding type plug An adapter is available for connecting three blade grounding type plugs to two slot receptacles The grounding lug extending from the adapter must be connected to a permanent ground such as a properly grounded outlet box The adapter should not be used if a three slot grounded receptacle is available DO NOT DEF...

Page 6: ...parts may be purchased through the manufacturer if your product is out of warranty If you feel that the elements are definitely faulty right out of the box contact Customer Support A representative can then direct you to the next step Q Once I plug the unit in and turn it on how long will it take to heat my room A The heating process in the heater begins immediately upon powering on and setting th...

Page 7: ... cycles down The fan continues to run so that every last bit of heat is blown out of the heat chamber while allowing the unit to continue filtering your air Once the internal box components cool completely the fan should then shut off on its own In this case allow a few minutes after the heat cycles off with power on The fan will shut off faster when the power is turned off Q My units power cord g...

Page 8: ... water make it colder A Water temperature does not noticeably impact the cooling performance Q What happens if the unit runs out of water A If the unit runs out of water the misting icon on the control panel will blink and the unit will simply stop humidifying the water No harm will be done by operating the unit without water Q Should there be a certain amount of space around the unit A Yes there ...

Page 9: ...SIBLE CAUSE CORRECTIVE ACTION The unit does not turn on 1 The power cord is not plugged in 2 The electricity at the main fuse box is not working 3 The battery in the remote control is dead 4 The thermostat on the heater is set lower than the room temperature 1 Plug the power cord into an electrical outlet 2 Check the electricity at the main fuse box 3 Replace the batteries in the remote control 4 ...

Page 10: ...ndicates when the fan function is engaged 9 Fan Mode Indicator Indicates fan speed setting between High Medium Low modes 10 Auto Mist Mode Indicates when the misting mode is set to Auto 11 Mist Mode Indicator Indicates when the misting mode is High Low 12 Mist Indicator Indicates when the misting function is engaged 13 Set Degree Indicator Indicates temperature in Fahrenheit 14 Temp Humidity Indic...

Page 11: ...ed High Low Auto 4 Digital Display Readout of the set room temperature 5 Oscillation Indicator Light Indicates when the oscillation function is active 6 Temp Up Button Increases the set temperature value 7 Temp Down Button Decreases the set temperature value 8 Power Button Powers the unit on or off 9 Heat Button Engages or disengages the heat function 10 Fan Button Cycles the fan function between ...

Page 12: ...el if included Note Set temp must be higher than room temp 2 C B 3 Set the temperature by pressing the arrows on the control panel C or the remote control B You can set the temperature on the heater anywhere between 50 F and 90 F or between 10 C and 32 C Once you have chosen the desired temperature the heater will remain on until the room temperature increases to the temperature on the digital dis...

Page 13: ...o cool completely 1 To keep the unit clean clean the outer shell with a soft damp cloth Use a mild detergent if necessary After cleaning dry the unit with a soft cloth 2 Clean the humidifier tank using a soft bristled brush and a mild cleanser when cleaning out the inside of your unit s water tank Wipe down the exterior with a clean damp cloth Wait for all components to dry completely before filli...

Page 14: ... Do not use the unit without the filter assembly in place 1 2 1 ADDING WATER TO THE WATER TANK 1 While the unit is off and unplugged press the level located in the handle of the water tank on the back of the unit 2 Unscrew the top cap by turning counter clockwise and add 1 gallon of distilled water DO NOT OVER FILL THE TANK Replace the top cap and gently tighten DO NOT OVER TIGHTEN THE CAP 3 Caref...

Page 15: ...er s warranty department The purchaser is responsible for insuring any parts shipped or returned if desired The purchaser is responsible to prepay any shipping charges both ways including but not limited to taxes and duties All exchanged parts and products replaced under this warranty will become the property of manufacturer The manufacturer reserves the right to change manufacturers of replacemen...

Page 16: ...ment parts call our technical support department at 1 866 484 2066 8 a m 5 p m CST Monday Friday PART DESCRIPTION XXAC3004US XXAC3012US A Control panel COPA MCAC COPA MCAC B Fan FAN MCAC FAN MCAC C Power board POBO MCAC POBO MCAC D Tip over switch TIPSW TIPSW E Limit switch LIMITSW LIMITSW F Infrared tube QUAR R750 QUAR R750 G Thermostat Wire SENSOR SENSOR H Remote control REMO MCAC DREMO MCAC J W...

Reviews: