For Machines Mfg. Since 7/09
Model SB1016/SB1036
-39-
O P E R A T I O N
3-Jaw Chuck
Refer to
Chuck & Faceplate Mounting
instructions on
Page 35
to mount the 3-jaw
chuck to the spindle.
The 3-jaw scroll-type chuck included with this
lathe features hardened steel jaws that center the
workpiece. When the operator opens or closes the
jaws with the chuck key, the jaws move in unison.
There are two sets of removable hardened steel
jaws included with the 3-jaw chuck—inside and
outside jaws. Use the correct jaws for the size
and configuration of the workpiece to hold it
firmly and securely on the chuck (see
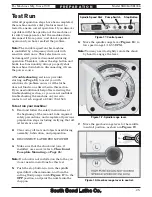
Figure
56
). The outside of the jaws are used to hold the
workpiece from the outer diameter.
Figure 56. Chuck and jaw selection.
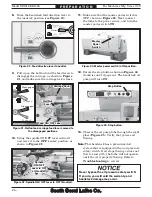
Numbered from 1–3, the jaws must be used in
the matching numbered jaw guides, as shown in
Figure 57
.
Figure 57 Jaw guides and jaw numbers.
Jaw Guide #1
Jaw
Numbers
Note:
The chuck does not need to be removed
from the spindle to swap the jaws.
Changing Jaws
Item Needed
Qty
Chuck Key ............................................................. 1
White Lithium Grease .......................... As Needed
Chuck Cradle or Plywood
3
⁄
4
" (to protect bed) ...... 1
To change the jaw:
1.
DISCONNECT LATHE FROM POWER!
2.
Place a piece of wood over the ways to
protect them from potential damage.
3.
Insert the chuck key and turn it
counterclockwise to back the jaws out and
remove them.
4.
Clean the jaw mating surfaces and apply
a thin film of white lithium grease to the
mating surfaces.
5.
Set the previously-mounted jaws aside in a
safe place free of moisture and abrasives.
6.
Rotate the chuck key clockwise until you see
the initial thread of the scroll gear just begin
to enter jaw guide #1 (see
Figure 58
).
7.
Insert jaw #1 into jaw guide #1 and hold the
jaw against the scroll gear lead thread.
8.
Rotate the chuck key clockwise one turn to
engage the tip of the scroll gear lead thread
into the jaw. Pull on the jaw—now it should
be locked into the jaw guide.
9.
Repeat
the
Steps 6
–
8
for jaws and guides #2
and #3.
Figure 58. Inserting jaw guide #1.
Initial Thread


