background image

18

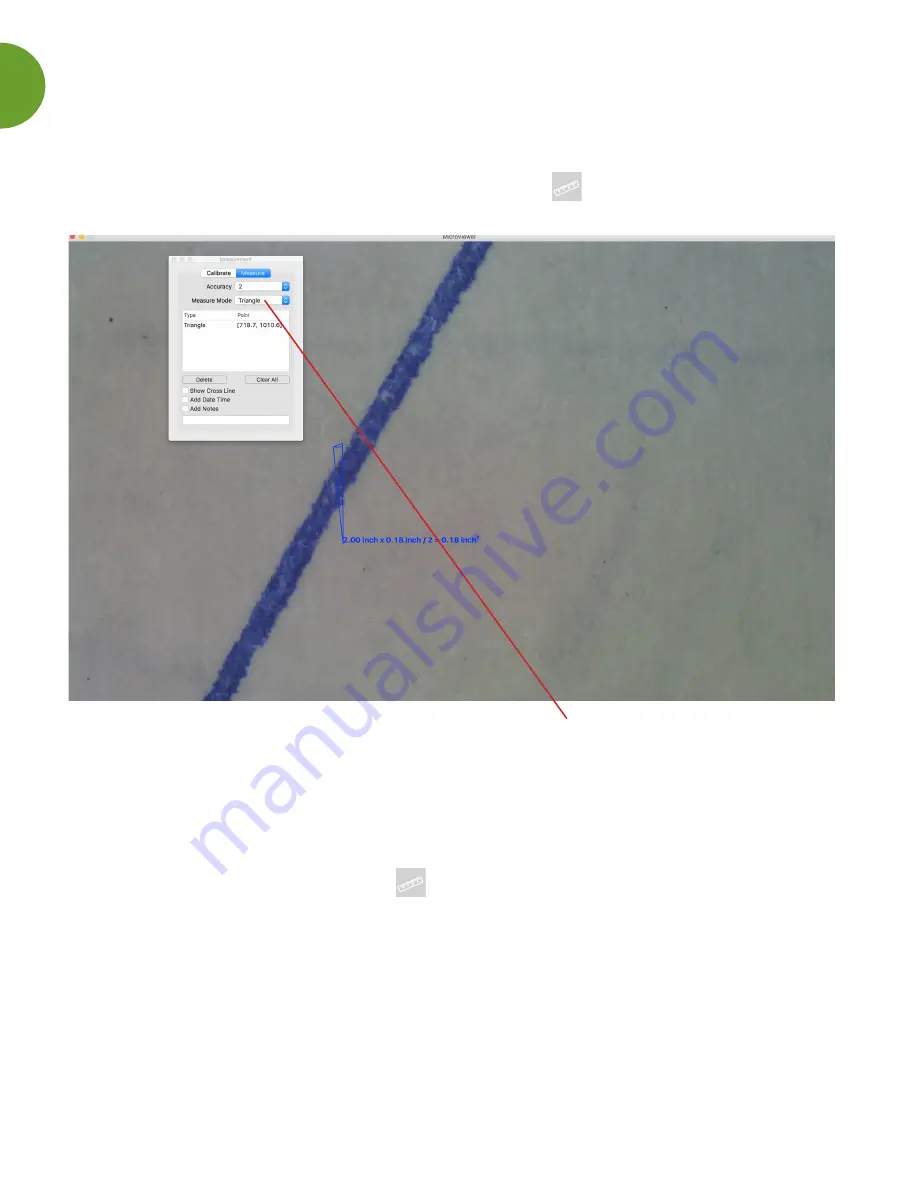
HOW TO MEASURE A TRIANGLE

After calibrating you can begin measuring. 

Follow the full calibration directions on page 13. Click the              Measure button.  

Select the Measure Mode drop down menu and choose Triangle for the Measure Mode. 

1.  Hold the button of the mouse at the first point of the object.    

2.  Drag to the second part and release. 

3.  Immediately hold the right button on the mouse again at the second point of the object,    

     then drag to the third point of the object.

To return to the live screen, click on the          Measure icon button in the Tool Bar

Summary of Contents for MicroSight 1.3MP

Page 1: ...www southernsciencesupply com 877 968 7522 USER MANUAL M A C C O M P U T E R S MicroSight 1 3MP MicroSight 5MP MICROSCOPE...

Page 2: ...tos and Videos 8 How to Create Time Lapse Video 9 Understanding the Preferences Window 10 How to Compare Two Images 11 How to Use the Draw Tool 12 How to Calibrate For Measurement 13 Understanding the...

Page 3: ...cuit boards printing inspection textile inspection paper money and coins stamps jewelry inspection rock and mineral inspections and so much more The software is always included with these microscopes...

Page 4: ...hey are both case sensitive There are no letter Os use zeros 3 Serial numbers may be used more than one time 4 After entering the serial number press OK not evaluate The evaluate button is for a trial...

Page 5: ...xt time if focuses the specimen will be magnified to 200x MICROSCOPE ADJUSTABLE LIGHT Adjust the light intensity by turning the thin wheel on the microscope ADDITIONAL FOCUS TIPS All of the Southern S...

Page 6: ...6 You will see the function keys in a Tool Bar near the software screen This toolbar can be moved to anywhere on your screen FUNCTION KEY LIST Below is a quick overview of the keys...

Page 7: ...n Double click the picture to open it in the microscope window The image is now ready for editing HOW TO VIEW AN IMAGE I HAVE ALREADY TAKEN Make sure the MicroSight microscope is plugged into the USB...

Page 8: ...You can choose to save all videos to your desktop and then move them into the appropriate folders or redirect the software to send them directly to a specific folder each time you take a video IMAGES...

Page 9: ...ful If you choose 5 1 only one second of every 5 seconds will be recorded If you choose 60 1 only one second of every 60 seconds will be recorded and so on WARNING If you choose the time lapse functio...

Page 10: ...he picture saving location Next file number Set up the the file name of the next picture Image file type Set up the compression type of video Full Screen Mode If the full screen mode box is marked Mic...

Page 11: ...e by selecting the Save icon or print by selecting the Print icon You can plug two digital microscopes into the USB ports to compare images from two microscopes or to compare two live images This can...

Page 12: ...set up the line width and color Draw circles You can set up the line width and color Draw circles You can set up the line width and color Input text You can set up the line width and color Free hand d...

Page 13: ...e the distance magnification or resolution Step 3 Check Calibrate option and choose the Reference Unit and Reference Size which is the largest dimension visible on your snapshot Ex The largest dimensi...

Page 14: ...easurement mode from the following options Angle Circle Ellipse Line Rectangle Triangle 3DotsRadius Delete Click the measurement data and click the delete button to delete the data Clear All Delete al...

Page 15: ...e Measure Mode drop down menu and choose Angle for the Measure Mode 1 Hold the button of the mouse at the point A of the angle 2 Drag to point B of the angle and release the button of the mouse 3 Clic...

Page 16: ...and choose Ellipse for the Measure Mode 1 Select the Ellipse option in the Measure Mode Hold the button of the mouse at the upper left of the object 2 Drag to the lower right of the object 3 Release...

Page 17: ...Measure Mode drop down menu and choose Line for the Measure Mode 1 Hold the button of the mouse at the starting of the line Drag to the finishing point of the line 2 Release the right button of the m...

Page 18: ...drop down menu and choose Triangle for the Measure Mode 1 Hold the button of the mouse at the first point of the object 2 Drag to the second part and release 3 Immediately hold the right button on th...

Page 19: ...p down menu and choose 3DorRadius for the Measure Mode 1 Hold the button of the mouse at the first point of the arc 2 Drag to the second point and release 3 Click the mouse button at the third point o...

Page 20: ...77 968 7522 cell 210 887 0479 www southernsciencesupply com TROUBLESHOOTING Q U E S T I O N S A N S W E R S For technical questions compatibility issues or other wonderings please reach out to us We p...

Reviews: