background image

Before Starting Engine:

A

Adding Fuel to Cultivator:

B

1.  Stop engine and allow it to cool before refueling. 

2.  Place the unit upright on the ground or on a sturdy bench and wipe and any debris from around the fuel cap.

3.  Remove fuel cap slowly and use a funnel to pour the mixture into the tank, and replace the fuel cap.

4.  Avoid spilling fuel or oil. Wipe up all fuel spills.

5.  Move at least 10 feet (3 meters) away from fueling site before starting engine. 

Operation

• Save all instructions 

Questions? Call Toll Free at 1-800-737-2112 

Copyright © 2009 MAT Engine Technologies, LLC

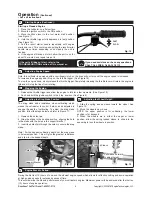
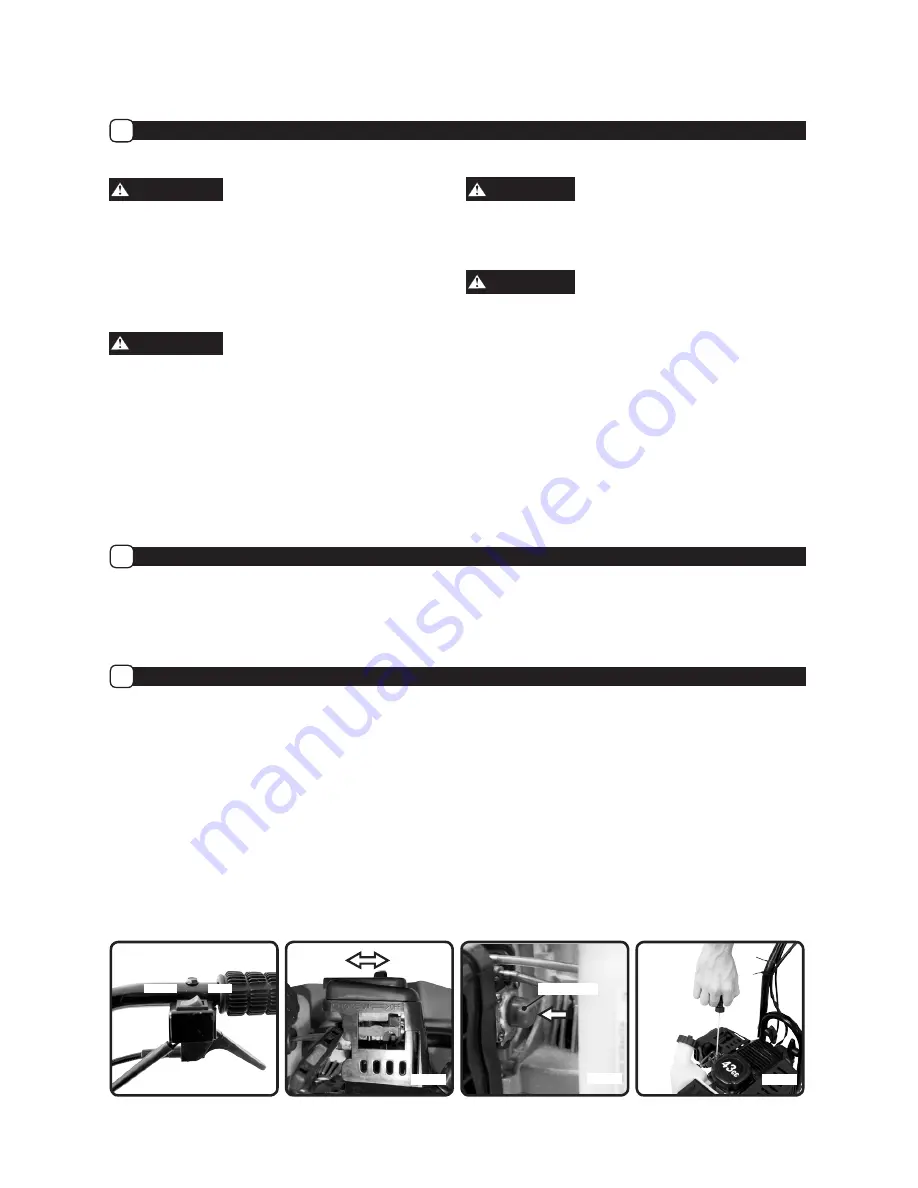
Fig. 6

Fig. 9

Fig. 7

COLD START

RUN/WARM 

START

Fig. 8

PRIMER BULB

Mixing Fuel / 2-Cycle Oil

WARNING

Do not smoke or allow smoking near fuel or the cultivator. 

Mix  and  pour  fuel  outdoors  WHERE  THERE  ARE  NO 

SPARKS OR FLAMES. 

The 2-cycle engine on your cultivator requires that fuel and 

2-cycle  engine  oil  need  to  be  pre-mixed  before  adding  to 

the fuel tank.  

WARNING

  Always  mix  the  gasoline  and  2-cycle  oil  in  a  container 

approved for gasoline.  Never mix fuel directly in the engine 

fuel tank. 

Use fresh unleaded gasoline with an octane rating of 87 or 

higher and less than 10% ethanol or methanol.  

Use  2-cycle  oil  that  meets  or  exceeds  JASO  –  FC 

specifications  and  is  intended  for  mixing  at  a  fuel  to  oil 

ratio of 40:1.

CAUTION

Use  of  incorrect  gasoline  such  as  diesel  fuel  or  gasoline 

containing more than 10% ethanol or methanol will damage 

the cultivator engine and void your warranty. 

CAUTION

Use of incorrect oil, such as automotive oil, 2-cycle marine 

outboard oil, or any oil other than specified oil will damage 

the cultivator engine and void your warranty.

To mix the fuel and 2-cycle oil, follow instructions on 2-cycle 

oil container for mixing fuel.  Mix gasoline and 2-cycle oil 

at a ratio of 40:1.  A mixture with a 40:1 ratio is obtained 

by mixing 1 gallon (4 liters) of gasoline with 3.2 ounces of 

oil  (95  ml).   After  adding  oil  to  gasoline,  shake  container 

momentarily to ensure proper mixing. 

IMPORTANT:  Mix  only  enough  fuel  for  your  immediate 

needs.  Do not store pre-mixed fuel.

Starting Engine:

C

Starting a Cold Engine

1.  Place the cultivator on a flat surface.

2.  Move the ignition switch to the “on” position. (See Figure 6)

3.  Move  the  choke  lever  to  the  ‘cold  start’  position.  (See 

Figure 7)

4.  Press the primer bulb slowly 6 times. (See Figure 8)

5.  Grab the recoil starter handle with your right hand, and 

support the cultivator with your left hand. (See Figure 9)

6.  Pull  the  recoil  starter  handle  sharply  until  the  engine 

starts and runs

7.  After  engine  starts  and  runs  for  10-15  seconds,  move 

choke lever to “run/ warm start” position.  (See Figure 7)

Starting a Warm Engine

1.  Place the cultivator on a flat surface.

2.  Move the ignition switch to the “on” position. (See Figure 6)

3.  Move  the  choke  lever  to  the  ‘run/  warm  start’  position. 

(See Figure 7)

4.  Grab the recoil starter handle with your right hand, and 

support the cultivator with your left hand. (See Figure 9)

5.  Pull  the  recoil  starter  handle  sharply  until  the  engine 

starts and runs.

ON/RUN

STOP

Summary of Contents for S-CV-43

Page 1: ...r Read and understand all warnings and instructions in this manual before using this tool Improper use of this tool can cause severe injury or death Keep this manual for future reference Record the fo...

Page 2: ...and clothing away from rotating tines Contact with rotating tines may result in serious injury Safety Definitions Save all instructions Safety Warning Symbols Control and Operating Symbols Choke Cont...

Page 3: ...defects or other reproductive harm Important Safety Information Save all instructions While Operating Cultivator 1 Stay alert Use common sense Watch what you are doing 2 Do not operate cultivator if...

Page 4: ...ct cultivator periodically Keep machine attachments and accessories in safe working condition If cultivator is not working properly or damaged have it repaired by a qualified service center 3 Check fo...

Page 5: ...ION CJ7Y or equivalent Net Weight 33 lbs 15 kg Product Specifications Save all instructions Parts Features Questions Call Toll Free at 1 800 737 2112 4 Copyright 2009 MAT Engine Technologies LLC 6 5 4...

Page 6: ...should be set in the lowest position WARNING Do NOT place the cultivator on a high surface where it can fall and cause property damage or personal injury 2 Assemble the middle handle to the lower han...

Page 7: ...of the label For a 10 tilling width 1 Assemble the tines as shown in Figure 4b Make sure the collars of the tines are facing each other 2 Insert the pins into the holes at each end of the tine shaft...

Page 8: ...l damage the cultivator engine and void your warranty CAUTION Use of incorrect oil such as automotive oil 2 cycle marine outboard oil or any oil other than specified oil will damage the cultivator eng...

Page 9: ...n allow the spring loaded sleeve to slide into the assembly to lock the wheels in position Adjusting the Wheel Height G Starting Engine Continued C Adjusting Engine Speed D If the unit still doesn t s...

Page 10: ...lace spark plug every year to maintain engine performance and easy starting To inspect or replace the spark plug 1 Remove the insulated spark plug boot 2 Use the spark plug wrench to remove the spark...

Page 11: ...filter 3 Contact a qualified service center 4 Rotate choke lever to the RUN WARM START position Engine runs hot 1 Fuel mixture incorrect 2 Spark Plug incorrect 3 Carburetor requires adjustment 4 Carb...

Page 12: ...ty is hereby limited to the purchase price of the product and MAT Engine Technologies LLC shall not be liable for any other damages whatsoever including indirect incidental or consequential damages So...

Page 13: ...aired or replaced by METL Owner s Warranty Responsibilities As the SORE owner you are responsible for the performance of the required maintenance listed in your owner s manual METL recommends that you...

Page 14: ...ding to Subsection 4 below Any such part repaired or replaced under warranty will be warranted for the remainder of the period prior to the first scheduled replacement point for the part 4 Repair or r...

Page 15: ...ill eligible for warranty coverage The following emissions warranty parts list is covered 1 Fuel Metering System a Gasoline carburetor assembly and its internal components if so equipped b Fuel filter...

Page 16: ...t is defective the part will be repaired or replaced by METL Owner s Warranty Responsibilities As the SORE owner you are responsible for performance of the required maintenance listed in your owner s...

Page 17: ...ls prior to the first scheduled replacement the part must be repaired or replaced by METL Any such part repaired or replaced under warranty must be warranted for a time not less than the remainder of...

Reviews: