Questions? Call Toll Free at 1-800-737-2112
Copyright © 2011 MAT Engine Technologies, LLC
Assembly
(Continued)
• Save all instructions
IMPORTANT:
DO NOT ADD ENGINE OIL BEFORE
COMPLETING THE ASSEMBLY STEPS BELOW.
DURING ASSEMBLY THE ENGINE MAY BE TIPPED
FOR EXTENDED TIMES. OIL CAN DRAIN INTO THE
UPPER PART OF THE ENGINE CAUSING DIFFICULTY
IN STARTING ENGINE.
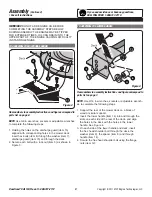
TO ASSEMBLE THE DISCHARGE GUARD
Item numbers in assembly instructions and figure correspond to
parts list on page 8.
NOTE:
Use 3/8 in wrenches, sockets or adjustable wrenches
to complete the following steps.
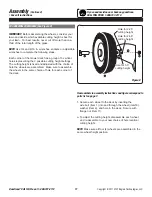
1. Holding the holes on the discharge guard (item 15)
aligned with corresponding holes in the mower deck,
insert hex bolts (item 4) through the washer (item 7),
discharge guard (item 15) and through the deck.
2. Secure each bolt with a lock nut (item 5) as shown in
Figure 3.
TO ASSEMBLE THE LOWER HANDLE
Item numbers in assembly instructions and figure correspond to
parts list on page 7.
NOTE:
Use 9/16 in wrenches, sockets or adjustable wrench-
es to complete the following steps.
1. Support the rear of the mower deck on a block of
wood or similar support.
2. Insert the lower handle (item 14) into and through the
slots on each side of the rear of the deck, and align
the holes in the deck with the holes in the lower
handle. See Figure 4.
3. On each side of the lower handle and deck, insert
the hex head shoulder bolt through the deck, the
washer (item 9), the spacer (item 6) and through
handle (item 14).
4. Secure the hex head shoulder bolt using the flange
nuts (item 12).
If you need assistance or have any questions,
CALL TOLL FREE: 1-800-737-2112.
9
Figure 3
Figure 4


