Southworth Products
PUN Manual
22
standard lock-out/tag-out procedures.
4. Disconnect the hydraulic supply line to the bottom end of the cylinder. Place the
free end into a container to collect the used oil.
5. Repeat the same procedure for the hydraulic supply line to the top end of the
cylinder.
6. At the top end of the rod remove the “keeper” from the upper cylinder clevis and
drive out the upper clevis pin. Repeat the same procedure to remove the lower
cylinder clevis pin.
7.
Push the rod back into the cylinder to drive the hydraulic fluid out through the
hose and into the container. You may use air pressure at the hydraulic port to do
this.
8. Now the cylinder can be removed for repacking
or replacement.
8.7 Repacking a Cylinder
Repacking the cylinders requires special training
and tools. If you are not familiar with repacking
procedures, this work should be left to a qualified
hydraulic repair shop.
During reassembly, it is very important to keep all
of the parts free of dirt, dust, metal chips, water,
and other contamination. Most of the problems with
hydraulic systems are caused by contamination in
the oil.
1. Begin by removing the cylinder as described in the
last section.
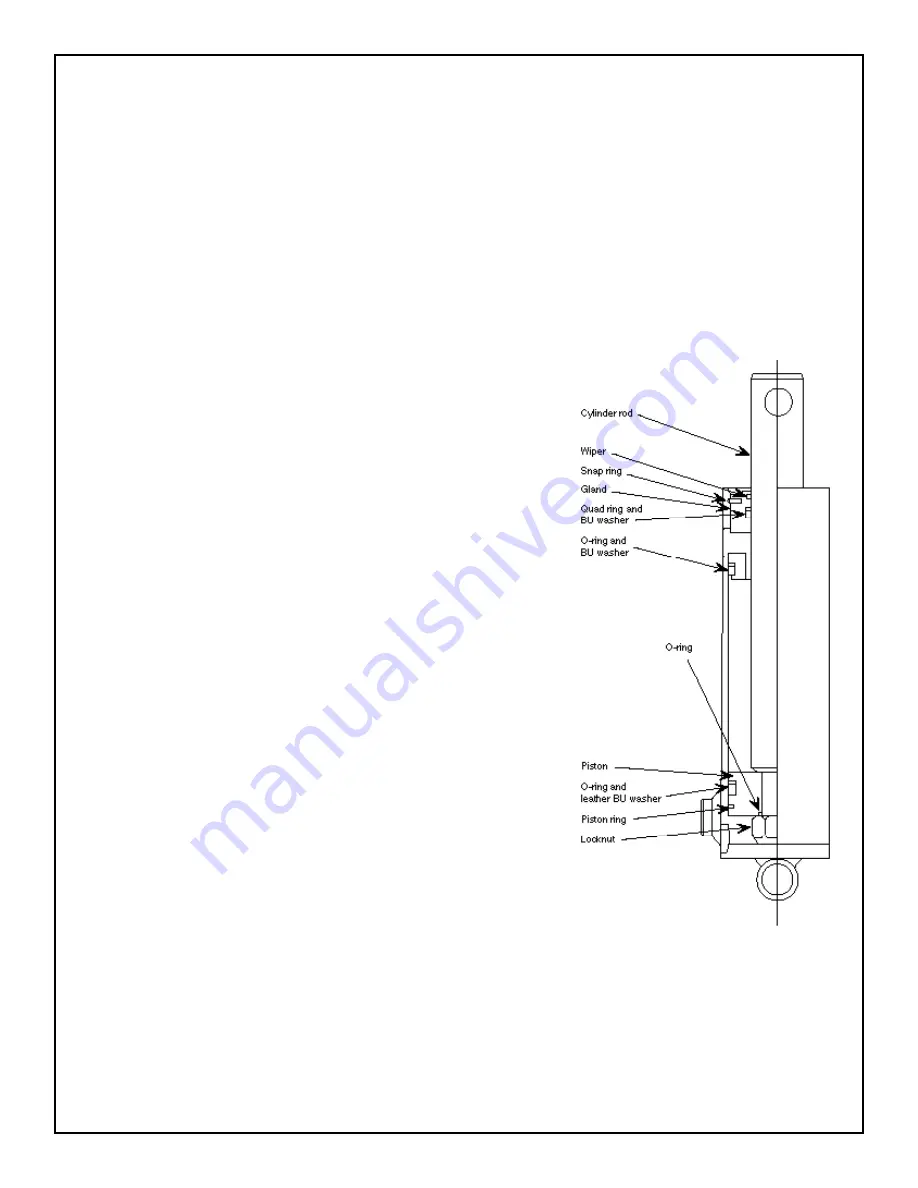
2. The image shows the parts inside a cylinder. Secure
the cylinder in a vise so that it cannot turn. Clear the
work area so that you can lay the parts on a clean
surface.
3. At the upper end of the cylinder, remove the snap
ring. Pull the rod to within 3 inches of full extension.
Compress the ring and, at the same time, pull
outward on the rod. This will pull the gland out of the
cylinder.
4.
Pull the rod and piston all of the way out of the cylinder. This assembly is heavy! Be
careful not to drop it as it comes free.
5. Remove the piston from the cylinder rod. (Be careful to protect the cylinder rod as you
do this. Any burrs on the rod could damage the packing.) Note the position of the piston
ring and remove it. Remove the leather BU washer and larger O-ring from the piston.


