background image

AR-323-D

V200623

ACCESS & INDUSTRIAL CONTROL

- 4 -

Smart Digital Door Lock

RF Card


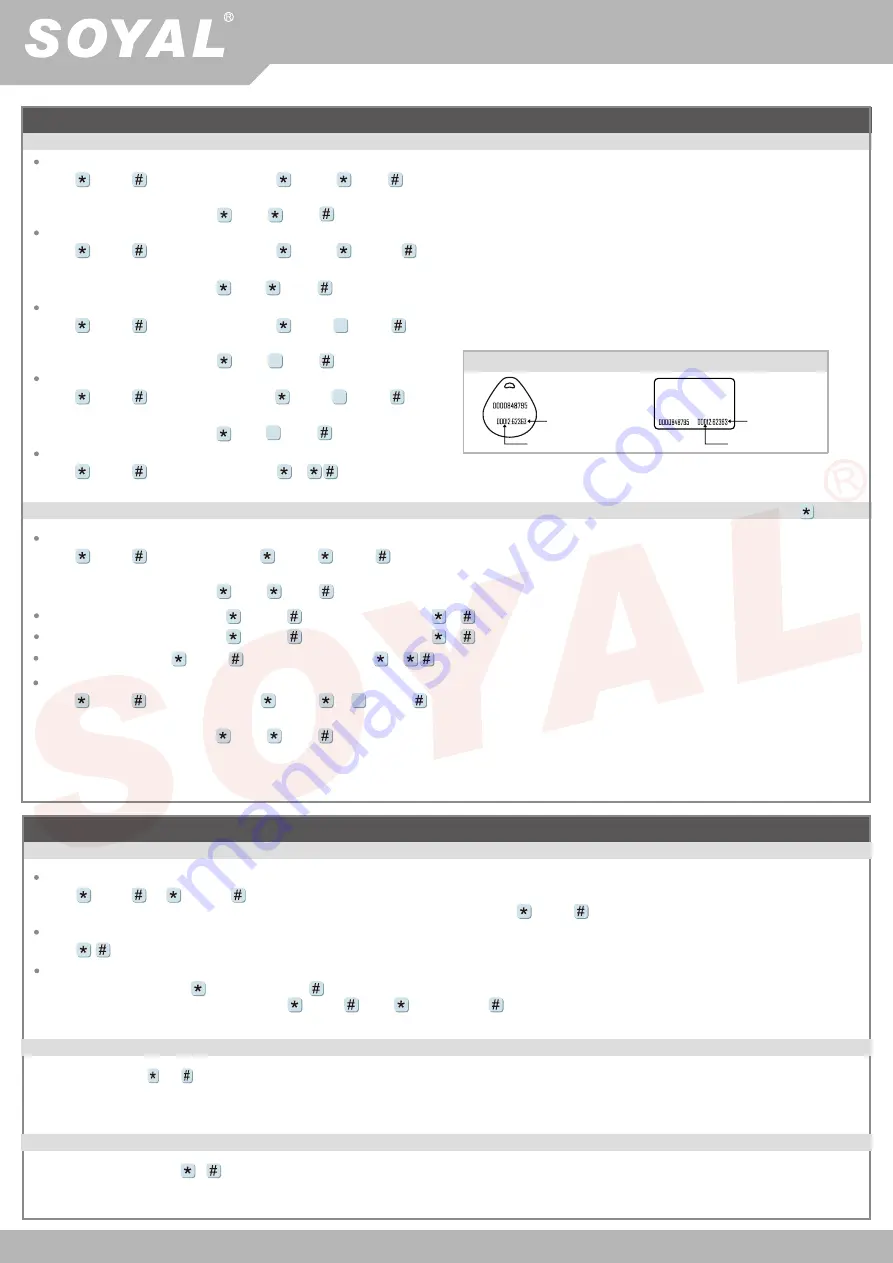
Adding and Deleting Tag

M4/M8

Delete All Tags

Input      123456      (or Master Code)

 → 

29     29

Delete Single Tag

Input      123456      (or Master Code)

 → 

10     SSSSS     EEEEE

[e.g.] Delete User Address: 00058


Enter program mode

 → 

10     00058     00058

9

9

Delete a batch of Tags

Input      123456      (or Master Code)

 → 

10     SSSSS     EEEEE

[e.g.] Delete User Address: 00101~00245


Enter program mode

 → 

10     00101     00245

9

9

Add a Single Tag or Random tags

Input      123456      (or Master Code)

 → 

19     UUUUU     00001

     → 

Present the tag(s) to Access Controller 

(single tag or random tags one by one)

→ 

Done

[e.g.] Add 2 random cards to User Addresses No. 100 and No. 101:


Enter program mode

 → 

19     00100     00001

     → 

Present the tags one by one

 → 

Done

Input      123456      (or Master Code)

 → 

19     UUUUU     QQQQQ

     → 

Present the tag 

(only use the tag with the 

lowest number

)

 → 

OK

Add a batch of Sequential tags

[e.g.] Add 20 pcs sequential tags (62312~62331) to User Address NO.101 ~ NO.120:


Enter program mode

 → 

19     00101     00120

     → 

Close Tag into RF Area 

(only use the tag 

NO.62312

)

 → 

OK

M6

In this mode, User Address = Card Code

In this mode, Card and PIN, If you want to modify refer to password setting 17

Add Tags

Input      123456      (or Master Code)

 → 

11     SSSSS     EEEEE

     → 

OK 

[e.g.] Add User Address: 00100~01254


Enter program mode

 → 

11     00100     01254

     → 

OK 

Add tag by presenting:
Delete tag by presenting:

Input      123456      (or Master Code)

 → 

22       1        

→ 

Present the tag to Access Controller 

→ 

OK  

Input      123456      (or Master Code)

 → 

22       0        

→ 

Present the tag to Access Controller 

→ 

OK  

Delete All Tags:

Input      123456      (or Master Code)

 → 

29     29

Delete Tags

Input      123456      (or Master Code)

 → 

10     SSSSS     (or     )EEEEE

     → 

OK

[e.g.] Delete a tag with card code 62362


Enter program mode

 → 

10     62362     62362

     → 

OK 

9

Tag Information


(125kHz) 

※ 

For Mifare tags, the separator between Site Code & Card Code is comma "

,

".

SITE CODE

CARD CODE

SITE CODE

CARD CODE


Operation process

A. Enter / Exit Program Mode

Master Code modification

Enter program mode

 → 

09     PPPPPPRRRRRR         [Input the 6-digit new master code twice.]

[e.g.] Set the Master code to be 876112, input  


123456

     → 

09     876112876112

Enter the program mode

Input      123456      or      PPPPPP
[e.g.] The Default Value= 123456, if the Master Code is already changed= 876112, input  


876112

     → 

program mode entered

Exit the program mode

Input

Enter program mode

 → 

00     NNN      

 [Node ID: 001~254; if the access controller is connected to AR-716E, its Node ID will be 001~016.]

B. Change the Node ID of Controller

Enter program mode

 → 

04     N       [N=4/6/8]

C.Set up M4/M6/M8

Summary of Contents for AR-323D

Page 1: ...ower DC0V Power DC12V Wire Application Door Handle Direction RH Right Push LH Left Push RHR Right Pull Before installation please check which door hand you require LHR Left Pull Door Handle Mortise Lock Sticker Strike Sticker 1 Mortise 2 Mortise Plate mounted 3 Spindle of Knob 4 Spindle of Handle x2 11 Screw x2 5 Cylinder Lock 6 Mechanical Key x2 7 Waterproof Strap x2 8 Handle Screw x2 9 Elastic S...

Page 2: ... make cuts depending on hole stickers dimension Remove 2 Mortise Plate from 1 Mortise lock body Note 1 Only make deadbolt knob hole from inner door to mortise don t cross to outer door 2 Make sure accurate position right hole direction of striker plate before making cuts latch bolt position can be made firstly 3 Networking mode Additional hinge cuts is required for PC connection Separate 2 Mortise...

Page 3: ...dy and wired on site 4 5 6 Important 1 The depth of the 5 Cylinder Lock installation has already fixed The screw position must meet with the hollow part of the 5 Cylinder Lock 2 We suggest making sure that the upper bolt and the lower bolt functions correctly before fixing the screw Testing can be made using the mechanical key by rotating it to left and right and it will move bolt position means i...

Page 4: ...tion and the flat surface is facing out Provided 7 Waterproof Strap is recommended to apply for waterproof function and to preserve the lock durability from door opening and closing Front panel Connect 1 Mortise to Front Panel 10 STEP 1 Connect the Front Panel CN3 Connector of Mortise to 1 Mortise STEP 2 Bring CN2 Connector of Reader into Cable Hole to be connected to Back Panel later STEP 3 Plug ...

Page 5: ...l cover STEP 1 STEP 2 Back panel CN1 X CN2 Y 1 Connect 1 Mortise to Back Panel 13 STEP 1 Connect the CN1 Power and Communication Cable to DC power and RS485 communication refer to the Wiring Section STEP 2 Continuation from Step 10 2 connect the cable from Cable Hole to CN2 Connector of Reader of the Back Panel STEP 3 Fasten 3 Spindle of Knob from Deadbolt Knob Hole of 1 Mortise into Deadbolt Knob...

Page 6: ... Front Panel Back Panel and Front Panel position is in correct position 1 Peel off Strike Sticker and paste into the desired spot for installation 2 Start making the hole drilling based on the hole dimension on the sticker 3 Remove the sticker after hole drilling is finished STEP 1 Embed the Strike Box into the hole STEP 2 Embed the Strike Plate on Strike Box and fasten with Screws STEP 3 Installa...

Page 7: ...ant to modify refer to password setting 17 Add Tags Input 123456 or Master Code 11 SSSSS EEEEE OK e g Add User Address 00100 01254 Enter program mode 11 00100 01254 OK Add tag by presenting Delete tag by presenting Input 123456 or Master Code 22 1 Present the tag to Access Controller OK Input 123456 or Master Code 22 0 Present the tag to Access Controller OK Delete All Tags Input 123456 or Master ...

Page 8: ...y and Friday 08 1 09301620 01010100 Done M4 M8 Private PIN Card or PIN Enter program mode 12 UUUUU PPPP e g User Address 00001 and pass code 1234 input 12 00001 1234 Card and PIN Enter program mode 13 UUUUU PPPP e g User Address 00001 and pass code 1234 input 13 00001 1234 M6 Public PIN Card or PIN Enter program mode 15 PPPP Input 4 digit PIN default value 4321 PPPP 0000 cancel the function of sim...

Page 9: ...suddenly off then on Function Default Value M4 M6 M8 24 DDD Function Selection Value Application Default Value Auto Open without Presenting in Auto open Time Zone Alarm Output Lift Control Stop Alarm by pressing RTE Button or Closing the Door Doorbell 0 Disable 0 Alarm Output 0 None 0 Disable Networking Standalone Networking Standalone Networking Standalone Networking Standalone 001 002 064 128 1 ...

Page 10: ...e buffer time before entering arming mode 001 600 1 600 sec TTT the buffer time before the alarm is activated 001 600 1 600 sec SSSSS EEEEE 00000 01023 00000 03000 for AR 725H SSSSS Starting User Address EEEEE Ending User Address N 0 1st time zone 1 2nd time zone HHMM Starting time hhmm ending time i e 08301600 08 30 to 16 00 7123456H 7 days of week Sun Mon Tue Wed Thu Fri Sat Holiday H 0 disable ...

Page 11: ...Networking Standalone Networking Standalone Networking Standalone Networking Standalone Networking Standalone Networking Standalone 001 002 003 004 016 032 064 128 1 Activate 1 Activate 1 Activate 1 Activate 1 Activate 1 Activate 1 Activate 1 Activate 2 1 323DMaster Test MASTER CARD Setting Use the MASTER CARD software Input the MASTER CARD number and press Write Cut off and tranmit the power Acti...

Reviews: