background image

Introduction

SY-5EMM

19

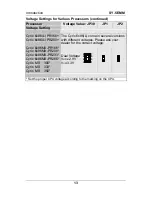
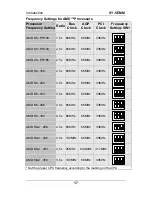
Frequency Settings for Cyrix ™ Processors (Continued)
Processor
Frequency Setting

Ratio

Bus

Clock

AGP

Clock

PCI

Clock

Frequency

Setting: SW1

Cyrix M II - 350**

3.0 x

100MHz 66MHz 33MHz

** Set the proper CPU frequency according to the marking on the CPU.
  Over specification is not guaranteed.

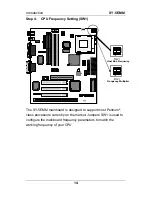
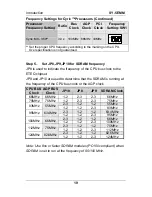
Step 5.  Set JP8,JP9,JP10 for SDRAM frequency

JP8 is used to indicate the frequency of the CPU bus clock to the

ETEQ chipset.

JP9 and JP10 are used to determine that the SDRAM is running at

the frequency of the CPU bus clock or the AGP clock.

CPU BUS

Clock

AGP BUS

Clock

JP10

JP8

JP9

SDRAM Clock

66MHz

66MHz

1-2

2-3

2-3

66MHz

75MHz

75MHz

1-2

2-3

2-3

75MHz

2-3

1-2

1-2

55MHz

83MHz

55MHz

1-2

1-2

2-3

83MHz

2-3

1-2

1-2

63.4MHz

95MHz

63.4MHz

1-2

1-2

2-3

95MHz

2-3

1-2

1-2

66MHz

100MHz

66MHz

1-2

1-2

2-3

100MHz

2-3

1-2

1-2

75MHz

112MHz

75MHz

1-2

1-2

2-3

112MHz

2-3

1-2

1-2

82.6MHz

124MHz

82.6MHz

1-2

1-2

2-3

124MHz

Note: Use 8ns or faster SDRAM modules (PC100 compliant) when

SDRAM is set to run at the frequency of 95/100 MHz.

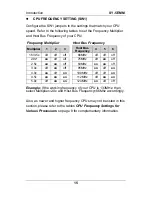
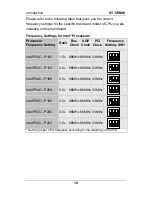
1 2 3 4 5 6

ON

Summary of Contents for Super 7 SY-5EMM

Page 1: ...SY 5EMM Super 7 TM Mainboard Pentium Class CPU supported ETEQ82C663 PCI AGP Mainboard Micro ATX Form Factor User s Guide Technical Reference...

Page 2: ...he product described within it at any time without notice and without obligation to notify any person of such revision or change The information contained in this manual is provided for general use by...

Page 3: ...DARD CMOS SETUP 38 3 2 BIOS FEATURES SETUP 41 3 3 CHIPSET FEATURES SETUP 47 3 4 POWER MANAGEMENT SETUP 51 3 5 PNP PCI CONFIGURATION SETUP 56 3 6 LOAD SETUP DEFAULTS 59 3 7 LOAD BIOS DEFAULTS 59 3 8 IN...

Page 4: ...unction DMI utility Back Panel SY 5EMM Platform JP44 1 3 AGP Slot ISA Slot 1 ATX Power 3V Lithium Battery ETEQ EQ82C6629B P B SRAM 64Kx64 TAG 32Kx8 JP19JP20 JP5 1 3 IDE 2 1 FDC 1 IDE 1 1 JP10 1 3 JP8...

Page 5: ...X CPUs with PR150 PR266 speeds and Cyrix M II 300 350 CPU Supports AMD K5 CPUs running at PR100 PR166 speeds AMD K6 CPUs running at speeds of 166 300 MHz speeds and AMD K6 2 266 350 CPU Features Socke...

Page 6: ...168 pin Unbuffered SDRAM DIMM Module Supports 8 256MB DIMM in each Bank Supports ECC configuration SIMM Bank SIMM1 SIMM2 Supports 8 64MB 2strips of 72 pin SIMM BIOS System BIOS built in Award BIOS AP...

Page 7: ...led Onboard Sound Function Jumpers JP44 WOL Wake On LAN 3 pin Connector SW1 CPU frequency Settings Jumper BACK PANEL FEATURES PRT 1 x Onboard 26 pin Female Parallel Printer Port COM1 COM2 2 x Onboard...

Page 8: ...d contact your dealer immediately 1 3 ELECTROSTATIC DISCHARGE PRECAUTIONS Make sure to ground yourself before handling the mainboard or other system components Electrostatic discharge can easily damag...

Page 9: ...M memory module 3 Computer case and chassis with adequate power supply unit 4 Monitor 5 Keyboard 6 Pointing Device PS 2 mouse 7 Speaker s optional 8 Disk Drives HDD CD ROM Floppy drive 9 External Peri...

Page 10: ...D ROM are not included in the package Warning Do not unpack the mainboard from its anti static packaging until you are ready to install it Like most electronic equipment your mainboard may be damaged...

Page 11: ...to lead you to a complete and correct installation Step 1 CPU Installation Follow these instructions to install your Pentium class processor correctly Locate the CPU socket labeled Socket 7 on your ma...

Page 12: ...etely and without forcing 4 Then close the socket handle to secure the CPU in place Step 2 CPU Fan Installation Your Pentium processor kit comes with a cooling fan Mount the fan on the processor accor...

Page 13: ...r the voltage of your CPU maybe different with the default setting l CPU VOLTAGE SETTING JP30 JP1 and JP2 JP30 is used to set the CPU core voltage JP1 and JP2 are used to select the CPU voltage type s...

Page 14: ...Value 1 2 3 4 5 6 7 8 3 5V close close close close 3 4V open close close close 3 3V close open close close 3 2V open open close close 3 1V close close open close 3 0V open close open close 2 9V close...

Page 15: ...P166 Intel P55C P200 Intel P55C P233 Dual Voltage VORE 2 8V VI O 3 3V AMD K5 PR100 AMD K5 PR133 AMD K5 PR166 Single Voltage VORE 3 5V VI O 3 5V AMD K6 166 AMD K6 200 Dual Voltage VORE 2 9V VI O 3 3V A...

Page 16: ...6 L PR200 The Cyrix 6x86 L come in several versions with different voltages Please ask your dealer for the correct voltage Cyrix 6x86MX PR166 Cyrix 6x86MX PR200 Cyrix 6x86MX PR233 Cyrix 6x86MX PR266 C...

Page 17: ...inboard is designed to support most Pentium class processors currently on the market Jumpers SW1 is used to configure the mainboard frequency parameters to match the working frequency of your CPU Flas...

Page 18: ...6MHz off off off 2 0x on off off 75MHz off on off 2 5x on on off 83MHz on on off 3 0x off on off 95MHz on off on 4 0x on off on 100MHz off off on 4 5x on on on 112MHz off on on 5 0x off on on 124MHz o...

Page 19: ...I Clock Frequency Setting SW1 Intel P54C P100 1 5 x 66MHz 66MHz 33MHz Intel P54C P133 2 0 x 66MHz 66MHz 33MHz Intel P54C P166 2 5 x 66MHz 66MHz 33MHz Intel P54C P200 3 0 x 66MHz 66MHz 33MHz Intel P55C...

Page 20: ...66MHz 33MHz AMD K6 233 3 5 x 66MHz 66MHz 33MHz AMD K6 266 4 0 x 66MHz 66MHz 33MHz AMD K6 300 4 5 x 66MHz 66MHz 33MHz AMD K6 2 266 4 0 x 66MHz 66MHz 33MHz AMD K6 2 300 3 0 x 100MHz 66MHz 33MHz AMD K6...

Page 21: ...MHz 75MHz 37 5MHz Cyrix MX PR233 2 5 x 75MHz 75MHz 37 5MHz Cyrix MX PR266 2 5 x 83MHz 55MHz 27 5MHz Cyrix M II 300 3 5 x 66MHz 66MHz 33MHz Cyrix M II 300 3 0 x 75MHz 75MHz 37 5MHz Cyrix M II 333 4 0 x...

Page 22: ...chipset JP9 and JP10 are used to determine that the SDRAM is running at the frequency of the CPU bus clock or the AGP clock CPU BUS Clock AGP BUS Clock JP10 JP8 JP9 SDRAM Clock 66MHz 66MHz 1 2 2 3 2...

Page 23: ...0ns access time This mainboard supports both EDO and SDRAM types of memory modules Note 1 Do not install EDO type of DIMM modules if you already use SDRAM in any DIMM bank l MEMORY CONFIGURATION This...

Page 24: ...M This mainboard offers two primary and secondary IDE device connectors IDE1 IDE2 It can support up to four high speed HDD or CD ROM Connect one side of the 40 pin flat cable to the IDE device HDD or...

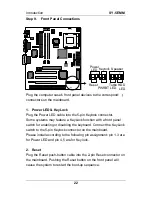
Page 25: ...switch for enabling or disabling the keyboard Connect the KeyLock switch to the 5 pin Keylock connector on the mainboard Please install according to the following pin assignment pin 1 3 are for Power...

Page 26: ...stem is in Turbo mode The manufacturer has permanently set this mainboard in Turbo mode due to most hardware and software compliance to turbo mode 5 IDE LED Attach the 2 pin IDE device LED cable to th...

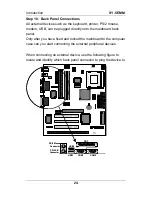
Page 27: ...r you have fixed and locked the mainboard to the computer case can you start connecting the external peripheral devices When connecting an external device use the following figure to locate and identi...

Page 28: ...lel device cable into the 26 pin female connector located at the rear panel of the mainboard 3 PS 2 Keyboard Plug the keyboard jack directly into the 6 pin female PS 2 keyboard connector located at th...

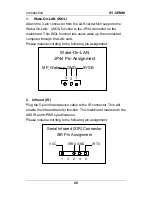
Page 29: ...he LAN card Please install according to the following pin assignment 2 Infrared IR Plug the 5 pin infrared device cable to the IR connector This will enable the infrared transfer function This mainboa...

Page 30: ...install according to the following pin assignment Step 12 Chassis Cooling Fan Installation After you have seated the Chassis cooling fan properly on the processor attach the 3 pin fan cable to the CH...

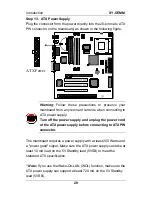
Page 31: ...wer supply Turn off the power supply and unplug the power cord of the ATX power supply before connecting to ATX PW connector The mainboard requires a power supply with at least 200 Watts and a power g...

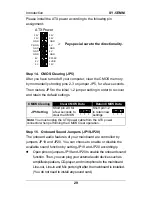
Page 32: ...g Short pin 2 3 for a few seconds to clear the CMOS Short pin 1 2 to retain new settings Note You must unplug the ATX power cable from the ATX power connector when performing the CMOS Clear operation...

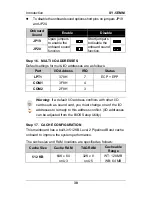
Page 33: ...PT1 378H 7 ECP EPP COM1 3F8H 4 COM2 2F8H 3 Warning If a default I O address conflicts with other I O cards such as sound card you must change one of the I O addresses to remedy to this address conflic...

Page 34: ...ALS120 sound chipset technology and applications programs Note Please refer to Chapter 5 ALS120 Audio Driver Installation for a detailed procedure on how to install the audio driver depending on the...

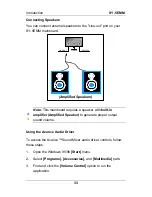
Page 35: ...und Blaster Pro l Sound Blaster 16 Emulation l Windows Sound System Connecting your Audio Devices You can connect audio devices to the following ports headphones or pre amplified speakers to the line...

Page 36: ...t in amplifier Amplified Speaker to generate proper output sound volume Using the Avance Audio Driver To access the Avance Sound Mixer audio driver controls follow these steps 1 Open the Windows 95 98...

Page 37: ...rnal volume and balance of each individual audio device Also this audio mixer lets you apply ave sound effects Important The Playback volume controls the master output sound volume of your system Depe...

Page 38: ...ring diagnostic checks Repeat this operation until you get the following screen 3 The BIOS Setup screen appears You are now ready to configure your system with the BIOS setup program Go to Chapter 3 B...

Page 39: ...he Main Menu press arrow keys to enter the selected submenu Modifying selected items l Use the Up Down keys to modify values within the selected fields Some fields let you enter values directly ROM PC...

Page 40: ...M O S S E T U P U T I L I T Y A W A R D S O F T W A R E I N C S T A N D A R D C M O S S E T U P B I O S F E A T U R E S S E T U P C H I P S E T F E A T U R E S S E T U P P O W E R M A N A G E M E N T...

Page 41: ...t time 24 hour clock format 3 15 PM is displayed as 15 15 00 ROM PCI ISA BIOS STANDARD CMOS SETUP AWARD SOFTWARE INC Date mm dd yy Time hh mm ss Fri May 29 1998 9 42 43 HARD DISKS TYPE SIZE CYLS HEAD...

Page 42: ...Normal Normal IDE hard disk 528MB LBA Enhanced IDE hard disk 528MB Mode Large Large IDE hard disk for certain hard disk Note If you have any questions on your hard disk type or mode ask your hard disk...

Page 43: ...EGA VGA Default CGA 40 CGA 80 Mono Monochrome 3 1 5 Halt On When the BIOS detects system errors this function will stop the system Select which type of error will cause the system halt All Errors Defa...

Page 44: ...Virus Warning CPU Internal Cache External Cache Quick Power On Self Test Boot Sequence Swap Floppy Drive Boot Up NumLock Status Gate A20 Option Memory Parity ECC Check Typematic Rate Setting Typemati...

Page 45: ...ect the boot sectors and partition tables of your hard disk Any attempt to write to them will the system to halt and display a warning message 3 2 2 Cache Memory Options Setting Description Note Disab...

Page 46: ...I F A SCSI SCSI A C SCSI C A C only Boot Sequence LS ZIP C Choose the boot sequence adapted to your needs for example l A C SCSI means the BIOS will look for an operating system first in drive A then...

Page 47: ...d 3 2 4 Typematic Settings Typematic Settings Setting Description Note Disabled Default Typematic Rate Setting Enabled Enables to adjust the keystroke repeat rate The following Typematic Rate and Type...

Page 48: ...board IDE IDE Second Channel Control Enabled Use a PS 2 mouse Default Disabled Default Enabled PCI VGA Palette Snoop The color of the monitor may be altered when using an MPEG card Enable this option...

Page 49: ...Description Note Disabled Enabled Video or Adapter BIOS Shadow The BIOS is shadowed in a 16K segment if it is enabled and if it has BIOS present These 16 segments can be shadowed from ROM to RAM BIOS...

Page 50: ...hift F2 Select Item Modify Color DIMM1 DRAM Timing DIMM2 DRAM Timing SIMM 1 2 DRMA Timing DRAM Read Pipeline Cache Rd CPU Wt Pipeline Linear Burst Video BIOS Cacheable System BIOS Cacheable Memory Hol...

Page 51: ...Cache Rd CPU Wt Pipeline Enabled Enhances system performance Default Fast Enhances system performance Default Cache Timing Fastest Disabled Use the default setting Default Linear Burst Enabled Linear...

Page 52: ...fault Disabled Default USB Keyboard Support Enabled Enabled if you use an USB Keyboard Disabled Use the default setting Default Spread Spectrum Modulated Enabled When using Spread Spectrum Modulated 1...

Page 53: ...te Current CPU Temperature C F Show the current status of CPU temperature Current CPUFAN Temperature C F Show the current status of CPU Fan Current CHAFAN Temperature C F Show the current status of th...

Page 54: ...ondary Secondary Secondary Primary Primary Primary Disabled ESC F1 F5 Quit Help Old Values PU PD Shift F2 Select Item Modify Color ACPI function Power Management PM Control by APM Video Off Option Vid...

Page 55: ...d Power Management APM you must run power exe under DOS V6 0 or later version Default PM Control by APM No Suspend Off The monitor will be switched off in suspend mode Default All Modes Off Video Off...

Page 56: ...wing Doze Mode field may be configured only if Power Management is set to User Define Disable Default Doze Mode 10sec 1Hour When the set time has elapsed BIOS sends a command to the system to enter Do...

Page 57: ...ve SIM signal until the master is finished while the master is working DMA master OFF Default Disabled Only work when the computer is powered on The system will resume active when modem is ringing Def...

Page 58: ...PM Events Setting Description Note Primary IRQ3 COM2 IRQ4 COM1 IRQ5 LPT2 IRQ6 Floppy Disk IRQ7 LPT1 IRQ12 PS 2 mouse IRQ13 Coprocessor IRQ14 HardDsik IRQ Secondary IRQ9 IRQ2 Redir IRQ10 Reserved IRQ1...

Page 59: ...7 assigned to IRQ 9 assigned to IRQ 10 assigned to IRQ 11 assigned to IRQ 12 assigned to IRQ 14 assigned to IRQ 15 assigned to DMA 0 assigned to DMA 1 assigned to DMA 3 assigned to DMA 5 assigned to...

Page 60: ...assign IRQ and DMA to PCI or ISA PnP manually IRQ 3 4 5 7 9 10 11 12 14 15 assigned to _ DMA 0 1 3 5 6 7 assigned to _ Resources Controlled By Auto The Plug and Play BIOS auto manages PCI ISA PnP car...

Page 61: ...d IRQ 3 4 5 7 9 10 11 12 14 15 DMA 0 1 3 5 6 7 Disabled CPU to PCI write Buffer Enabled Enable buffering of CPU writes to the PCI bus the CPU will not have to wait Default Disabled Default PCI Master...

Page 62: ...N T S E T U P P N P P C I C O N F I G U R A T I O N L O A D S E T U P D E F A U L T S L O A D B I O S D E F A U L T S I N T E G R A T E D P E R I P H E R A L S S U P E R V I S O R P A S S W O R D U S...

Page 63: ...odify Color OnChip IDE First Channel OnChip IDE Second Channel IDE Prefetch Mode IDE HDD Block Mode IDE Primary Master PIO IDE Primary Slave PIO IDE Secondary Master PIO IDE Secondary Slave PIO IDE Pr...

Page 64: ...wing fields may be configured only if Internal PCI IDE is set to Both Primary or Secondary Mode 0 4 0 is the slowest speed 4 is the fastest speed IDE Primary Master PIO Primary Slave PIO Secondary Mas...

Page 65: ...orts Onboard Serial Ports Setting Description Note Disabled 3F8 IRQ4 Default port 1 2F8 IRQ3 Default port 2 3E8 IRQ4 2E8 IRQ3 Onboard UART 1 Onboard UART 2 Auto Choose serial port 1 2 s I O address Do...

Page 66: ...Setting Description Note 378 Default Disabled 3BC Onboard Parallel Port 278 Choose the printer I O address ECP EPP Normal Default EPP Parallel Port Mode ECP The mode depends on your external device t...

Page 67: ...word is required every time the system is booted This means only a person who knows the password can use this computer b Setup The password is required only when you attempt to enter the BIOS Setup pr...

Page 68: ...on 3 9 ROM PCI ISA BIOS CMOS SETUP UTILITY AWARD SOFTWARE INC STANDARD CMOS SETUP BIOS FEATURES SETUP CHIPSET FEATURES SETUP POWER MANAGEMENT SETUP PNP PCI CONFIGURATION LOAD SETUP DEFAULTS LOAD BIOS...

Page 69: ...cordingly Note This function is only valid for IDE type of hard disk drives ROM PCI ISA BIOS CMOS SETUP UTILITY AWARD SOFTWARE INC HARD DISKS TYPE SIZE CYLS HEAD PRECOMP LANDZ SECTOR MODE Primary Mast...

Page 70: ...s software available for installation and a database in HTML format with information on SOYO Mainboards and other products Step 1 Insert the SOYO CD into the CD ROM drive The SOYO CD will auto run and...

Page 71: ...to install the ETEQ drivers Follow the instruction below Click the Install Drivers button to display the list of drivers that can be installed on your mainboard The start up program displays the drive...

Page 72: ...a driver starts running the SOYO CD will exit After finishing the installation restart the SOYO CD and install the next driver Note Once you have selected a driver the system will automatically exit...

Page 73: ...s how to install the ALS120 audio driver and application program Your mainboard comes with a ALS120 installation CD ROM The CD Title Disk contains the following applications programs l Windows 3 1 l D...

Page 74: ...box to install the ALS120 sound driver to the default directory or click on Browse if you want to install to a different directory 6 Setup will automatically create a folder and icons for the sound ap...

Page 75: ...em bootup drive C l To make changes to the defaults select the parameter with the Up Down Arrow keys and press the Enter key Then change the parameter and press the Enter key again to accept the chang...

Page 76: ...isk 8 Click the Browse from Copying Files 9 Select D drivers ALS_AUD directory and click OK 10 Windows95 will automatically copy all of the needed files and configure the ALS sound card After first in...

Page 77: ...Drivers Installation SY 5EMM 74 12 Click Finish Button 13 Windows98 will automatically copy all of the needed files and configure the ALS sound card...

Page 78: ...s utility program is used to set up the ALS120 sound card It is automatically started when the Avance Logic software drivers are first installed in a DOS or Windows 3 1 application It should be re run...

Page 79: ...e external MIDI is enabled the I O port and IRQ settings will be displayed and can be changed by mouse control or down arrow key The default settings are I O Port 330 and IRQ 9 Select and set any chan...

Page 80: ...s changed in the system The following are descriptions of and solutions for the more common problems that you may encounter Please review these problems before requesting technical assistance Troubles...

Reviews: