background image

SY-K7VMP 

Quick Start Guide 


16


In

sta

lla

tio

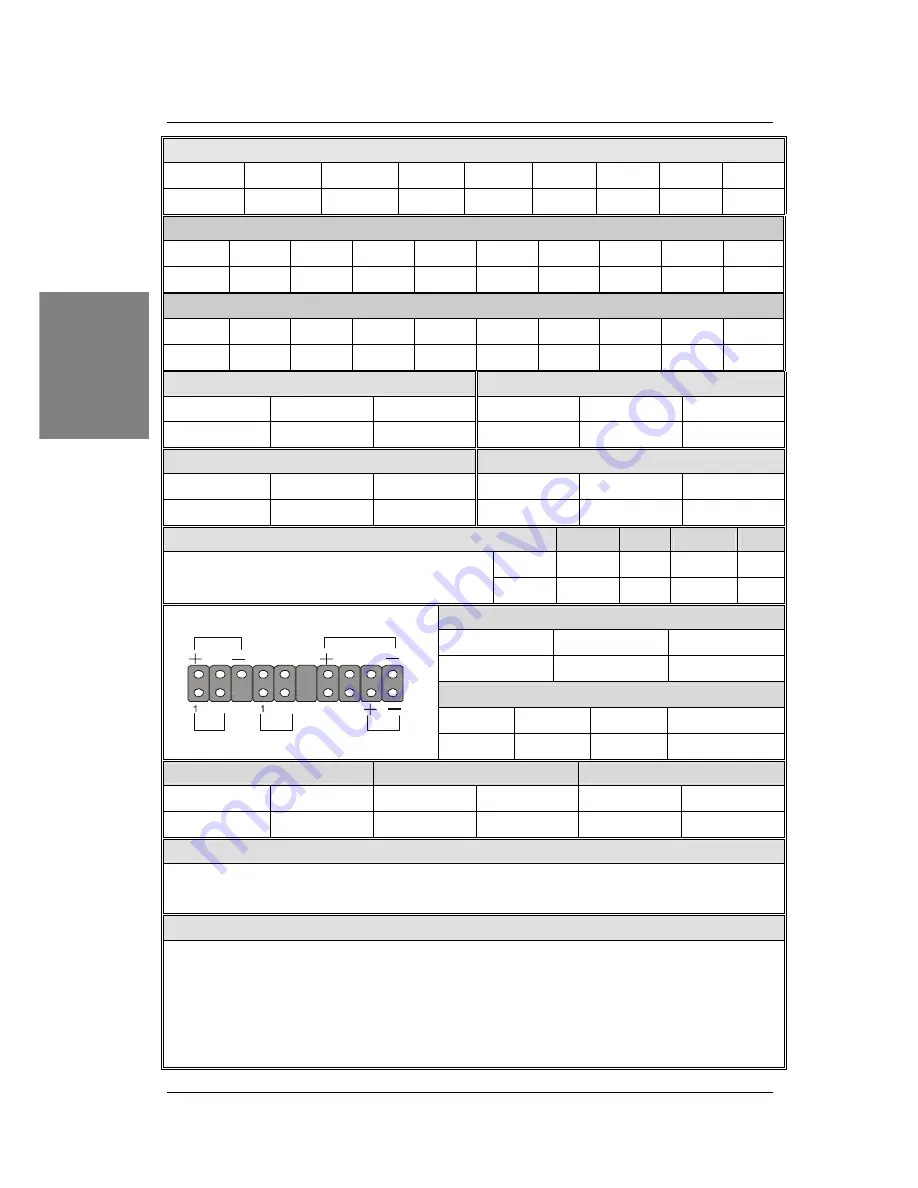
USB20_1 

Pin1 Pin2 Pin3 Pin4 

Pin6 Pin7 Pin8 Pin9 Pin10 

Power Data(-) Data(+) GND Power 

Data(-) 

Data(+) 

GND GND 

1394: FW1 

Pin1 Pin2 Pin3 Pin4 Pin5 Pin6 Pin7 Pin8 Pin9 Pin10 

A0PC GND B0PC  NC PWR0 A0MC CGND B0MC PWR0 

CGND 

1394: FW2 

Pin1 Pin2 Pin3 Pin4 Pin5 Pin6 Pin7 Pin8 Pin9 Pin10 

A1PC GND B1PC  NC PWR1 A1MC CGND B1MC PWR1 

CGND 

CPU Cooling Fan: CPUFAN1 

CPU Cooling Fan: CPUFAN2 

Pin1 Pin2 Pin3 Pin1 Pin2 Pin3 

GND 12V 

SENSOR 

GND 12V  NC 

Chassis Fan: CHAFAN1 

Chassis Fan: CHAFAN2/3 

Pin1 Pin2 Pin3 Pin1 Pin2 Pin3 

CONTROL 12V SENSOR GND  12V 

NC 

CD -IN: CDIN1 / AUXIN1


Pin1 

Pin2 

Pin3 

Pin4 

CDIN1

L G G R 

Connect the CD Line-in cord from the CR-ROM 
device to the matching connector CDIN 

AUXIN1

L G G R 

Power LED 

Pin1 Pin2 Pin3 

VCC NC GND 

Speaker 

Pin1 Pin2 Pin3 

Pin4 


VCC NC  NC Speaker 

out 

HDD LED 

PWRBT 

RESET 

Pin1 Pin2 Pin1 Pin2 Pin1 Pin2 

LED Anode 

LED Cathode  Power On/Off 

GND 

Control PIN 

GND 

ATX Power On/Off: PWRBT 

Connect your power switch to this header (momentary switch type). 

To turn off the system, press this switch and hold down for longer than 4 seconds. 

ATX Power Supply: ATX PW 

Attach the ATX Power cable to this connector. (This motherboard requires an ATX power supply, an AT 

power supply can NOT be used.) 
Note: We recommend using an AMD approved power supply or at least 350W. 

When using the Power-On by PS/2 Keyboard function, please make sure the ATX power supply is able to 

provide at least 720mA on the 5V Standby lead (5VSB) in order to meet the standard ATX specifications. 

Speaker

Reset

PWRBT

Power LED

HDD LED

Summary of Contents for SY-K7VMP

Page 1: ...SY K7VMP Motherboard Quick Start Guide Hardware Installation Quick BIOS Setup Introduction The SOYO CD USB 2 0 Driver Installation Audio Driver Installation ...

Page 2: ...er guide before proceeding with your installations Serious damage may occur if the procedure is not followed properly 3 If you have any problem getting your system to work please follow the troubleshooting tips in your user guide 4 For immediate Technical questions please visit http www soyousa com support and http www soyousa com kb ...

Page 3: ...bed in it from time to time without obligation to notify any person of such revision or amend The information contained in this manual is provided to our customers for general use Customers should be aware that the personal computer field is subject to many patents All of our customers should ensure that their use of our products does not infringe upon any patents It is the policy of SOYO Computer...

Page 4: ...s with the basic steps of motherboard setting and operation For further information please refer to the SY K7VMP motherboard User s Manual that came with your motherboard Unpacking When unpacking the motherboard check for the following items The SY K7VMPAGP PCI Motherboard The user manual The Installation CD ROM One IDE Device ATA 133 Flat Cable One Floppy Disk Drive Flat Cable One Heat Sink Compo...

Page 5: ...T COM A VGA out I O CHIP 2 1 15 GAME1 JP5 Audio out Front out Audio in Rear out MIC IN Center Bass out SIRCON PCI Slot 5 PCI Slot 1 PCI Slot 4 PCI Slot 3 PCI Slot 2 USB20_1 10 5 COM2 1 1 1 1 9 2 1 5 3 CDIN1 AUXIN1 USBLAN USB 1 USB 2 LAN Connector J30 CDSPDO 2 1 7 8 AC97 codec LAN Chip FLP IDE 1IDE 2 1 2 ABR FW1 5 10 1 6 FW2 5 10 1 6 VT6307 ...

Page 6: ...emory settings AGP 1x AGP master 4x 8x slot 1 5v only PCI 5x 32 bit bus master PCI slots Super I O ITE IT8705F Super I O controller supporting Floppy disk controller Parallel port SPP EPP and ECP compliant 2x 16550A compatible RS232 serial ports 1x rear 1x motherboard connector IrDA compatible infrared port Gameport header PS 2 Keyboard and mouse Hardware monitor for monitoring temperatures voltag...

Page 7: ...indispensable for server systems Wake On Ring and Power On by Alarm to allow your system to wake up from suspend or power on through the modem or RTC alarm Multiple boot allowing your system to boot from for example CD ROM Software SOYO Hardware Doctor allowing you to fully monitor and control your system SOYO Bonus Pack CD ROM containing free bonus software Industry standards This motherboard is ...

Page 8: ...rect method to install your new SY K7VMP motherboard For detailed information please refer to the SY K7VMP motherboard User s Manual and Technical Reference online manual on the CD ROM package that came with your motherboard Gather and prepare all necessary components to complete the installation successfully Socket A processor with CPU cooling fan boxed type DDR SDRAM module s Computer case with ...

Page 9: ...uronTM processor that you have purchased separately follow these instructions 1 Lift the socket handle up to a vertical position 2 Align the blunt edge of the CPU with the matching pinhole edge on the socket 3 Seat the processor in the socket completely and without forcing 4 Then close the socket handle to secure the CPU in place Remember to connect the CPU Cooling Fan to the appropriate power con...

Page 10: ...rocessor according to the instructions providedby themanufacturer Thefanis akey componentthatwillensuresystemstability The fan prevents overheating therefore prolonging the life of your CPU Note Remember to connect the fan to the appropriate power source CPU Fan Mount Procedure To prevent scratch or damage on the motherboard please follow the instructions on how to mount the CPU fan properly 1 App...

Page 11: ...SY K7VMP Quick Start Guide 11 Installation 2 Carefully mount the fan on top of the CPU and clip on the first lock 3 Clip on the second lock and please make sure not to damage scratch the board 2 1 ...

Page 12: ...d beep until the power button is pressed for one time FOC Fan Off Control The newly designed SOYO FOC is based on the concept of total protection for the CPU which is very different from what is currently seen on the market The H W control function is used to see a passive security system of monitoring and warning S W Simultaneous Signal Follow up techniques and Auto Power Off System are included ...

Page 13: ...tion is provided for the CPU fans without sensor pins to avoid the power off Users may press the Insert key to jump over the Power Off mode go to the BIOS and disable FOC Now system can be booted normally We provide the following User Friendly protection features 1 Fan Off Control The motherboard detects the status of the CPU fan and protects the CPU by automatically disconnecting the power supply...

Page 14: ...BR supportsAMDAthlon XP and Morgan CPU Thunderbird and Duron CPUs are not supported Some early versions of the 2400 and 2600 XP CPUs when used in this motherboard will automatically activate the ABR function thus making a beeping sound and shut down your system If this compatibility issue arises you need to disable theABR function via theABR hardware jumper Enabled Disabled ABR Jumper Step 2 Confi...

Page 15: ...rals and the power supply to the motherboard The internal peripherals consist of IDE devices HDD CD ROM Floppy Disk Drive Chassis Fan Front Panel Devices Internal Speaker Reset Button IDE LED and power switch Wake On LAN card and other devices For more details on connecting internal and external peripherals to your new SY K7VMP motherboard please refer to SY K7VMP motherboard User s Manual and Tec...

Page 16: ...device to the matching connector CDIN AUXIN1 L G G R Power LED Pin1 Pin2 Pin3 VCC NC GND Speaker Pin1 Pin2 Pin3 Pin4 VCC NC NC Speaker out HDD LED PWRBT RESET Pin1 Pin2 Pin1 Pin2 Pin1 Pin2 LEDAnode LED Cathode Power On Off GND Control PIN GND ATX Power On Off PWRBT Connect your power switch to this header momentary switch type To turn off the system press this switch and hold down for longer than ...

Page 17: ...at least 5 seconds to clear the CMOS Short pin 1 2 to retain new settings Note You must unplug the ATX power cable from the ATX power connector when performing the CMOS Clear operation On board Speaker connection When using 2 channel speaker connect the speaker cable to Line out If you re using 4 channel speaker connect the front L R speakers to Line out and rear L R speakers to Line in Make sure ...

Page 18: ...o enter the Award BIOS Setup program The CMOS SETUP UTILITY will be shown on the screen Then follow these steps to configure your system Step 1 Select STANDARD CMOS SETUP Set Date Time and Floppy drive type then set Hard Disk Type to Auto Step 2 Select LOAD OPTIMIZED DEFAULTS Select the LOAD OPTIMIZED DEFAULTS menu and type Y at the prompt to load the BIOS optimal setup Step 3 Select SAVE EXIT SET...

Page 19: ...F format b The drivers software available for installation and c A database in HTML format with information on SOYO motherboards and other products Step 1 Insert the SOYO CD into the CD ROM drive If you are running Windows NT 2K XP the SOYO CD will not detect your motherboard type In that case the following dialog will pop up Please choose your motherboard model number and press OK Now the SOYO CD...

Page 20: ...at In order to read a PDF file the appropriate Acrobat Reader software must be installed in your system Note The Start Up program automatically detects if the Acrobat Reader utility is already present in your system and otherwise prompts you on whether or not you want to install it You must install the Acrobat Reader utility to be able to read the user s manual file Follow the instructions on your...

Page 21: ...ntain the stability of systems using VIA chipsets These four drivers are VIA Registry INF Driver VIAAGP VxD driver VIAATAPI Vendor Support Driver and VIA PCI IRQ Miniport Driver VIA KM400 Onboard Display Driver for Win 9x ME NT 2k XP This program will install the driver for the VIA Onboard Display adapter Note that for Windows NT the driver installation should be done manually Check the ReadMe inc...

Page 22: ... to set alarms when current system values exceed or fall below pre set values Step 3 Check the Latest Releases Click the Check the latest Releases button to go the SOYO Website to automatically find the latest BIOS manual and driver releases for your motherboard This button will only work if your computer is connected to the internet through a network or modem connection Make sure to get your mode...

Page 23: ...SY K7VMP Quick Start Guide 23 The SOYO CD After Windows XP installation your device manager should look like this ...

Page 24: ...SY K7VMP Quick Start Guide 24 The SOYO CD After driver installation your Windows XP device manager should look like this ...

Page 25: ...SY K7VMP Quick Start Guide 25 The SOYO CD Drivers directory list in the CD driver Audiodriver Via4in1driver OnboardLAN USB2 0driverforWin 98SE ME KM400VGAdriver ...

Page 26: ...iver windows may prompt you to restart your computer When your computer has restarted it may look for the windows driver on your windows installation CD and ask you to insert your installation CD into your CD drive At this point you need to insert the windows installation CD into your CD drive You will then be prompted to select the correct directory on your windows CD ...

Page 27: ...ows Update for Windows XP For additional information regarding USB 2 0 support in Windows XP please visit http www microsoft com hwdev bus USB default asp Windows XP Service Pack1 Include USB2 0 Driver After installing service pack1 please do the following 1 Go into the device manager 2 Remove 3 Restart your system Next time Windows XP starts up a new USB 2 0 controller will be found ...

Page 28: ...guide for CPU supported on this M B 4 Check if the power supply is ok The minimum should be 350 watts AMD approved 5 Make sure the CPU fan is connected to CPUFAN1 connector 6 Remove the M B from the case and test the system The M B might be shorted to the case The system power up no video beeping heard 1 Clear CMOS battery JP5 connector see this Quick start guide for more info on how to clear the ...

Page 29: ...ry might be drained 4 The BIOS chip might be failing I hear a 1 2 beeping sound and then the system shut down what is the problem Verify that the CPU fan is connected to the CPUFAN1 connector Stability Issues My system intermittently locks up very unstable 1 Check the CPU Temperature your CPU might be overheating Change the CPU FAN 2 Do not overclock your CPU 3 Check the specification of the memor...

Page 30: ...e revision number such as kvxa_2BA1 meaning BIOS revision 2BA1 for the SY K7V Dragon plus mainboard or 6BA IV_2AA2 which means SY 6BA IV motherboard with a 2AA2 BIOS Where can I find the latest BIOS of my motherboard Please go to the technical support page of one of the SOYO websites Taiwan www soyo com tw US www soyousa com Germany www soyo de and look up your motherboard to find the latest BIOS ...

Page 31: ...Feature in BIOS setup then set the AC97Audio setup option to disabled I cannot get the sound working on my system 1 Check if the speaker wire is connected to the line out connector on the M B 2 Check if the speaker power is powered on 3 Install the audio driver supplied on our driver disc 4 Check BIOS setup if AC97Audio setup option is enabled 5 If sound already installed check our website for aud...

Page 32: ...ystem finds my CD ROM sometimes not 1 Check CD ROM if it is working properly 2 The power supply might not have enough wattage to support all the peripherals If your system has other peripherals connected like CD RW extra HDD etc disconnect them When I boot up my new computer I get floppy boot failure and the LED on the floppy stays on Make sure the red wire of floppy ribbon cable goes to Pin1 on t...

Page 33: ...pei Hsien Taiwan R O C TEL 886 2 22903300 FAX 886 2 22983322 http www soyo com Email info mail soyo com tw USA SOYO INC 41484 Christy Street Fremont CA 94538 USA TEL 1 510 226 7696 FAX 1 510 226 9218 http www soyousa com http www soyousa com kb Email support soyousa com GM SOYO Deutschland GmbH SAATTechnology GmbH August Wilhelm Kuhnholz Str 15 D 26135 Oldenburg Oldb Germany TEL 49 441 209100 FAX ...

Page 34: ...Edition July 2003 Version P1 0 SY K7VMP SERIAL ...

Reviews: