background image

8

Setting the Filter Cycle Frequency:

 - 

Enter the programming menu 

by pressing and holding the 

FILTER 

key for 5 seconds.  The current 

time will be displayed with the hours flashing.  If adjusting the clock is 
necessary do it now, otherwise press the 

FILTER

 key repeatedly until 

FF

##

 is displayed.  

“FF”


represents FILTER


FREQUENCY


“##”


represents the number of cycles per day, 

1 - 4

 cycles per day. 

Press the 

UP 

or 

DOWN 

key to adjust the cycles as required.

Setting the Economy Mode:


Enter the programming menu by 

pressing and holding the 

FILTER 

key for 5 seconds.  The current time 

will be displayed with the hours flashing.  If adjusting the clock is 
necessary do it now, otherwise press the 

FILTER

 key repeatedly until 

EP

##

 is displayed.  

“EP”


represents ECONOMY PROGRAM


“##”

 represents cycle enabled or not

1 = On / Cycle Enabled
0 = OFF


/ Cycle Disabled

Press the 

UP 

or 

DOWN 

key to adjust the setting as required.

Setting the Economy Start Time:


Enter the programming menu by 

pressing and holding the 

FILTER 

key for 5 seconds.  The current time 

will be displayed with the hours flashing.  If adjusting the clock is 
necessary do it now, otherwise press the 

FILTER

 key repeatedly until 

ES

##

 is displayed.  

“ES”


represents ECONOMY START,


“##”


represents hour the cycle starts

Press the 

UP 

or 

DOWN 

key to adjust the setting as required paying 

close PM indicator.

Setting the Economy Duration:


Enter the programming menu by 

pressing and holding the 

FILTER 

key for 5 seconds.  The current time 

will be displayed with the hours flashing.  If adjusting the clock is 
necessary do it now, otherwise press the 

FILTER

 key repeatedly until 

 ##

 is displayed.  

“e  ”


represents ECONOMY DURATION,  

“##”

 represents the active time in hours. 

Press the 

UP 

or 

DOWN 

key to adjust the hours as required

0 = No Economy
24 = Continuous Economy


P

P

Changing the Temperature Readout:


Enter the programming menu 

by pressing and holding the 

FILTER 

key for 5 seconds.  The current 

time will be displayed with the hours flashing.  If adjusting the clock is 
necessary do it now, otherwise press the 

FILTER

 key repeatedly until 

F

 or 

C

 is displayed. 

Press the 

UP 

or 

DOWN 

key to adjust as required

F

 = Farenheit

C

 = Celcius 

PROGRAMMING FILTRATION (cont.)

Summary of Contents for 6230Y Series

Page 1: ...6230Y SERIES OWNERS OPERATION GUIDE ...

Page 2: ... SYSTEM OPERATION Power Up Breaker Settings Spaside Operation Features Filtration Programming Spa Light Error Indication OPERATIONAL CONSIDERATIONS Warm Weather Conditions Filtration System Winterizing Chemical Water Treatment TROUBLESHOOTING Notes 2 3 4 5 6 7 8 8 10 9 9 11 13 8 9 14 ...

Page 3: ...l metal surfaces A spa may be installed within 5 feet of metal surfaces if each metal surface is permanently connected by a solid copper conductor attached to the wire connector on the terminal box that is provided for this purpose Refer to NEC and local codes in effect at the time of installation A pressure wire connector is provided on the control box to permit connection of a solid copper bondi...

Page 4: ...cal shock replace damaged cord immediately For Permanently Installed Units A terminal marked G or ground is provided in the wiring box located inside the equipment compartment To reduce the risk of electric shock connect the terminal or connector to the grounding terminal of your electrical service or supply panel with a continuous green insulated copper wire in accordance with National Electric C...

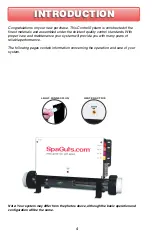
Page 5: ... control standards With proper care and maintenance your system will provide you with many years of reliable performance The following pages contain information concerning the operation and care of your system LIGHT CONNECTION HEATER ACTIVE Note Your system may differ from the photos above although the basic operation and configuration will be the same ...

Page 6: ...fied typically from10 to 48 AMP Then pressFilter button to set breaker rating This table shows typicalsettings of b for differentGFCIratings Select the one that matchesyour breaker GFCI b 60 Amp 48Amp 50Amp 40Amp 40Amp 32Amp 30Amp 24 16Amp 98 It simportant to specify the current ratingof the GFCI usedto ensure safe and efficient current management andreducenuisanceGFCI trippings Press and hold Filte...

Page 7: ... Key again to turn off The blower indicator lights up whenBlower is on The Set Point icon indicates that the display shows the NOT the current water temperature desired temperature The Set Point icon indicates that the display shows the NOT the current water temperature desired temperature Pump 1 Indicator Pump 2 Indicator Blower Indicator Light Indicator Filtration Indicator Heater Indicator Pump...

Page 8: ...seconds the system will exit the program menu without saving the changes PM indicator Setting the Clock Enter the programming menu by pressing and holding the FILTER key for 5 seconds The current time will be displayed with the hours flashing Press the UP or DOWN key to adjust the hours accordingly making sure the PM indicator is set properly Press the PROGRAM key to advance to changing the minute...

Page 9: ...LTER key for 5 seconds The current time will be displayed with the hours flashing If adjusting the clock is necessary do it now otherwise press the FILTER key repeatedly until ES is displayed ES represents ECONOMY START represents hour the cycle starts Press the UP or DOWN key to adjust the setting as required paying close PM indicator Setting the Economy Duration Enter the programming menu by pre...

Page 10: ... insulation so as to keep electrical costs down This energy conservation efficiency may be achieved by extensive insulation of the skirt plumbing and spa shell and in some climates full foam insulation may have been provided This energy conservation feature may cause an inconvenience during warmer times of the year During warm periods of the year the temperature within the equipment compartment ca...

Page 11: ...of protection is required to keep the spa from freezing This mode will be active for a minimum of 24 hours In this mode the system will automatically turn on the pump s and or blower for a minimum of 1 minute to prevent freezing The Filter Cycle indicator will Flash while this mode is active No user interaction is required system will resume normal operation once the freeze hazard has passed nnp m...

Page 12: ...r The heater pump and accessory will be deactivated until the water cools Be sure to check the actual water temperature with an accurate thermometer An internal hardware error has been detected in the spapack Contact your local dealer DO NOT ENTER SPA WATER Ÿ Make sure that the low level programming has been properly set with or without circulation pump depending on your system configuration Ÿ Mak...

Page 13: ...r Temperature Protection On Refer to page 9 NO THERAPY JET OPERATION Water Shut Off Valves are Closed Open Shut Off valves Dirty Filter Clean or replace filter Jets Not Properly Adjusted Adjust Jets Diverter Valve Not Properly Adjusted Adjust diverter valve Thermal Overload Tripping Check for restricted flow of water Over Temperature Protection On Refer to page 9 NOTHING OPERATES The following des...

Page 14: ... your local dealer Light Not Plugged In Plug in the Light NO LIGHT OPERATION WATER LEAKS Spa Overfilled Adjust water level Too Many People in the Spa Adjust water level Drain Valve Left Open Close drain valve Couplings or Unions Loose Tighten or contact your local dealer Pump Seal Leaking Contact your local dealer Plumbing Connections Leaking Contact your local dealer Water Leaking from Spaside Co...

Page 15: ...ins information you will need to establish your electrical service The voltage and amperage ratings are shown on the bottom of the label Product Model Serial and Code numbers are also shown on the label Note This information will be necessary if you should ever have to request warranty or any other type of service REFER TO NEC FOR BREAKER SIZING ORDER CODE MODEL CODE VOLTS AMPS PRODUCT CSXXXX XXXX...

Page 16: ...15 85 0062 AZY Rev 02 7 19 ...

Reviews: