background image


Installation  

1.


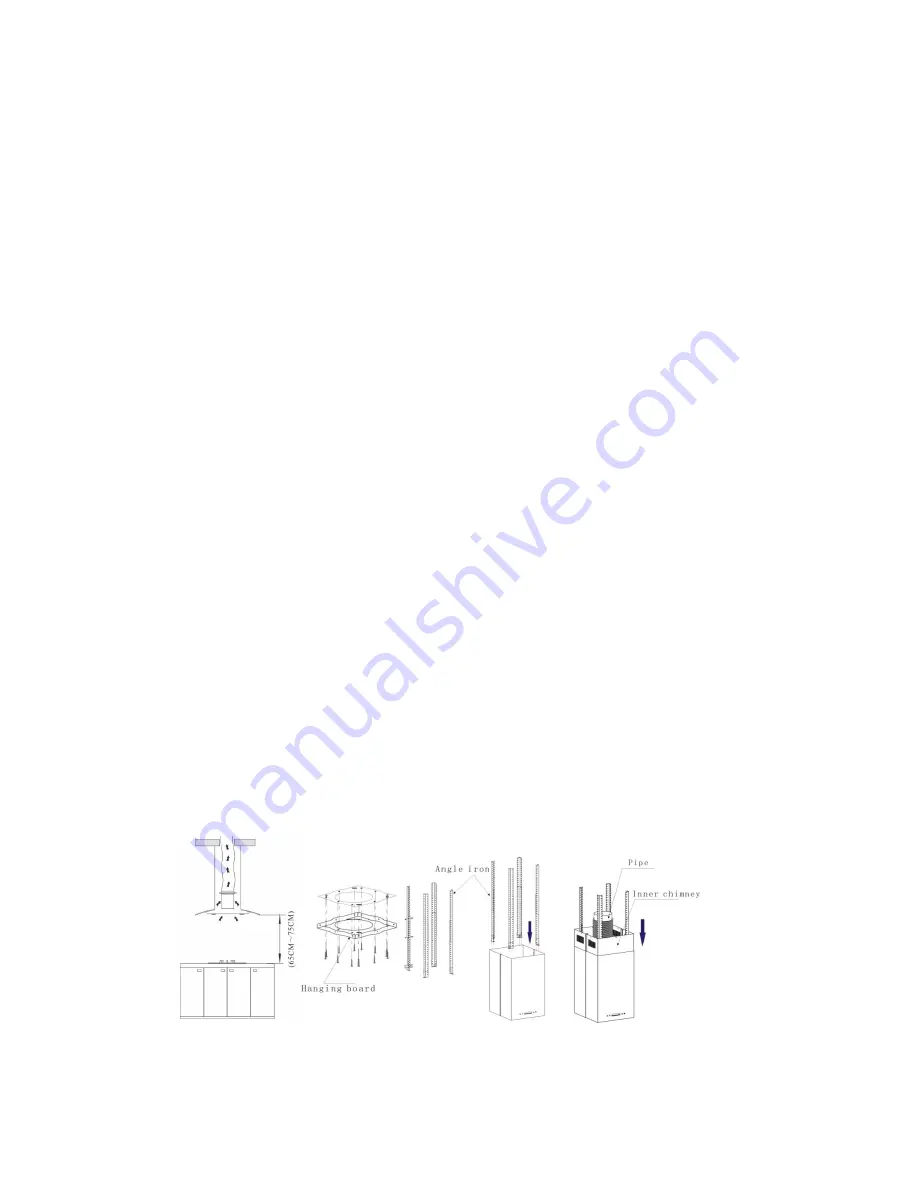
The range hoods should be placed at a distance of 26-30 

inches from the cooking surface for best effect. See  Pic 1. 

2.


For safety, the ceiling should be able to carry load of a 200 

pounds , Drill a hole with dia 8” in the ceiling as shown on Pic 

2. 

3.


According  to  the  support  board,  drill  the  holes  in  the  ceiling, 

see Pic 2. Make the support board fixed on the wooden ceiling 

by flat screws. According to the the size of  Pic 1,  calculated 

the  length  of  the  angle  iron,  flat  screws  and  nut  with  gasket 

will be used to connect the angle iron and another angle iron ( 

the overlap length of angle iron can not be less than 4”). 

4.


See Pic 3, connect the angle iron and body by screw and 

washer, and then, fix the outlet and put the pipe inside; make 

the inner chimney into the body. 

5.


See Pic 4, left up the body, fix the angle iron and hanging 

board by nut & screw & washer. 

6.


 See Pic 5, make the pipe outside through the hanging board 

with a  Ø 7”  hole; pull up the inner chimney to the hanging 

board, mathen, fix the inner chimney at the hanging board. 


          Pic 1                   Pic 2                         Pic 3 

Summary of Contents for SV400G-IM

Page 1: ...Instruction manual MODEL NO SV400G IM Spagna Vetro Range Hood Burnaby BC Canada www KitchenHoods ca Tel 604 430 5252 ...

Page 2: ...ge hood according to the instruction manual If there is any fault with your range hood please call out service department Please keep the room draughty when your range hood and gas hob are working Do not exhaust the gas from range hood through the same heated flue which is for the gas from gas hob or other kitchen appliances Before installation and usage read all the instructions To ensure that yo...

Page 3: ... of Pic 1 calculated the length of the angle iron flat screws and nut with gasket will be used to connect the angle iron and another angle iron the overlap length of angle iron can not be less than 4 4 See Pic 3 connect the angle iron and body by screw and washer and then fix the outlet and put the pipe inside make the inner chimney into the body 5 See Pic 4 left up the body fix the angle iron and...

Page 4: ...ers Tear down your range hood as per the approach shown on Pic 6 You can clean the filter as below 1 Soak them about 3 minutes in hot water 40 50 degrees with a grease loosening detergent then brush it gently with a soft brush Please do not apply too much pressure avoid to damage it ...

Page 5: ...h off before cleaning Carbon filter installation See Pic 7 If the hood without extension pipe it should be installed carbon filter which decrease strong smell produced by cooking Normally the carbon filter should be changed at three or six months according to your cooking habit Attention The carbon filter should be bought additionally Speed adjustment See pictures LCD Electronic button Pic 7 ...

Page 6: ...s button one more time the hood works at HIGH speed Press button again the hood works at LOW speed again and it repeat While pressing button the button is always on If you want to stop the hood now press the button once 5 When the hood is not working press button once The hood will work at the speed it works last time and LCD will show Press button again the hood stop working and will disappear fr...

Page 7: ...01 When LCD shows 00 it doesn t work by pressing button After setting hour and minute press to confirm When button doesn t work button is used for delay timer function Delay timer function allows you to set the hoods automatically power off according to the delay timer you set from 1 minute to 60 minutes Press button once it enters for delay timer setting and LCD shows Press button once the number...

Page 8: ...acklight will disappear But please note the Lamp is not under control of delay timer Next time if you want to use delay timer function and you press button without any change on time The hood will automatically count time down from your previous setting after 5 seconds www KitchenHoods ca Burnaby BC Canada ...

Reviews: