background image

Assemble the Gas Strut

15

Assemble the Gas Strut

Required Parts:

Completed Gas Strut Assembly:

•  Kit 3

•  Socket Wrench or Wrench

F


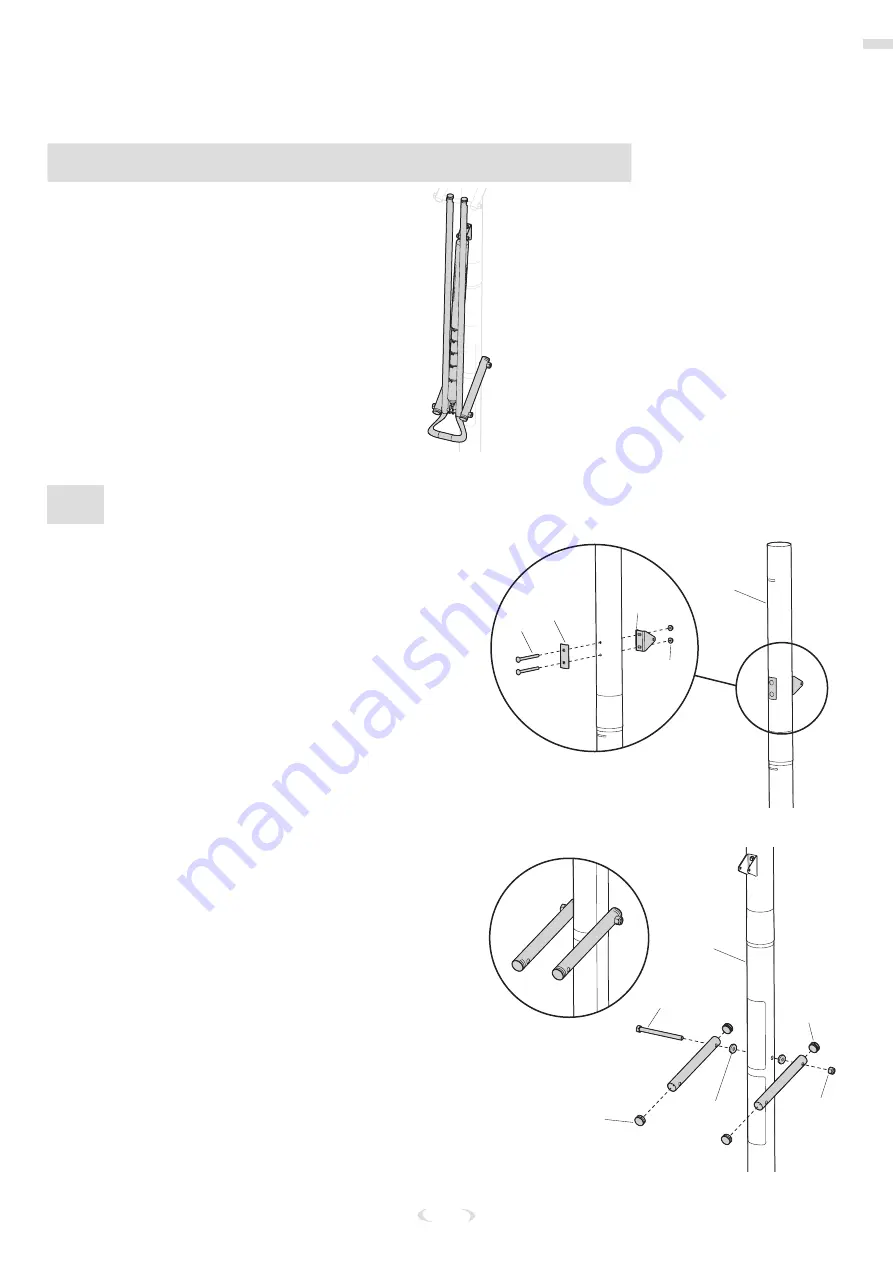
ASSEMBLE THE GAS STRUT

1. 

Secure the pole mount bracket (27) 

and reinforcement bracket (34) into the 

top pole (4) mounting holes using the 

carriage bolts (28).

2. 

Tighten the flange nuts (16).

#28

#34

#4

#16

#27

3. 

Install the gas strut handle arm tubes 

(53) to the middle pole (5) using hex bolt 

(44), spacers (61), and nylock nut (40).

4. 

Insert plugs (38) into tubes (53).

#5

#38

#61

#53

#44

#40

#38

Summary of Contents for ACCUGLIDE 6A1042

Page 1: ...tralia 1300 367 582 www spalding com 10 21 ID M6A9223 Model Number found on product box WARNING READ AND UNDERSTAND THE OPERATOR S MANUAL BEFORE USING THIS UNIT FAILURE TO FOLLOW THE OPERATING INSTRUCTIONS COULD RESULT IN INJURY OR DAMAGE TO PROPERTY PORTABLE BASKETBALL SYSTEM Owner s Manual ENGLISH ...

Page 2: ...re Before You Begin READ AND UNDERSTAND OPERATOR S MANUAL BEFORE USING THIS UNIT Remove ALL contents from boxes Be sure to check INSIDE pole sections hardware and additional parts are packed inside This manual accompanied by sales receipt should be saved and kept on hand as a convenient reference as it contains important information about your model WARNING FAILURE TO FOLLOW OPERATING INSTRUCTIONS...

Page 3: ...stem is not installed maintained and operated properly If using a ladder during assembly use extreme caution Check base regularly for leakage Slow leaks could cause the system to tip over unexpectedly Seat the pole sections properly if applicable Failure to do so could allow the pole sections to separate during play and or during transport of the system Climate corrosion or misuse could result in ...

Page 4: ...from holes if necessary NOTE Not all items pictured are included with every model Package Contents Check the contents of each kit and other parts to ensure all components are present Keep the kit hardware in the labeled bag as they will be used in different steps of assembly See Parts List on page 29 for a complete list of replacement part numbers BASE ASSEMBLY 3 2 19 10 39 50 6 1 5 4 1 Base x1 2 ...

Page 5: ...5 16 18 x 4 5 Long x1 12 Washer Flat 3 8 ID x6 13 Nut Nylock 5 16 18 x1 15 Bolt Hex Flange 5 16 18 x 1 5 Long x2 16 Nut Hex Flange 5 16 18 x2 46 Spacer 0 5 ID x 0 25 Long x2 GAS STRUT ASSEMBLY 37 38 59 27 52 56 54 53 27 Pole Mount Bracket x1 37 Plug Tube Snap In 1 Black x2 38 Plug Tube Snap In 1 25 Black x4 52 Tube Vertical Elevator Gas Strut x2 53 Tube Gas Strut Handle Arms x2 54 Gas Strut Assemb...

Page 6: ...34 16 40 61 13 Nut Nylock 5 16 18 x1 16 Nut Hex Flange 5 16 18 x2 18 Bolt Hex 5 16 18 x 1 75 Long x1 28 Bolt Carriage 5 16 18 x 4 25 Long x2 34 Reinforcement Bracket x1 40 Nut Nylock 1 2 13 x2 61 Spacer 0 5 ID x 0 13 Long x2 BACKBOARD ASSEMBLY 22 41 60 42 22 Cap Pole Top 3 5 x1 41 Elevator Tube Lower Black x22 42 Elevator Tube Upper Black x2 60 Trigger Elevator x1 ...

Page 7: ...pacer 51 I D x 5 0 Long x1 KIT 4 208996 208484 208484 Steel Spacer Steel Spacer 9 29 40 14 20 57 58 55 9 Nut Nylock 3 8 16 x2 14 Spacer Metal 0 5 ID x 62 Long x4 20 Spacer 530 ID x 88 Long x4 29 Spacer 530 ID x 1 50 Long x1 40 Nut Nylock 1 2 13 x4 55 Spacer 0 5 ID x 0 63 Long x2 57 Nut Nylock M4 x 0 7 x1 58 Bolt Hex M4 x 0 7 x 25 mm Long x1 ...

Page 8: ...ate Rim x1 62 Label Logo x1 KIT 5 208908 203100 NUT HEX FLANGE 5 16 18 16 48 51 31 35 33 36 30 47 32 25 26 16 Nut Hex Flange 5 16 18 x4 30 Spring Black Slam Jam x1 31 Bracket Reinforcement Slam Jam x1 33 T Bolt 3 8 16 x 3 25 Long x1 35 Washer Flat Slam Jam x1 36 Nut Special x1 48 Screw 8 x3 4L For Cover x2 51 Bolt Hex Flange 5 16 18 x 1 625 Long x4 ...

Page 9: ... for Assembly 2 Capable Adults Mallet Safety Glasses Socket Wrench 7 mm 1 2 9 16 3 4 Socket Wrench Extension Wrench 7 mm 1 2 9 16 3 4 Tape Measure Screwdriver Sawhorse Step Ladder 8 ft Scrap Wood Board Sand Garden Hose OPTIONAL Adjustable Wrenches ...

Page 10: ...bly Overview 10 Assembly Overview Backboard Section G Elevator System Section F Bottom Pole Section A D Base Section C D E Rim Section H Top Pole Section A D Middle Pole Section A D Wheel Carriage Section B ...

Page 11: ...ase Assembly Kit 1 Kit 2 Scrap Wood Board Socket Wrench or Wrench Mallet A ASSEMBLE THE OVAL POLE 1 Identify the top 4 middle 5 and bottom 6 oval pole sections 2 Mark 3 1 2 9 cm from the top of both the middle 5 and bottom 6 pole sections 4 5 3 1 2 9 cm 3 1 2 9 cm 6 ...

Page 12: ...ING CUSTOMER SERVICE AT 1 800 558 5234 FOR ASSISTANCE 3 Align the top 4 pole section with the middle 5 pole section and slide together 4 Bounce assembled sections on a scrap wood board until the overlap reaches the marked line 5 5 5 4 4 4 3 1 2 9 cm 5 Align the assembled oval pole section with the bottom 6 pole section and slide together 6 Bounce assembled sections on a scrap wood board until the ...

Page 13: ...E BASE 1 Insert the wheel axle assembly into the bottom of the base 1 2 Insert the bolts 17 through the washers 12 into wheel brackets 19 under the base 19 17 12 1 D INSTALL THE OVAL POLE ONTO THE BASE 1 Insert the oval pole assembly into the base 2 Secure the oval pole assembly in place using the pole mounting plate 50 and bolts 7 50 7 ...

Page 14: ...3 WARNING TIGHTEN THE BOLT 11 IN THE LOCK NUT 13 UNTIL IT IS FLUSH EVEN WITH THE OUTER EDGE OF THE NUT 2 Align the base support frame 39 under the base 1 3 Rotate the non secured angled ends of the struts 10 to align with the base and base support frame 39 4 Secure the tank struts 10 and base support frame 39 to the base using the bolts 15 washers 12 and nuts 16 12 15 12 1 10 39 16 ...

Page 15: ...S STRUT 1 Secure the pole mount bracket 27 and reinforcement bracket 34 into the top pole 4 mounting holes using the carriage bolts 28 2 Tighten the flange nuts 16 28 34 4 16 27 3 Install the gas strut handle arm tubes 53 to the middle pole 5 using hex bolt 44 spacers 61 and nylock nut 40 4 Insert plugs 38 into tubes 53 5 38 61 53 44 40 38 ...

Page 16: ...assembly 54 to the pole mount bracket 27 using the bolt 18 and nut 13 54 18 27 4 13 7 Orient the vertical connecting tubes 52 according to the identification stickers 8 Insert the caps 37 into the top of the tubes 52 9 Slide the bottom end of the tubes 52 over the handle 59 and align the holes 59 BOTTOM TOP Identification Sticker 37 52 ...

Page 17: ... STRUT 10 Insert the bolt 44 through the handle arms 53 vertical tubes 52 and the gas strut assembly bracket Secure using the nut 40 52 44 40 53 WARNING TIGHTEN THE BOLT 44 IN THE LOCK NUT 40 UNTIL IT IS FLUSH EVEN WITH THE OUTER EDGE OF THE NUT ...

Page 18: ...Kit 4 Socket Wrench or Wrench WARNING TWO PEOPLE ARE REQUIRED FOR THIS PROCEDURE FAILURE TO FOLLOW THIS WARNING COULD RESULT IN SERIOUS INJURY AND OR PROPERTY DAMAGE G ASSEMBLE THE BACKBOARD 1 Support the pole on a sawhorse 2 Identify the lower elevator tube 41 and upper elevator tube 42 42 41 ...

Page 19: ...e bolts 20 4 20 40 Elevator Tube Orientation 42 42 43 5 Attach the lower elevator tubes 41 to the upper pole section 4 using the bolt 43 spacer 20 and nut 40 6 Attach the lower elevator tubes 41 to the gas strut vertical elevator tubes 52 using the bolts 43 spacers 29 and 55 and nuts 40 7 Securely tighten all the bolts 8 Attach the pole cap 22 22 20 20 62 40 43 29 41 41 62 55 55 ...

Page 20: ... to the back of the backboard using the metal spacers 14 bolts 8 and nuts 9 9 8 42 41 14 14 9 8 10 Secure the spacer 49 between the lower elevator tubes 42 using the bolt 43 and nut 40 11 Securely tighten all the bolts 43 40 49 42 41 WARNING DO NOT LEAVE THE ASSEMBLY UNATTENDED WHEN EMPTY IT MAY TIP OVER ...

Page 21: ...12 Fasten the trigger 60 to the gas strut assembly 54 using the bolt 58 and nut 57 NOTE THE TRIGGER WILL BE BETWEEN THE PLATES OF THE BRACKET AND ABOVE THE BOLT 44 SQUEEZING THE TRIGGER WILL ALLOW THE RIM HEIGHT TO BE ADJUSTED 54 57 60 60 58 57 60 58 44 ...

Page 22: ...rench H ASSEMBLE THE GOAL 1 Insert the t bolt 33 through the slam jam bracket 32 2 Secure the slam jam bracket 32 to the backboard using the bolts 51 and nuts 16 51 33 32 16 3 Fit the rim 25 securely into the slam jam bracket 32 Allow the t bolt 33 to slip through the center hole in the rim 25 25 32 33 ...

Page 23: ...e Goal 23 H ASSEMBLE THE GOAL 4 Install the reinforcement bracket 31 onto the t bolt 33 31 33 5 Install the spring 30 onto the t bolt 33 30 33 6 Install the special nut 36 and washer 35 onto the t bolt 33 36 35 33 ...

Page 24: ... GOAL 7 Tighten the nut 36 until 1 8 of the bolt threads onto the exposed end of the t bolt 33 35 33 30 36 1 8 3mm 8 Attach the cover 47 to the rim 25 using the cover screws 48 47 62 25 48 9 Thread the net 26 onto the rim 25 25 26 26 25 ...

Page 25: ...e the Goal 25 H ASSEMBLE THE GOAL May not be included with your system 10 Fasten the pole pad to the front of the pole using the hook and loop straps When finished your system should look like the image below ...

Page 26: ...COULD RESULT IN SERIOUS INJURY DO NOT LEAVE THE ASSEMBLY UNATTENDED WHEN EMPTY IT MAY TIP OVER MAKE SURE BASE CAP GASKETS 45 ARE INSTALLED BASE WILL NOT SEAL CORRECTLY IF GASKET 45 IS MISSING DAMAGED OR NOT SECURED PROPERLY THE SYSTEM MAY TIP OVER FAILURE TO FOLLOW THIS WARNING COULD RESULT IN SERIOUS INJURY AND OR PROPERTY DAMAGE CONTACT CUSTOMER SERVICE IMMEDIATELY IF THIS IS MISSING OR DAMAGED ...

Page 27: ... CHECK WATER LEVEL BEFORE EACH USE TO FILL WITH SAND 1 Roll the completed assembly to desired location 2 Carefully tip the system forward 3 Fill the base with sand approx 400 lbs 181 kg 4 DO NOT LEAVE THE SYSTEM UNATTENDED 5 When the base has the appropriate amount of ballast tighten both base caps 23 and base cap gaskets 45 securely into place 6 Push in the cap 24 securely 7 Carefully upright the...

Page 28: ...st the backboard height 60 K MOVING THE UNIT 1 Lower the backboard height to the lowest position 2 Grasp the oval pole and tilt system until the wheels of the base engage with the ground 3 Roll the system to desired location 4 Tilt the basketball system into the upright position 5 Check the system for stablility ...

Page 29: ... 60 59 58 57 54 56 43 8 49 4 20 22 42 14 9 41 52 37 40 29 62 45 23 24 26 36 35 31 30 47 48 33 16 32 51 25 16 13 18 44 53 38 61 61 38 53 38 38 27 14 9 28 40 5 21 1 6 19 17 12 2 34 40 39 10 46 11 12 13 15 16 12 12 10 50 7 62 55 ...

Page 30: ...38 4 208828 Plug Tube Snap In 1 25 Black 13 2 203099 Nut Nylock 5 16 18 39 1 901536 Frame Base Support 14 4 208484 Spacer Metal 0 5 I D x 0 62 Long 40 6 206340 Nut Nylock 1 2 13 15 2 203798 Bolt Hex Flange 5 16 18 x 1 5 Long 41 2 901532 Elevator Tube Lower Black 16 8 203100 Nut Hex Flange 5 16 18 42 2 901416 Elevator Tubes Upper Black 17 4 204962 Bolt Hex 5 16 18 x 625 Long 43 4 206244 Bolt Hex 1 ...

Page 31: ...Handle Arms 58 1 208762 Bolt Hex M4 x 0 7 x 25mm Long 54 1 702653 Gas strut assembly 59 1 600342 Handle Gas Lift 55 2 201642 Spacer 0 5 ID x 0 63 Long 60 1 600343 Trigger Elevator 56 1 801477 Cover Spalding 61 2 265533 Spacer 0 5 ID x 0 13 Long 57 1 204007 Nut Nylock M4 x 0 7 62 1 20279502 Label Logo ...

Page 32: ... 32 ...

Page 33: ... THESE WARNINGS MAY RESULT IN SERIOUS INJURY AND OR PROPERTY DAMAGE ID 500082 07 21 Trademarks registered in the USA and other countries In the U S 1 800 558 5234 In Canada 1 800 284 8339 In Australia 1 300 367 582 ATTENTION CE PANNEAU ET CET ANNEAU NE SONT PAS CONÇUS POUR SUPPORTER UN JOUEUR SUSPENDU À L ANNEAU OU AU FILET LE NON RESPECT DE CETTE MISE EN GARDE PEUT ENTRAÎNER DES BLESSURES CORPORE...

Page 34: ...CIONES DE FUNCIONAMIENTO PODRÍA OCASIONAR LESIONES O DAÑOS MATERIALES Teléfono gratuito del servicio al cliente EE UU 1 800 558 5234 Canadá 1 800 284 8339 Europa 353 51 379777 Australia 1300 367 582 www spalding com Número de modelo se encuentra en la caja del producto SISTEMA PORTÁTIL DE BALONCESTO Manual del propietario ESPAÑOL ...

Page 35: ...e preguntas o le Llame al número de atenci GRATUITO que figura en la p STOP Tiene preguntas o le Llame al número telefónico GR al Cliente que se indica en la NO regrese a la NO regrese a la ALTO Antes de empezar LEA Y COMPRENDA EL MANUAL DEL OPERADOR ANTES DE USAR ESTA UNIDAD Saque TODO el contenido de las cajas Asegúrese de revisar el INTERIOR de las secciones de los postes los herrajes y las pie...

Page 36: ...e instala mantiene y funciona adecuadamente Si usa una escalera durante el montaje extreme la precaución Revise regularmente la base para detectar si hay fugas Las fugas lentas pueden hacer que el sistema se vuelque inesperadamente Asiente las secciones del poste correctamente si corresponde De lo contrario las secciones del poste podrían separarse al jugar o al transportarlo El clima la corrosión...

Page 37: ... los orificios NOTA No todos los artículos ilustrados están incluidos en cada modelo Contenido del paquete Compruebe el contenido de cada kit y otras piezas para asegurarse de que se incluyen todas las partes Conserve los herrajes del kit en la bolsa etiquetada ya que los utilizará en diferentes pasos del montaje Vea el Listado de piezas de la página 62 para ver la lista completa de los números de...

Page 38: ... 12 Arandela plana 3 8 d int x6 13 Tuerca Nylock 5 16 18 x1 15 Perno brida hexagonal 5 16 18 x 1 5 de largo x2 16 Tuerca brida hexagonal 5 16 18 x2 46 Espaciador 0 5 d int x 0 25 de largo x2 MONTAJE DEL PUNTAL DE GAS Núm 37 Núm 38 Núm 59 Núm 27 Núm 52 Núm 56 Núm 54 Núm 53 27 Soporte montaje del poste x1 37 Tapón tubo a presión 1 negro x2 38 Tapón tubo a presión 1 25 negro x4 52 Tubo elevador verti...

Page 39: ... Nylock 5 16 18 x1 16 Tuerca brida hexagonal 5 16 18 x2 18 Perno hexagonal 5 16 18 x 1 75 de largo x1 28 Perno carruaje 5 16 18 x 4 25 de largo x2 34 Soporte de refuerzo x1 40 Tuerca Nylock 1 2 13 x2 61 Espaciador 0 5 d int x 0 13 de largo x2 MONTAJE DEL TABLERO 22 41 60 42 Núm 60 Núm 22 Núm 42 Núm 41 22 Tapa parte superior del poste 3 5 x1 41 Tubo del elevador inferior negro x22 42 Tubo del eleva...

Page 40: ...go x1 KIT 4 208996 208484 208484 Steel Spacer Steel Spacer Núm 9 Núm 29 Núm 40 Núm 14 Núm 20 Núm 57 Núm 58 Núm 55 9 Tuerca Nylock 3 8 16 x2 14 Espaciador de metal 0 5 d int x 0 62 de largo x4 20 Espaciador 0 530 d int x 0 88 de largo x4 29 Espaciador 0 530 d int x 1 50 de largo x1 40 Tuerca Nylock 1 2 13 x4 55 Espaciador 0 5 d int x 0 63 de largo x2 57 Tuerca Nylock M4 X 0 7 x1 58 Perno hexagonal ...

Page 41: ...el logotipo x1 KIT 5 208908 203100 NUT HEX FLANGE 5 16 18 Núm 16 Núm 48 Núm 51 Núm 31 Núm 35 Núm 33 Núm 36 30 47 32 25 26 16 Tuerca brida hexagonal 5 16 18 x4 30 Resorte negro Slam Jam x1 31 Soporte refuerzo Slam Jam x1 33 Perno en T 3 8 16 x 3 25 de largo x1 35 Arandela plana Slam Jam x1 36 Tuerca especial x1 48 Tornillo núm 8 x 3 4 de largo para cubierta x2 51 Perno brida hexagonal 5 16 18 x 1 6...

Page 42: ...l montaje 2 adultos capaces Mazo Gafas de seguridad Llave de vaso 7 mm 1 2 9 16 3 4 Extensión de llave de vaso Llave 7 mm 1 2 9 16 3 4 Cinta métrica Destornillador Caballete Escalera de mano 8 pies Tabla de madera de desecho Manguera de jardín o arena OPCIONAL Llaves ajustables ...

Page 43: ... 43 Resumen del montaje Tablero Sección G Sistema Elevador Sección F Poste inferior Secciones A D Base Secciones C D E Aro Sección H Poste superior Secciones A D Poste intermedio Secciones A D Soporte con ruedas Sección B ...

Page 44: ... Kit 2 Tabla de madera de desecho Llave de vaso o llave Mazo A MONTAJE DEL POSTE OVALADO 1 Identifique la sección superior 4 intermedia 5 e inferior 6 del poste ovalado 2 Marque 3 1 2 9 cm desde la parte superior de las secciones del poste intermedia 5 e inferior 6 4 5 3 1 2 9 cm 3 1 2 9 cm 6 ...

Page 45: ...LIENTE DE SPALDING AL 1 800 558 5234 PARA RECIBIR AYUDA 3 Alinee la sección superior del poste 4 con la sección intermedia del poste 5 y encájelas 4 Empuje las secciones ensambladas sobre el bloque de madera hasta que la superposición alcance la línea marcada 5 5 5 4 4 4 3 1 2 9 cm 5 Alinee la sección del poste ovalado montada con la sección inferior del poste 6 y encájelas 6 Empuje las secciones ...

Page 46: ... parte inferior de la base 1 2 Introduzca los pernos 17 a través de las arandelas 12 en los soportes de las ruedas 19 debajo de la base 19 17 12 1 D COLOCACIÓN DEL POSTE OVALADO EN LA BASE 1 Introduzca el conjunto del poste ovalado en la base 2 Fije el conjunto del poste ovalado en el lugar correcto utilizando la placa del montaje del poste 50 y los pernos 7 50 7 Núm 19 Núm 2 Núm 19 Núm 17 Núm 12 ...

Page 47: ... 13 HASTA QUEDAR PAREJO CON EL BORDE EXTERIOR DE LA CONTRATUERCA 2 Alinee el bastidor de soporte de la base 39 bajo la base 1 3 Gire los extremos no fijados de los puntales 10 para alinearlos con la base y el bastidor de soporte de la base 39 4 Fije los puntales de tanque 10 y el bastidor de soporte de la base 39 a la base utilizando los pernos 15 arandelas 12 y tuercas 16 12 15 12 1 10 39 16 Núm ...

Page 48: ... en los orificios de montaje del poste superior 4 utilizando los pernos de carruaje 28 2 Apriete las tuercas bridadas 16 28 34 4 16 27 3 Instale los tubos del brazo del puntal de gas 53 en el poste intermedio 5 utilizando el perno hexagonal 44 los espaciadores 61 y la tuerca Nylock 40 4 Inserte los tapones 38 en los tubos 53 5 38 61 53 44 40 38 Núm 28 Núm 27 Núm 16 Núm 5 Núm 44 Núm 53 Núm 38 Núm 6...

Page 49: ... la tuerca 13 54 18 27 4 13 7 Coloque los tubos conectores verticales 52 según las etiquetas adhesivas de identificación 8 Inserte las tapas 37 en la parte superior de los tubos 52 9 Deslice el extremo inferior de los tubos 52 sobre la manija 59 alineando los orificios 59 BOTTOM TOP Identification Sticker 37 52 Núm 56 Núm 54 Núm 54 Núm 18 Núm 27 Núm 13 Núm 59 Núm 52 Núm 37 SUPERIOR INFERIOR Núm 4 ...

Page 50: ...avés de los brazos de la manija 53 los tubos verticales 52 y el soporte del montaje de puntal de gas Fíjelo utilizando la tuerca 40 52 44 40 53 ADVERTENCIA APRIETE EL PERNO 44 EN LA CONTRATUERCA 40 HASTA QUEDAR PAREJO CON EL BORDE EXTERIOR DE LA CONTRATUERCA Núm 52 Núm 53 Núm 40 Núm 44 ...

Page 51: ...lave ADVERTENCIA SE REQUIEREN DOS PERSONAS PARA ESTE PROCEDIMIENTO EL INCUMPLIMIENTO DE ESTA ADVERTENCIA PODRÍA OCASIONAR LESIONES GRAVES Y O DAÑOS MATERIALES G MONTAJE DEL TABLERO 1 Apoye el poste en el caballete 2 Identifique el tubo inferior del elevador 41 y el tubo superior del elevador 42 42 41 Núm 42 Núm 41 ...

Page 52: ...1 a la sección del poste superior 4 utilizando el perno 43 el espaciador 20 y la tuerca 40 6 Fije los tubos inferiores del elevador 41 a los tubos verticales del elevador del puntal de gas 52 utilizando los pernos 43 los espaciadores 29 y 55 y las tuercas 40 7 Apriete bien todos los pernos 8 File la tapa del poste 22 22 20 20 62 40 43 29 41 41 62 Núm 55 Núm 55 Núm 43 Núm 42 Núm 20 Núm 20 Núm 4 Ori...

Page 53: ... de metal 14 los pernos 8 y las tuercas 9 9 8 42 41 14 14 9 8 10 Fije el espaciador 49 entre los tubos inferiores del elevador 42 con el perno 43 y la tuerca 40 11 Apriete bien todos los pernos 43 40 49 42 41 ADVERTENCIA NO DEJE EL MONTAJE DESATENDIDO CUANDO ESTÉ VACÍO PUEDE VOLCARSE Núm 14 Núm 42 Núm 14 Núm 8 Núm 9 Núm 49 Núm 43 Núm 42 Núm 41 Núm 40 Núm 9 Núm 41 Núm 8 ...

Page 54: ... del puntal de gas 54 con el perno 58 y la tuerca 57 NOTA EL GATILLO QUEDARÁ SITUADO ENTRE LAS PLACAS DEL SOPORTE Y ENCIMA DEL PERNO 44 AL APRETAR EL GATILLO SE PODRÁ AJUSTAR LA ALTURA DEL ARO 54 57 60 60 58 57 60 58 Núm 57 Núm 60 Núm 58 Núm 57 Núm 54 Núm 60 Núm 60 Núm 58 Núm 44 ...

Page 55: ...CANASTA 1 Inserte el perno en T 33 a través del soporte slam jam 32 2 Fije el soporte slam jam 32 en el tablero con los pernos 51 y las tuercas 16 51 33 32 16 3 Fije firmemente el aro 25 en el soporte slam jam 32 Deje que el perno en T 33 se deslice a través del orificio central en el aro 25 Núm 25 Núm 32 Núm 33 Núm 33 Núm 32 Núm 51 Núm 16 ...

Page 56: ...JE DE LA CANASTA 4 Instale el soporte de refuerzo 31 en el perno en T 33 Núm 31 Núm 33 5 Coloque el resorte 30 en el perno en T 33 Núm 30 Núm 33 6 Instale la tuerca especial 36 y la arandela 35 en el perno en T 33 Núm 36 Núm 35 Núm 33 ...

Page 57: ...m de las roscas del perno en el extremo expuesto del perno en T 33 Núm 35 Núm 33 Núm 30 Núm 36 1 8 3 mm 8 Coloque la cubierta 47 en el aro 25 utilizando los tornillos de la cubierta 48 Núm 47 Núm 62 Núm 25 Núm 48 9 Enganche la red 26 en el aro 25 25 26 26 25 Núm 26 Núm 25 Núm 25 Núm 26 ...

Page 58: ...58 H MONTAJE DE LA CANASTA Puede no incluirse en su sistema 10 Fije la almohadilla del poste en la parte frontal del poste con las correas de velcro Cuando termine su sistema debería estar como aparece en la siguiente imagen ...

Page 59: ... GRAVES Y O DAÑOS MATERIALES NO DEJE EL MONTAJE DESATENDIDO CUANDO ESTÉ VACÍO PUEDE VOLCARSE ASEGÚRESE DE QUE LAS JUNTAS DE LA TAPA DE LA BASE 45 ESTÁN COLOCADAS LA BASE NO SE SELLARÁ DE FORMA CORRECTA SI LA JUNTA 45 NO SE COLOCA SI ESTÁ DAÑADA O NO ESTÁ BIEN ASEGURADA EL SISTEMA PUEDE VOLCARSE EL INCUMPLIMIENTO DE ESTA ADVERTENCIA PODRÍA OCASIONAR LESIONES GRAVES Y O DAÑOS MATERIALES COMUNÍQUESE ...

Page 60: ...O CON ARENA 1 Mueva el conjunto completado a la ubicación deseada 2 Con cuidado incline el sistema hacia delante 3 Llene la base con arena aprox 400 libras 181 kg 4 NO DEJE EL SISTEMA DESATENDIDO 5 Cuando la base tenga la cantidad de contrapeso adecuada apriete bien las dos tapas de la base 23 y las juntas de la tapa de la base 45 en su sitio 6 Coloque la tapa 24 de forma firme 7 Coloque el sistem...

Page 61: ...l tablero 60 K CAMBIO DE UBICACIÓN DE LA UNIDAD 1 Baje la altura del tablero hasta la posición más baja 2 Agarre el poste ovalado e incline el sistema hasta que las ruedas de la base toquen el suelo 3 Mueva el sistema hasta la ubicación deseada 4 Coloque el sistema de baloncesto en posición vertical 5 Compruebe la estabilidad del sistema ...

Page 62: ...4 Núm 22 Núm 49 Núm 8 Núm 20 Núm 43 Núm 4 Núm 13 Núm 16 Núm 18 Núm 37 Núm 56 Núm 52 Núm 27 Núm 54 Núm 58 Núm 59 Núm 60 Núm 11 Núm 15 Núm 24 Núm 23 Núm 12 Núm 12 Núm 16 Núm 45 Núm 39 Núm 1 Núm 12 Núm 10 Núm 46 Núm 10 Núm 13 Núm 38 Núm 44 Núm 53 Núm 38 Núm 61 Núm 61 Núm 53 Núm 38 Núm 34 Núm 28 Núm 48 Núm 25 Núm 16 Núm 33 Núm 32 Núm 51 Núm 47 Núm 40 Núm 38 Núm 21 Núm 5 Núm 26 Núm 6 Núm 17 Núm 19 Núm ...

Page 63: ...3 2 203099 Tuerca Nylock 5 16 18 39 1 901536 Bastidor soporte de la base 14 4 208484 Espaciador de metal d int 0 5 x 0 62 de largo 40 6 206340 Tuerca Nylock 1 2 13 15 2 203798 Perno brida hexagonal 5 16 18 x 1 5 de largo 41 2 901532 Tubo del elevador inferior negro 16 8 203100 Tuerca brida hexagonal 5 16 18 42 2 901416 Tubos del elevador superior negro 17 4 204962 Perno hexagonal 5 16 18 x 0 625 d...

Page 64: ...8 1 208762 Perno hexagonal M4 x 0 7 x 25 mm de largo 54 1 702653 Montaje del puntal de gas 59 1 600342 Manija elevador de gas 55 2 201642 Espaciador d int 0 5 x 0 63 de largo 60 1 600343 Gatillo elevador 56 1 801477 Cubierta Spalding 61 2 265533 Espaciador d int 0 5 x 0 13 de largo 57 1 204007 Tuerca Nylock M4 x 0 7 62 1 20279502 Etiqueta del logotipo ...

Page 65: ...65 ...

Page 66: ...ológicas adversas o de viento ya que el sistema podría volcarse Coloque el sistema en la posición de almacenamiento y o en una zona protegida del viento y de las condiciones meteorológicas y alejado de objetos personales y o cables aéreos Nunca juegue si el equipo está dañado Consulte el manual de instrucciones para montar y mantener el sistema de forma adecuada Cuando desplace el sistema tenga cu...

Reviews: