background image

19

1/06

ID#   M8801041

10.

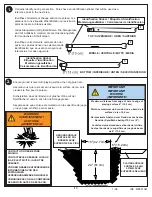
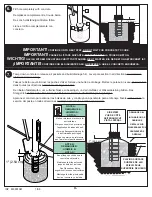
Stack upper pole section (1) to bottom and middle pole assembly and continue bouncing until top pole (1) no

longer moves toward taped reference mark on middle pole.

Empilez la section de poteau supérieure (1) sur l'ensemble des sections de poteau inférieure et centrale, puis

continuez à entrechoquer jusqu'à ce que la section supérieure (1) ne bouge plus vers la marque de référence

(ruban) de la section centrale.

Das obere Stangenteil (1) auf den aus dem unteren und mittleren Stangenteil bestehenden Aufbau aufsetzen und

weiter so lange zusammenstauchen, bis sich das obere Teil (1) nicht mehr auf die mit Klebeband markierte Stelle

am mittleren Teil zu bewegt.

Apile la sección superior del poste (1) con el conjunto de las secciones inferior y media del poste y continúe

golpeando hasta que la sección superior del poste (1) ya no se mueva hacia la marca de referencia con cinta de

la sección media del poste.

1

5

IMPORTANT!
IMPORTANT!

WICHTIG!

¡IMPORTANTE!

POLE SECTIONS SHOULD HAVE 
A 3-1/2" (9 CM) MINIMUM OVERLAP.

LES SECTIONS DE POTEAU
DOIVENT SE CHEVAUCHER DE 9 CM
MINIMUM.

DIE STANGENTEILE MÜSSEN
EINANDER UM MINDESTENS 
9 CM (3 ½ ZOLL) ÜBERLAPPEN. 

LAS SECCIONES DEL POSTE SE
DEBEN TRASLAPAR UN MÍNIMO DE
3-1/2" (9 CM).

1-1/2"

(3.81 cm)

5" 

(12.7 cm)

Wood Scrap (NOT SUPPLIED)

Chute de bois (NON FOURNIE)

Holzstück (NICHT IM LIEFERUMFANG ENTHALTEN)

Trozo de madera (NO SE SUMINISTRA)

Identification Sticker

Étiquette d'identification

Markierungsaufkleber

Calcomanías de identificación

IMPORTANT!
IMPORTANT!

WICHTIG!

¡IMPORTANTE!

WARNING


FAILURE 

TO FOLLOW 

THESE 

WARNINGS 

MAY RESUL

T

IN SERIOUS 

INJUR

Y AND/OR 

PROPERTY

 DAMAGE.

Owner 

must 

ensure that 

all players 

know an

d follow

these 

rules 

for safe 

operation 

of the system.

• DO NO

T HANG 

on the 

rim or any 

part of the 

system 

including 

backboar

d, suppor

t braces 

or net.

• During 

play, especiall

y when 

performing 

dunk 

type 

activities,

 keep 

player's face 

away from 

the bac

kboar

d, rim

and net.

 Serious 

injury coul

d occur

 if teeth/

face come 

in 

contact 

with bac

kboard, rim 

or net.

• Do not 

slide, climb,

 shake 

or play on 

base 

and/or 

pole.

• After 

assemb

ly is com

plete, fill 

system 

completel

y with

water 

or sand 

and stak

e to the 

ground.

 Never lea

ve system

in an upright 

position 

without 

filling 

base 

with weigh

t, as

system 

may tip 

over causing 

injuries.

• When 

adjusting 

height 

or moving 

system,

 keep 

hands 

and

fingers aw

ay from 

moving par

ts.

• Do not 

allow ch

ildren 

to move 

or adjust system.

• During 

play, do 

not wear 

jewelry (rings,

 watches,

 necklac

es,

etc.). Objects 

may entangle 

in net.

• Surface 

beneath 

the base 

must be 

smooth 

and free 

of 

gravel 

or other 

sharp 

objects.

 Punctures 

cause

 leakage and

could 

cause 

system 

to tip ov

er.

• Keep or

ganic 

material 

away from 

pole base

. Grass, litter

,

etc. could 

cause 

corrosion 

and/or 

deterioration.

• Chec

k pole 

system 

for signs 

of corr

osion 

(rust, pitting,

chipping) 

and repaint 

with exterior 

enamel 

paint. If rust 

has

penetrated 

through 

the steel 

anywhere

, replace 

pole 

immediate

ly.

• Chec

k system 

before 

each use 

for proper

 ballast,

 loose

hardware

, excessive 

wear 

and signs 

corrosion 

and repair

before 

use.

• Chec

k system 

before 

each use 

for instability

.

• Do not

 use system 

during 

windy and/or 

severe weather 

conditions;

 system 

may tip 

over. Place 

system 

in the 

storage position 

and/or 

in an area 

protected 

from the 

wind

and free 

from personal 

proper

ty and/

or overhead 

wires.

• Never pla

y on dam

aged equipment.

• See 

instruction 

manual 

for proper

 installation 

and 

maintenance

.

• When 

moving 

system,

 use caution 

to keep 

mechanism 

from

shifting.

• Keep pole 

top covered 

with cap 

at all times.

• Do not 

allow water 

in tank 

to freez

e. During 

sub-freezing

weather 

add non-to

xic antifreez

e, sand 

or empty 

tank 

completel

y and 

store. (Do 

not use 

salt.)

• Use ex

treme 

caution 

if placing 

system 

on sloped 

surface

.

System

 may tip 

over more 

easily.

201241

2/99

In the U.S.:1-800

-558-52

34 and 

Canada: 

1-800-284-83

39

The warning label should be 90 degees

from uppermost holes on top pole (1) - see

Illustration.
L'étiquette d'avertissement doit se trouver à

90 degrés des trous situés en haut de la

section de poteau supérieure (1) - voir

l'illustration.
Der Warnaufkleber muss um 90 Grad von

den obersten Löchern im oberen Stangenteil

(1) versetzt sein - siehe Abbildung.
La etiqueta de advertencia debe quedar a

90 grados de los orificios más superiores de

la sección superior del poste (1); vea la

ilustración.

Summary of Contents for M8801041

Page 1: ...esure où il contient des informations importantes sur votre modèle READ AND UNDERSTAND OPERATOR S MANUAL BEFORE USING THIS UNIT FAILURE TO FOLLOW OPERATING INSTRUCTIONS COULD RESULT IN INJURY OR DAMAGE TO PROPERTY LISEZ LE MODE D EMPLOI AVANT D UTILISER CE SYSTÈME SOUS PEINE D ENCOURIR DES BLESSURES OU DES DÉGÂTS MATÉRIELS WARNING AVERTISSEMENT Write Model Number From Box Here Inscrivez ici le num...

Page 2: ...ßband Cinta de medir de 15 4 57 m Schaufel und Erdlochbohrer Pala y excavador del orificio para el poste Holzbrett Ausschuß Tabla de madera un trozo Sägebock oder Stütztisch Caballete o mesa de apoyo Keil Cuña Behälter zum Mischen Recipiente para mezclar je 2 Schrauben und oder Steckschlüssel tiefe Einsätze empfohlen 2 de cada una llaves de tuercas y o llaves de tuercas de boca tubular y casquillo...

Page 3: ...icios si es necesario No todos los artículos ilustrados se incluyen con cada modelo NOTICE TO ASSEMBLERS Adult Assembly Required Dispose of ALL packaging materials promptly As with all products periodically inspect for loose small parts ALL basketball systems including those used for DISPLAYS MUST be assembled and installed according to instructions Failure to follow instructions could result in S...

Page 4: ...ura del sistema NO SE CUELGUE del borde ni de ninguna parte del sistema inclusive el respaldo las abrazaderas de apoyo y la red Durante el juego especialmente cuando se realizan actividades de tipo clavada dunk el jugador debe mantener la cara alejada del respaldo el borde y la red Si los dientes o la cara entran en contacto con el respaldo el borde o la red se puede sufrir una lesión grave Durant...

Page 5: ...Soyez prudent lorsque vous utilisez ce système Si vous utilisez une échelle en cours de montage soyez extrêmement prudent Il est recommandé de s y prendre à deux 2 adultes pour réaliser cette opération Emboîtez correctement les sections de poteau Elles risquent sinon de se déboîter en cours de jeu Avant de creuser contactez les fournisseurs d électricité gaz et eau pour situer les câbles d aliment...

Page 6: ...inn des Zusammenbaus die Anleitung durchlesen und anhand des Schlüssels zur Identifizierung der Befestigungsteile und der Teileliste in diesem Dokument die einzelnen Bauteile bestimmen INSTRUCCIONES DE SEGURIDAD La mayoría de las lesiones son causadas por el uso inadecuado y o por el incumplimiento de las instrucciones Tenga cuidado cuando use este sistema Si utiliza una escalera de mano durante e...

Page 7: ... ACRYLIQUE EXAMINEZ LE BIEN POUR VOUS ASSURER QU IL N A PAS ÉTÉ ENDOMMAGÉ EN COURS DE TRANSPORT S IL EST FISSURÉ IL RISQUE DE SE CASSER SUBITEMENT SI LE PANNEAU EST ENDOMMAGÉ D UNE QUELCONQUE MANIÈRE AVANT OU APRÈS L ASSEMBLAGE APPELEZ LE NUMÉRO SANS FRAIS États Unis 1 800 558 5234 CANADA 1 800 284 8339 http www huffysports com WARNUNG BEI EINEM MIT EINER ACRYL RÜCKWAND AUSGESTATTETEN SYSTEM DIE K...

Page 8: ...r Slam Jam 35 1 203470 Rondelle plate Slam Jam 36 1 203795 Écrou spécial Slam Jam 37 4 204961 Boulon tête à six pans 3 8 16 x 16 mm long 38 1 Filet 39 4 203100 Ecrou bride à six pans 5 16 18 Des pièces supplémentaires sont peut être fournies avec ce modèle PARTS LIST See Hardware Identifier Item Qty Part No Description 1 1 FR908143 Top Pole Section 2 1 FR918125 Middle Pole Section 3 1 FR928407 Bot...

Page 9: ... 5 16 18 Diesem Modell können zusätzliche Teile beigepackt sein TEILELISTE Siehe Teileschlüssel Artículo Cant Pieza N º Descripción 1 1 908143 Sección superior del poste 2 1 90812501 Sección media del poste 3 1 928407 Sección inferior del poste 4 2 202800 Mitad de la manga del piso 5 1 202801 Tapa de la manga del piso 6 1 203279 Cinta antiderrapante 7 2 90096401 Soporte del tablero negro 8 1 90360...

Page 10: ...LEGSCHEIBEN IDENTIFICADOR DE HERRAJE TUERCAS Y ARANDELAS HARDWARE IDENTIFIER METAL SPACERS IDENTIFICATION DES PIÈCES ENTRETOISES EN ACIER BEFESTIGUNGSTEILESCHLÜSSEL ABSTANDSSTÜCKE AUS METALL IDENTIFICADOR DE HERRAJE SEPARADORES DE METAL 18 2 You may have extra parts with this model Des pièces supplémentaires sont peut être fournies avec ce modèle Diesem Modell können zusätzliche Teile beigepackt s...

Page 11: ...TOISES PINCES EN PLASTIQUE BEFESTIGUNGSTEILESCHLÜSSEL ABSTANDSSTÜCKE UND CLIPS AUS KUNSTSTOFF IDENTIFICADORES DE HERRAJE SEPARADORES Y SUJETADORES DE PLÁSTICO HARDWARE IDENTIFIER OTHER IDENTIFICATION DES PIÈCES AUTRES BEFESTIGUNGSTEILESCHLÜSSEL SONSTIGE TEILE IDENTIFICADOR DE HERRAJE OTROS 30 2 19 2 22 2 Item 23 1 ...

Page 12: ...rière Schaufel und Erdlochbohrer Pala y excavador del orificio para el poste Carpenter s Level Niveau à bulle Wasserwaage Nivel de carpintero Container to Mix Récipient pour mélanger Behälter zum Mischen Recipiente para mezclar This is what your system will look like when you ve finished this section Voici à quoi ressemblera votre système lorsque vous en aurez fini avec cette section So sieht das ...

Page 13: ...in the next step Identifiez correctement chaque section de poteau Les poteaux ont une étiquette d identification qui servira de point de repère à l étape suivante Jedes Stangenteil richtig identifizieren Die Stangenteile sind mit Aufklebern markiert die als Orientierungshilfe für den nächsten Schritt dienen Identifique correctamente cada sección del poste Los postes tienen una calcomanía de identi...

Page 14: ...älften der Bodenmuffe 4 zusammendrücken bis sie ineinander einrasten Das untere Stangenteil 3 in die Bodenmuffe 4 stecken und durch Festdrehen der Bodenmuffenabdeckung 5 gut sichern Conecte las dos mitades de la manga del piso 4 Introduzca y fije la sección inferior del poste 3 en la manga del piso 4 apretando la tapa de la manga del piso 5 3 5 4 4 Flared end goes inside ground sleeve L extrémité ...

Page 15: ...r in hole FIG A Insérez le manchon de fixation au sol en le centrant dans le trou FIG A Die Bodenmuffenbaugruppe in das Loch stecken und darin zentrieren ABB A Introduzca y centre el conjunto de la manga del piso en el orificio FIG A 5A Leave 1 below flange exposed for drainage hill Laissez 2 5 cm exposés sous la bride pour la butte de drainage Unter dem Flansch ca 2 5 cm für ein Gefälle zur Wasse...

Page 16: ...tras el concreto se está endureciendo 1 2 54 cm SIDE VIEW VUE DE CÔTÉ SEITENANSICHT VISTA LATERAL DRAINAGE HILL INCLINAISON DE DRAINAGE GEFÄLLE ZUR WASSERABLEITUN PENDIENTE DE DRENAJE IMPORTANT CONTINUE ON TO NEXT STEP DO NOT WAIT FOR CONCRETE TO CURE IMPORTANT PASSEZ À L ÉTAPE SUIVANTE N ATTENDEZ PAS LA PRISE DU BÉTON WICHTIG GLEICH MIT DEM NÄCHSTEN SCHRITT FORTFAHREN NICHT WARTEN BIS DER BETON G...

Page 17: ...NS 24 STUNDEN LANG WARTEN DER BETON MUSS TROCKNEN IMPORTANTE ESPERE UN MÍNIMO DE 24 HORAS ANTES DE CONTINUAR CON EL PASO SIGUIENTE EL CONCRETO DEBE ENDURECERSE Surface de jeu Spielfläche Superficie de juego Keep ground sleeve cap on bottom pole Maintenez le capuchon du manchon de fixation au sol sur la section de poteau inférieure Die Bodenmuffenabdeckung auf der unteren stange lassen Mantenga la ...

Page 18: ...ción media ya no se mueva hacia la marca de referencia con cinta que se encuentra en la sección inferior del poste 2 3 Wood Scrap NOT SUPPLIED Chute de bois NON FOURNIE Holzstück NICHT IM LIEFERUMFANG ENTHALTEN Trozo de madera NO SE SUMINISTRA Identification Sticker Étiquette d identification Markierungsaufkleber Calcomanías de identificación IMPORTANT IMPORTANT WICHTIG IMPORTANTE POLE SECTIONS SH...

Page 19: ... and or pole After assembly is complete fill system completely with water or sand and stake to the ground Never leave system in an upright position without filling base with weight as system may tip over causing injuries When adjusting height or moving system keep hands and fingers away from moving parts Do not allow children to move or adjust system During play do not wear jewelry rings watches n...

Page 20: ...u ve finished this section Voici à quoi ressemblera votre système lorsque vous en aurez fini avec cette section So sieht das System aus wenn Sie mit diesem Bauabschnitt fertig sind Así es como se verá su sistema cuando haya terminado esta sección TOOLS REQUIRED FOR THIS SECTION OUTILS REQUIS POUR CETTE SECTION FÜR DIESEN BAUABSCHNITT BENÖTIGTES WERKZEUG HERRAMIENTAS REQUERIDAS PARA ESTA SECCIÓN 2 ...

Page 21: ...illustré Das Abstandsstück 25 in die Klinke 13 einpassen Dann die Montage mit der Schraube 12 den Stützhalterungen 15 und der Mutter 10 wie gezeigt fortsetzen Ajuste el separador 25 en el fiador 13 Luego continúe el montaje usando un perno 12 soportes 15 y tuerca 10 como se muestra IMPORTANT IMPORTANT WICHTIG IMPORTANTE DO NOT TIGHTEN HARDWARE COMPLETELY NE SERREZ PAS LA VISSERIE À FOND DIE BEFEST...

Page 22: ...G IMPORTANTE TIGHTEN ALL HARDWARE FROM STEPS 2 THROUGH 4B COMPLETY DO NOT OVER TIGHTEN BOLT 20 AND NUT 21 FROM STEP 3 PAWL MUST MOVE FREELY SERREZ À FOND TOUTE LA VISSERIE DES ÉTAPES 2 À 4B NE SERREZ PAS TROP LE BOULON 20 ET L ÉCROU 21 DE L ÉTAPE 3 LE CLIQUET DOIT BOUGER LIBREMENT ALLE IN DEN SCHRITTEN 2 BIS 4B BENUTZTEN BEFESTIGUNGSTEILE JETZT FEST ANZIEHEN DIE IN SCHRITT 3 BESCHRIEBENE SCHRAUBE ...

Page 23: ... washers 24 Fixez le cliquet 13 en position avec l axe à épaulement 23 et les rondelles 24 Die Klinke 13 mit dem Lastösenbolzen 23 und den Unterlegscheiben 24 in der Einbauposition sichern Fije el fiador 13 en su lugar con un pasador de horquilla 23 y arandelas 24 23 24 13 24 ...

Page 24: ...nge in die benötigte Position strecken Estire el resorte 26 hasta su posición con pinzas 13 26 WARNING AVERTISSEMENT WARNUNG ADVERTENCIA USE EYE PROTECTION WHEN INSTALLING SPRINGS PROTÉGEZ VOUS LES YEUX LORSQUE VOUS INSTALLEZ DES RESSORTS BEIM ANBRINGEN DER FEDERN AUGENSCHUTZ TRAGEN CUANDO INSTALE LOS RESORTES UTILICE PROTECTORES OCULARES ...

Page 25: ...9 como se muestra Fije los conjuntos del soporte Slam Jam 29 y del soporte del respaldo 7 en el respaldo Utilizando el perno 27 y la arandela 39 como se muestra 7 11 28 39 39 27 27 29 29 WARNING AVERTISSEMENT WARNUNG ADVERTENCIA TWO CAPABLE ADULTS REQUIRED FOR THIS PROCEDURE FAILURE TO FOLLOW THIS WARNING COULD RESULT IN SERIOUS INJURY AND OR PROPERTY DAMAGE DEUX ADULTES CAPABLES REQUIS POUR CETTE...

Page 26: ...de des entretoises 30 du boulon 20 et de l écrou 21 comme illustré Die oberen Verlängerungsrohre 11 wie gezeigt mit Abstandsstücken 30 Schrauben 20 und Mutter 21 an den Korbwandklammern 7 befestigen Conecte los tubos elevadores superiores 11 en los soportes del respaldo 7 usando espaciadores 30 pernos 20 y tuercas 21 como se muestra 8 20 30 30 21 11 11 11 11 7 IMPORTANT IMPORTANT WICHTIG IMPORTANT...

Page 27: ...ÜR DIESEN BAUABSCHNITT BENÖTIGTES WERKZEUG HERRAMIENTAS REQUERIDAS PARA ESTA SECCIÓN Container to Mix Récipient pour mélanger Behälter zum Mischen Recipiente para mezclar This is what your system will look like when you ve finished this section Voici à quoi ressemblera votre système lorsque vous en aurez fini avec cette section So sieht das System aus wenn Sie mit diesem Bauabschnitt fertig sind A...

Page 28: ...EZ CET AVERTISSEMENT SOUS PEINE D ENCOURIR DES BLESSURES GRAVES ET OU DES DÉGÂTS MATÉRIELS BITTE VORSICHTIG ZU WERKE GEHEN DIE VERLÄNGERUNGSBAUGRUPPE IST SEHR SCHWER DIESER VERFAHRENSSCHRITT MUSS VON ZWEI DAZU IN DER LAGE BEFINDLICHEN PERSONEN AUSGEFÜHRT WERDEN EIN MISSACHTEN DIESER WARNUNG KANN ZU SCHWEREN VERLETZUNGEN UND ODER SACHSCHÄDEN FÜHREN TENGA CUIDADO EL CONJUNTO DEL ELEVADOR ES PESADO S...

Page 29: ...ial 36 et la rondelle 35 sur le boulon à T 28 E Serrez l écrou 36 jusqu à ce qu il se trouve au même niveau que l extrémité du boulon à T 28 A Den Korbbrand 32 wie gezeigt in die Halterung 29 einsetzen Die T Nutenschraube 28 durch das mittlere Loch im Korbrand 32 gleiten lassen B Die Verstärkungshalterung 33 wie gezeigt über die T Nutenschraube 28 schieben C Die Feder 34 wie gezeigt auf der T Nute...

Page 30: ...30 ID M8801041 1 06 2 33 36 35 29 28 32 34 28 35 36 A B C D E 28 28 ...

Page 31: ...lips 9 near top and bottom of rebar 8 as shown Assemblez les entretoises de centrage de la barre d armature 9 près du haut et du bas de la barre 8 comme illustré Die zur Zentrierung der Versteifungsstange 9 dienenden Abstandsstücke wie gezeigt in der Nähe des oberen und unteren Endes der Stange 8 anbringen Monte los separadores de centramiento de la barra de refuerzo 9 cerca de las partes superior...

Page 32: ...mately 1 2 54 cm below bottom elevator hole as shown Remplissez le poteau de béton jusqu à environ 2 54 cm en dessous du trou inférieur du système élévateur comme illustré Die Stange wie gezeigt bis zu ca 2 54 cm 1 Zoll unter dem unteren Loch der Verlängerungsstangenvorrichtung mit Beton füllen Llene con concreto aproximadamente 1 2 54 cm del poste debajo del orificio elevador inferior como se mue...

Page 33: ...R CETTE SECTION FÜR DIESEN BAUABSCHNITT BENÖTIGTES WERKZEUG HERRAMIENTAS REQUERIDAS PARA ESTA SECCIÓN This is what your system will look like when you ve finished this section Voici à quoi ressemblera votre système lorsque vous en aurez fini avec cette section So sieht das System aus wenn Sie mit diesem Bauabschnitt fertig sind Así es como se verá su sistema cuando haya terminado esta sección 7 In...

Page 34: ...E PODRÍA OCASIONAR UNA LESIÓN GRAVE Y O DAÑOS A LA PROPIEDAD WARNING AVERTISSEMENT WARNUNG ADVERTENCIA DO NOT USE THE BACKBOARD OR RIM TO MOVE POLE ASSEMBLY INTO POSITION THE BACKBOARD AND RIM ARE NOT LOCKED AND WILL ROTATE FAILURE TO FOLLOW THIS WARNING COULD RESULT IN SERIOUS INJURY AND OR PROPERTY DAMAGE NE SAISISSEZ PAS LE POTEAU PAR LE PANNEAU OU LE CERCEAU POUR LE DÉPLACER JUSQU À SA POSITIO...

Page 35: ... BACKBOARD 1 TO RAISE BACKBOARD Slowly push up on the rim broom handle or wooden dowel 3 4 7 8 19mm 22mm diameter as shown to engage locking mechanism at desired height 2 TO LOWER BACKBOARD Push lever up to unlock and carefully lower backboard to lowest position with LEVER 1 2 BROOM HANDLE POUR AJUSTER LE PANNEAU 1 POUR REMONTER LE PANNEAU Poussez lentement le cerceau vers le haut avec un manche d...

Reviews: