background image

1

Operating instructions

EN

The drill stand 

SP 60

 ensures convenient and pre-

cise drilling with diamond core drills BBK2 1500 and 

BBK3 1500.


WARNING! 

This drill stand can be used safely 

only after carefully reading and strictly observing the 

present operating instructions as well as the original 

instructions of the diamond core drill.

Technical specifications

Model 

SP 60


Bracket diameter

60 mm


Maximum feed

440 mm


Drill bit to column axis

90 mm


Base dimensions

165 x 210 mm


Overall dimensions

- Height

840 mm

- Width

170 mm 

- Length

210 mm


Weight

9.8 kg

Safety instructions


WARNING! Read all safety warnings and 

all instructions.

 Failure to follow the warnings and 

instructions  may  result  in  electric  shock,  fire  and/or 

serious injury.

Save all warnings and instructions for future 

reference.


When mounting and dismounting the drill as well as 

performing any operations with them, always check 

the position of ON/OFF switch. The drill must be con

-

nected to the power supply socket only when this 

switch is in OFF position. Always withdraw the drill 

plug from the socket upon completion of work.


Assemble the drill stand carefully according the in-

structions before installing the drill. Proper assembly 

is important to ensure flawless operation of the drill 

stand.


Secure the drill stand on a firm flat surface or wall. 

The drill stand must be absolutely immobile to ensure 

smooth and secure operation of the drill.


Fasten the drill reliably to the drill stand before starting 

to operate it. Slipping the drill in the stand may cause 

loss of control.


Do not overload the drill stand and do not use it as a lad-

der or scaffolding. This may lead to shifting the gravity 

centre upwards and cause overturning the drill stand.


Keep work area clean and well lit. Cluttered or dark 

areas invite accidents.


Remove any adjusting key or wrench before turning 

the power tool on. A wrench or a key left attached to a 

rotating part of the power tool may result in personal 

injury.


Handle the drill stand carefully. Check that moving 

parts function perfectly and do not bind, check for bro-

ken or damaged parts which may affect the stand op-

eration. Replace the damaged parts prior to operation 

with the stand. Many accidents are caused by poorly 

maintained tools and accessories.


When not in use, keep the drill stand out of reach of 

children. Do not allow persons unfamiliar with the 

drill stand or these instructions to operate the stand. 

Machines are dangerous in the hands of untrained 

persons.


Repair shall be carried out by qualified technicians 

only using original spare parts to ensure the drill stand 

safety operation.


Hold the drill stand by insulated gripping surfaces 

only, when performing an operation where the cutting 

accessory may contact hidden wiring or its own cord. 

Cutting accessory contacting a “live” wire may make 

exposed metal parts of the drill  “live” and could give 

the operator an electric shock.


Always keep the power cable away from the working 

area of the drill.


Strictly observe the safety and operation instructions 

for the drill and the additional accessories.


Prior to performing any operation with the drill stand, 

during interruption of work and when not in use, se-

cure the drill stand by locking the carriage to prevent 

undesired movement.

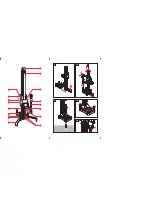
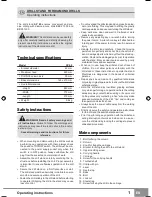
Main components

  1.  Bolt for fixing the column

  2.  Column

  3.  Knob for fixing the carriage

  4.  Bracket for fixing the drill to the drill stand

  5.  Upper centring screw

  6.  Carrying handle

  7.  Carriage

  8.  Screw for the carrying handle

  9.  Toothed shaft

 10.  Circlip with pin

 11.  Lever

 12.  Depth stop

 13.   Base

 14.   Bolt

 15.  Lock nut

 16.  Steel strap

 17.  Screw for fixing the drill to the carriage

DRILL STAND  FOR DIAMOND DRILLS

Operating instructions

pages-SP 60.indd   1

10.6.2013 г.   09:40:31 ч.

Summary of Contents for SP 60

Page 1: ...ЛМАЗНА СВЕРДЛИЛЬНА СТАНИНА Інструкція з експлуатації 19 20 СТОЙКА ЗА ДИАМАНТЕНО ПРОБИВНИ МАШИНИ Инструкция за използване www sparky eu 3 4 DIAMANTBOHRSTÄNDER Betriebsanleitung 12 14 STOJAK WIERTARSKI Instrukcja obsługi 7 8 SUPPORTO DA PERFORATRICE CON CORONA DIAMANTATA Istruzioni d uso 11 12 SUPORTE PARA FURADEIRA COM BROCA DE DIAMANTE Manual de instruções 9 10 SOPORTE PARA PERFORADORAS ADIAMANTAD...

Page 2: ...5 2 4 10 11 6 8 9 12 13 14 15 16 7 3 1 17 1 3 4 5 2 1 А B C D E ...

Page 3: ...n and well lit Cluttered or dark areas invite accidents Remove any adjusting key or wrench before turning the power tool on A wrench or a key left attached to a rotating part of the power tool may result in personal injury Handle the drill stand carefully Check that moving parts function perfectly and do not bind check for bro ken or damaged parts which may affect the stand op eration Replace the ...

Page 4: ...ond core bit Drill Ø20 mm opening with approx 65 mm depth Clean the opening from dust and debris Drive the anchor into the pre drilled opening Insert the stud mount the drill stand and tighten it by washer and nut Fig 3 Use standard knock in anchors Tighten the four bolts 14 by a spanner to remove any clearance under the base Fig 4 If necessary tighten the lock nuts 15 The drill stand must be ab s...

Page 5: ...auf den Ständer kann zum Versetzen seines Schwerpunkts nach oben führen infolge dessen er umkippen kann Halten Sie Ihren Arbeitsplatz sauber und gut beleuch tet Unordnung und nicht ausreichende Beleuchtung können zum Entstehen eines Arbeitsunfalls beitra gen Entfernen Sie Einstellwerkzeuge oder Schrauben schlüssel bevor Sie das Elektrowerkzeug einschal ten Ein Werkzeug oder Schlüssel der sich in e...

Page 6: ...ren Das Befestigen des Ständers erfolgt auf einer festen glatten Oberfläche oder an einer Wand mittels einer Einschlag Ankerschraube und eines Gewindestifts auf folgende Weise Markieren Sie die Öffnung für die Ankerschraube an einem Abstand von ungefähr 200 mm vom Zentrum der mit der Bohrkrone gebohrten Öffnung Bohren Sie eine Öffnung Ø20 mm mit Tiefe von unge fähr 65 mm Reinigen Sie die Öffnung v...

Page 7: ...dage En surchargeant le support ou en montant dessus vous risquez de dé placer son centre de gravité vers le haut ce qui peut conduire à son renversement Gardez le lieu de travail propre et bien éclairé Le désordre et l éclairage insuffisant peuvent contribuer à la survenance d un accident du travail Retirer toute clé de réglage avant de mettre l outil en marche Une clé laissée fixée sur une parti...

Page 8: ...ort soit assemblé sans la perceuse Le support est fixé sur une surface solide et lisse ou un mur à l aide d une cheville et d un goujon de la manière suivante Marquez l orifice destiné à la cheville à une distance d environ 200 mm du centre de l orifice percé à l aide de la couronne de perçage Percez un orifice d un diamètre de Ø20 mm à une profondeur d environ 65 mm Nettoyez l orifice de la pouss...

Page 9: ...rebbe provocare lo spostamento del suo centro di gravità in su e in seguito esso po trebbe ribaltarsi Mantenere il posto di lavoro pulito e ben illuminato Il disordine e l illuminazione insufficiente possono con tribuire all occorrenza di infortunio sul lavoro Togliere tutte le chiavi di regolazione prima di accen dere l utensile Una chiave lasciata inserita in una parte rotante di un utensile può...

Page 10: ...montare il supporto senza il trapano Il fissaggio del supporto va effettuato su una superficie solida liscia o su un muro mediante un ancora da pian tare ed una vite prigioniera nel modo seguente Fare un foro di Ø20 mm ad una profondità di 65 mm Pulire il foro da polvere e frantumi Piantare l ancora nel foro praticato in anticipo Avvitare la vite prigioniera sistemare il supporto e stringere con l...

Page 11: ...ga o la subida sobre el sopor te pueden conducir a que se desplace el centro de su peso hacia arriba y como resultado de ello puede llegar a volcarse Mantenga su lugar de trabajo limpio y bien iluminado El desorden y la iluminación insuficiente pueden con tribuir para que surja un accidente de trabajo Retire las llaves de ajuste antes de encender la herra mienta Dejar una llave cerca de una pieza ...

Page 12: ... una superficie o una pared fuerte y lisa mediante una ronda de anclaje y una espiga de la forma siguiente Marque el orificio de la ronda de anclaje a una dis tancia de aproximadamente 200 mm del centro del orificio perforado con la broca trepanadora Perfore un orificio de Ø20 mm a una profundidad de aproximadamente 65 mm Limpie el orificio de polvo y escombros Introduzca la ronda de anclaje en el...

Page 13: ...ou andaime Isto pode levar à deslocação do seu centro de gravidade para cima em resultado do qual ele pode reverter se Mantenha o lugar de trabalho limpo e bem ilumina do O desordem e a luz insuficiente podem contribuir para um acidente laboral Remover ferramentas de ajuste ou chaves de boca antes de ligar a ferramenta eléctrica Uma ferramenta ou chave que se encontre numa parte do aparelho em mov...

Page 14: ... O suporte fixa se sobre uma superfície sólida lisa ou sobre uma parede mediante âncora achatadora e espi ga do modo seguinte Marque a abertura da âncora a uma distância apro ximada de 200 mm do centro da apertura perfurada com a broca Abra uma abertura Ø20 mm a uma profundidade aproximada de 65 mm Limpe a aperture de poeira e detritos Achate a âncora dentro da abertura previamente aberta Dobre a ...

Page 15: ...tojaka do góry w wyniku tego stojak może się przewrócić Utrzymywać miejsce pracy czystość i dobre oświetle nie Bałagan i niedostateczne oświetlenie mogą przy czynić się do powstania wypadku przy pracy Przed włączeniem urządzenia upewnić się że nie jest dołączony żaden osprzęt regulujący np klucz Pozostawienie klucza w rotującej części urządzenia może spowodować obrażenia Stojak pielęgnować Sprawdz...

Page 16: ...nej gładkiej powierzchni lub na ścianie za pomocą wbijanej śruby kotwiącej i szpilki w sposób następujący Zaznaczyć otwór pod śrubę kotwiącą w odległości około 200 mm od środka otworu wierconego koronką wiertniczą Wywiercić otwór Ø20 mm na głębokość około 65 mm Wyczyścić otwór z pyłu i odłamków Wbić śrubę kotwiącą w uprzednio wywiercony otwór Wkręcić szpilkę ustawić stojak i zamocować przy po mocy...

Page 17: ... используйте ее как лестницу или строительные леса Перегрузка станины а также использование ее в качестве лестницы может привести к смещению центра тяжести в результате чего она перевернется Держите свое рабочее место в чистоте с хоро шим освещением Беспорядок и недостаточное освещение могут привести к производственной травме Удалите каждый ключ для затягивания или га ечный ключ перед включением э...

Page 18: ...ДУПРЕЖДЕНИЕ Убедитесь в том что винт 3 прочно закрученный Рекомендуется монтировать станину без дрели Закрепление станины осуществляется на прочной гладкой поверхности или стене с помощью анкера и шпильки следующим путем Маркируйте анкерное отверстие на расстоянии около 200 мм от центра выполняемого отверстия Просверлить отверстие Ø20 мм глубиной около 65 мм Очистите отверстие от пыли и частиц Заб...

Page 19: ... її в якості сходiв може призвести до зміщення центру ваги в ре зультаті чого вона перевернеться Тримайте своє робоче місце в чистоті і з хорошим освітленням Безлад та недостатнє освітлення можуть призвести до виникнення виробничої травми Видаліть кожен гайковий ключ перед включен ням електроприладу Ключ для затягування або гайковий ключ прикріплений до частини елек троприладу що обертається може ...

Page 20: ...и станину без дриля Закріплення станини здійснюється на міцній глад кій поверхні або стінi за допомогою анкера і шпильки наступним шляхом Маркіруйте анкерний отвір на відстані близько 200 мм від центру виконуваного отвору Просвердлити отвір Ø20 мм глибиною близько 65 мм Почистіть отвір від пилу і частинок Вбийте анкер у попередньо просвердлений отвір Закрутіть шпильку поставте станину і затягніть ...

Page 21: ...та и не я използвайте за стълба или скеле Претоварването или качване то върху стойката може да доведе до изместване на центъра на тежестта й нагоре в резултат на което тя да се преобърне Поддържайте работното си място чисто и добре осветено Безпорядъкът и недостатъчното ос ветление могат да спомогнат за възникването на трудова злополука Отстранете всеки ключ за затягане или гаечен ключ преди включ...

Page 22: ...а ПРЕДУПРЕЖДЕНИЕ Уверете се че за ключващия винт 3 е здраво затегнат Препоръчва се стойката да се монтира без борма шината Закрепването на стойката се извършва върху здра ва гладка повърхност или стена посредством наби вен анкер и шпилка по следния начин Маркирайте отвора за анкера на разстояние око ло 200 mm от центъра на пробивания с боркоро ната отвор Пробийте отвор Ø20 mm на дълбочина окoло 65...

Reviews: