


5
2.
View the photos on the app
or the web portal:
a.
Select MY CAMERAS > CAMERA MANAGEMENT or MANAGE PHOTOS.
b.
Refresh the browser periodically.
3.
Go to Complete Physical Camera Setup on page 5.
Auto Setup
Now that you have connected your camera to the Verizon™ network, you are
ready to complete the setup on your camera.
1.
With the camera in SETUP mode (switch in the ON position, screen in Preview
mode), press the
(Menu) button then use the arrow buttons to navigate
to the Wireless Settings tab and move through the submenu items.
a.
Send Mode: select Instant, then specify the number of photos to send
each day. Enter 0 if you want all photos to be sent.
b.
Send Via: select Auto.
c.
With Auto selected for Send Via, move to Recipient then enter one
destination email address. This may be either a regular email address or a
device email address in the carrier’s picture email format (e.g.,
5555551212@vzwpix.com or 5555551212@mms.att.net). Note: While
you can use your phone number email address, that is no longer
recommended because some carriers have begun blocking some MMS
messages and senders, which can result in your not receiving pictures from
your camera. Spartan Camera does not guarantee the delivery of emails.
d.
Name Tag: enter the name for your camera, up to 8 characters, that will
appear on the picture info strip.
e.
Power Saving: On provides longer battery life because the camera
connects to the network only when it needs to send a photo or status
report, Off provides slightly faster transmission speeds because the
camera stays connected to the network all the time. On is recommended.
f.
Press OK to save your changes.
g.
Press the
(Menu) button to return to the main menu.
2.
Refer to Manual Firmware Update on page 8 and update your camera’s
firmware if necessary.
3.
Set the other parameters (Camera Settings, Trigger Settings, System
Settings) using the information in the tables starting on page 6. It is
probably best to set the clock last.
4.
Once you have set all the parameters, press the
(Menu) button to
return to the Preview screen.
5.
When the camera shows that it is logged into the network, perform the
“Hello test” to confirm that the camera is online.
a.
Press the
(Menu) button.
b.
Scroll to the Wireless Settings tab.
c.
Under Diagnostics, select Hello test then press the OK button. If your
camera is connected to the network properly, you will see the message
Success.
6.
To test that the camera is taking and sending pictures properly, in Preview
mode, press OK to take a picture then OK again to send it. If you are not
setting up the camera to send pictures, you may want to test your camera
using the instructions on page 7.
7.
Arm your camera and walk test it. The camera will arm itself automatically
after being on for 3 minutes or you can arm it manually by long pressing
then choosing Yes.
Complete Physical Camera Setup
1.
After setting up and testing the camera, position it on the target area and
arm it. It will arm itself after 3 minutes or you can arm it manually by long
pressing
then choosing Yes. The camera will take pictures as
programmed. The height you mount your camera depends on what your
targets are, but 2-4 feet off the ground is generally best for wildlife,
depending on the size of the animals you want to photograph.
2.
The green light on the front of the camera should flash for a few seconds
to give you time to move out of the area.
3.
Important: Before you retrieve the SD card or change the settings, turn the
camera off by pushing the power switch to the OFF position.
Even in the OFF mode, the camera consumes a small amount of battery
power. You should remove the batteries if the camera will not be in use for
an extended time.
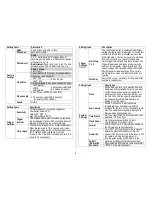
Camera Settings
The following tables list the settings that are available.
When using Premium service, use the app or portal, not the camera’s internal
menus, to set your camera.
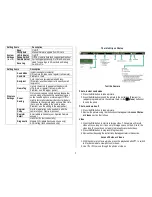
When using Auto, press the
(Menu) button to access the Setup menu.
Navigate the menus using the following keys:
Press
or
to move between the tabs (submenus).
Press
or
move among the submenu items.
Press
or
to change the value for an item.
Press the OK button to save all changes you’ve made to settings in a tab.
Press
(Menu) return to the main menu (tabs) or to exit Setup mode
(back one level).