background image

10

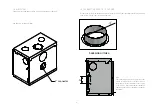
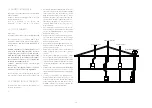
CLOSURE VALVE 

It is mandatory to install a closure valve to prevent 
condensate formation and to prevent the room from 
becoming cold while the stove is not in use. It should 
ideally be located as close as possible to the outside 
wall. It can be controlled from inside if it is not too far 
from the stove (cable length = 47”). 

PLEASE NOTE: COMBUSTION AIR INTAKE REQUIREMENTS. 
 
It is recommended that the 5” Combustion air intake 
duct is installed in a correct manner.
P l e a s e   f i n d   t h e   f o l l o w i n g   i n f o r m a t i o n . 
 
Outside Air- ducts must…
- Be protected on the outside by a grill where the free 
passage section of those grills is at least equivalent to 
the section of the air inlet.
Please note that the infiltration of wind, weather , snow 
and water can effect or damage the air combustion 
system.

- Ideally be fitted with a butterfly valve so that it can 
manually , be used to close the    

cold  air 

from entering the firebox.
Please note that the butterfly valve has to be 100% 
open or 100% closed and should not be used to adjust 
burn rate!
Try to keep the butterfly valve as close to the outside 
wall as possible.
- The air-duct should be insulated and the distance 
from the fireplace to the outside  should  be  as  short 
as possible.
For 5” air duct please refer to the maximum lengths 
and elbows.

Number of 90 degree elbows
4’ = 4 elbows
8’ = 4 elbows
10’ = 2 elbows
12’ = 0 elbow
If you exceed these guidelines, you must compensate 
by using a larger diameter and/or a smoother duct. 
Careful not to crush the duct!
It should ideally be located as close as possible to the 
outside wall.
Please insure that there is sufficient air to feed the 
fireplace in the room –please note that this is not ideal.

Please contact your dealer who offers suitable parts 
for air inlet ducts (pipes and damper). 

Make sure that the wire mesh is mounted at the com-
bustion air inlet.

3. INSTALLATION PLANNING

WARNING

WEAR GLOVES AND SAFETY GLASSES FOR PROTEC-
TION. CAREFULLY FOLLOW THE INSTRUCTIONS FOR 
ASSEMBLY OF THE PIPE AND OTHER PARTS NEEDED 
TO INSTALL THE APPLIANCE. FAILURE TO DO SO MAY 
RESULT IN A FIRE, ESPECIALLY IF COMBUSTIBLES ARE 
TOO CLOSE TO THE APPLIANCE OR CHIMNEY AND AIR 
SPACES ARE BLOCKED, PREVENTING THE FREE MOVE-
MENT OF COOLING AIR. DO NOT DRAW OUTSIDE AIR 
FROM GARAGE SPACES. EXHAUST PRODUCTS OF GAS-
OLINE ENGINES ARE HAZARDOUS. DO NOT INSTALL 
OUTSIDE AIR DUCTS SUCH THAT THE AIR MAY BE 
DRAWN FROM ATTIC SPACES, BASEMENTS OR ABOVE 
THE ROOFING WHERE OTHER HEATING APPLIANCES 
OR FANS AND CHIMNEYS EXHAUST UTILIZE AIR. THESE 
PRECAUTIONS WILL REDUCE THE POSSIBILITY OF 
APPLIANCE SMOKING OR AIR FLOW REVERSAL. THE 
OUTSIDE AIR INLET MUST REMAIN CLEAR OF LEAVES, 
DEBRIS ICE AND/OR SNOW OR ANY OTHER OBSTA-
CLES. IT MUST BE UNRESTRICTED WHILE APPLIANCE 
IS IN USE TO PREVENT ROOM AIR STARVATION WHICH 
CAN CAUSE SMOKE SPILLAGE AND AN INABILITY TO 
MAINTAIN A FIRE. SMOKE SPILLAGE CAN ALSO SET 
OFF SMOKE ALARMS. NEGATIVE PRESSURE WITHIN 
YOUR HOME MAY INADVERTENTLY AFFECT YOUR 
APPLIANCE. TO PREVENT CONTACT WITH SAGGING 
OR LOOSE INSULATION, THE APPLIANCE MUST NOT BE 
INSTALLED AGAINST VAPOUR BARRIERS OR EXPOSED 
INSULATION. LOCALIZED OVERHEATING COULD OCCUR 
AND A FIRE COULD RESULT. DO NOT USE MAKESHIFT 
COMPROMISES DURING INSTALLATION. DO NOT 
BLOCK OR RESTRICT AIR, GRILLE OR LOUVRE OPEN-
INGS. DO NOT ADD A HOOD. KEEP HAND TOOLS IN 
GOOD CONDITION; SHARPEN CUTTING EDGES AND 
MAKE SURE TOOL HANDLES ARE SECURE. ALWAYS 
MAINTAIN THE MINIMUM AIR SPACE REQUIRED TO 
THE ENCLOSURE TO PREVENT FIRES. DO NOT PACK 
REQUIRED AIR SPACES WITH INSULATION OR OTHER 
MATERIALS. COMBUSTION AIR INLET DUCTS ARE NOT 
TO TERMINATE IN ATTIC SPACES OR CRAWL SPACES.

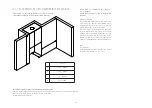
3.1 MINIMUM CLEARANCES TO 
COMBUSTIBLES

DO NOT PLACE ANY COMBUSTIBLE MATERIALS (FUR-
NITURE, FIREWOOD, ETC.) WITHIN 48”(1220mm) IN 
FRONT.
 
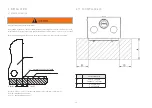
PLEASE NOTE- 1 5/8“ spacers at the back an ½“ spac-
ers on the sides
PLEASE KEEP THE 1/2 “ SPACES CLEAR OF INSTALLA-
TION MATERIAL.

Summary of Contents for 600-ZC

Page 1: ...t it is easy to refer to it Spartherm Feuerungstechnik GmbH Maschweg 38 49324 Melle Phone 49 5422 9441 0 Fax 49 5422 9441 14 www spartherm com The Spartherm Zero Clearnace fireplaces have been tested...

Page 2: ...grate or otherwise raise the fire At least 14 square inches 90 3 square centime ters of outside air must be admitted to the room or directly to the unit through a 5 127mm diameter pipe Failure to pro...

Page 3: ...MAINTENANCE 21 ASH REMOVAL PROCEDURES 22 CREOSOTE FORMATION AND REMOVAL 22 RUNAWAY OR CHIMNEY FIRE 22 CHIMNEY CLEANING 22 GLASS REPLACEMENT 22 CARE OF GLASS 22 CLEANING THE GLASS CERAMIC SHEET 23 CAR...

Page 4: ...erior Width depth height inches 25 5 16 19 23 5 16 29 1 4 20 25 5 16 Heating capacity at 20 C 4 F App m sq ft App m sq ft Recommended amount of wood when fueling lbs kg wood 2 3 logs of wood of app 18...

Page 5: ...infants toddlers from touching hot surfaces Even after the appliance is out the glass and or screen will remain hot for an extended period of time Check with your local hearth specialty dealer for sa...

Page 6: ...oins 9 du sol au bas de la vitre ou 4 avec une valeur R 2 957 pour le Canada ou 6 avec une valeur R 2 957 pour les USA Safety Information Informations Sur La S curit Listed by Manufactured by Sparther...

Page 7: ...n Schenkels Allgemeintoleranzen nach DIN 7168 mittel 2000 4000 1000 2000 400 1000 120 400 30 120 6 30 6 u0 2 u0 3 u0 5 u0 8 u1 2 u2 0 u0 1 Abma e Nennma Material KAMINKASSETTEN_700 Ersetz durch Zchg E...

Page 8: ...r wood burning appliance should be designed with the least amount of restriction possible to enable the exhaust products to easily flow through it Chimney vent systems that are too short or too long r...

Page 9: ...directly to the unit you need to have the right separate combustion air connector 5 Fix the connector directly to the unit Grills The combustion air ducts will be protected at the outside by a grill...

Page 10: ...let 3 INSTALLATION PLANNING WARNING WEAR GLOVES AND SAFETY GLASSES FOR PROTEC TION CAREFULLY FOLLOW THE INSTRUCTIONS FOR ASSEMBLY OF THE PIPE AND OTHER PARTS NEEDED TO INSTALL THE APPLIANCE FAILURE TO...

Page 11: ...2 9441 0 Fax 0 54 22 9441 14 A B C D IMPORTANT COMPLETE FRONT CHASE MUST BE NON COMBUSTIBLE The floor in front of the fireplace requires ember protection This protection must be non combustible Also t...

Page 12: ...he unit Use only an chimney certified as UL 103HT or ULC S 629 The dimensions and positioning of the different air inlet and outlet are available in the table in chapter dimensions ZC FIREPLACE 600 A...

Page 13: ...13 ZC FIREPLACE 700 A 29 5 8 752mm B 1 2 13mm C 1 5 8 41mm D 9 1 4 or 4 1 2 with R value 2 957 in Canada or 6 1 2 with R value 2 957 in USA...

Page 14: ...com bustible material is required In front of the unit the hearth extension must extend 6 on each side 8 in Canada The non combustible material that is used must be UL 1618 ember protection or in Can...

Page 15: ...door 18 US 457mm Canada 16 US 406mm Canada Heart extension to the side of fuel loading door 8 US 200mm Canada 6 US 152mm Canada Hearth material or R value for hearth material Non combustible material...

Page 16: ...ving the chimney supported by the supports The maximum chimney length that should be supported by the fireplace is 9 ft 2 75 m for 2 solid pack chimney and 12 ft 3 7 m for 1 sol id pack Chimney The ch...

Page 17: ...will pass At the attic level install an attic radiation shield from above 3 Follow the chimney s manufacturers instructions and place the first chimney length on the fireplace For all chimneys you mu...

Page 18: ...INSTALLATIONS fireplace chimney section radiant shield attic radiation shield flashing storm collar rain cap chimney section basement 1st floor attic elbow elbow wall radiation shield radiation shiel...

Page 19: ...19...

Page 20: ...in an unsatisfactory burn Remember it is more efficient to burn medium sized wood briskly and refuel frequently than to load the appliance with large logs that result in a smouldering inefficient fir...

Page 21: ...not used there is a risk of BURNS A Air supply open when lighting the fire or adding new wood The control lever is pushed completely to the right The firebox will now receive the maximum volume of co...

Page 22: ...d has cracks in the end grain Cut the wood so that it will fit horizontally front to back making for easier loading and less of a likelihood that the wood will roll onto the glass Manufactured firelog...

Page 23: ...n Volume of wood to add per hour 11 When the wood has been completely burnt and only embers are remaining from the initial wood added to the fire new wood can now be added as required hard wood is ide...

Page 24: ...uation and a place outside for everyone to meet Prepare to evacuate to ensure everyone s safety Close air control on appliance Call local fire department Have a fire extin guisher handy Contact local...

Page 25: ...or vinegar and towel to clean If not cleaned properly before operating for the first time the marks can cause permanent blemishes on the plating After the plating is cured the fingerprints and oils wi...

Page 26: ...aft Add more pipe Let air stabilize before opening door Ensure baffles are positioned correctly Negative pressure Open a window near the appliance Appliance emits odour Paint curing See GENERAL INSTRU...

Page 27: ...or overload the elevating mechanism If the installation instructions are not correctly fol lowed resulting in overheating of the pulleys and bearings the seals Reduced sealing due to thermal stress a...

Page 28: ...28 10 6 FOR YOUR INFORMATION...

Page 29: ...29 11 SERVICE HISTORY Appliance Service History This heater must be serviced annually depending on usage Date Dealer Name Service Technician Name Service Performed Special Concerns...

Page 30: ...PARTHERM A1 SP US CA 04 2021 THE GLOBAL BRAND FOR YOUR LIVING ROOM Your specialist dealer Spartherm Feuerungstechnik GmbH Maschweg 38 49324 Melle Phone 49 5422 9441 0 Fax 49 5422 9441 14 www spartherm...

Reviews: