background image

8

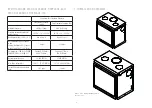
2.3 SPECIFICATION

Conversion Factors
Inches to millimeters (mm):  1’’ = 25.4 mm
British Thermal Unit BTU/h to Watt: 1BTU/h  = 
0.293 Watt
Kilogramm to Pound: 1kg = 2.205 lb
Cubicmeter to cubicfeet:

1m3 = 35.314 ft

3


2.4 GENERAL INSTRUCTIONS

WARNING

THIS APPLIANCE HAS NOT BEEN TESTED WITH 
ANY VENTED OR UNVENTED GAS LOG SET: TO 
REDUCE RISK OF FIRE OR PREVENT INJURY, DO 
NOT INSTALL A VENTED OR UNVENTED GAS LOG 
SET INTO THE APPLIANCE.

DO NOT CONNECT THIS APPLIANCE TO A CHIMNEY FLUE 
SERVING ANOTHER APPLIANCE.

This appliance and the components ARE DESIGNED TO BE 
INSTALLED AND OPERATED AS A SYSTEM. ANY ALTER-
ATION TO OR SUBSTITUTION FOR ITEMS IN THIS SYSTEM, 
UNLESS ALLOWED BY THESE INSTALLATION INSTRUC-
TIONS, WILL VOID THE LISTING AND MAY VOID THE PROD-
UCT WARRANTY. IT MAY ALSO CREATE A HAZARDOUS 
INSTALLATION. READ THROUGH THESE INSTRUCTIONS 
THROUGHLY BEFORE STARTING YOUR INSTALLATION AND 
FOLLOW THEM CAREFULLY THROUGHOUT YOUR PROJECT.

•  Before beginning your installation, consult with 

your local building code agency or fire officials and 
insurance representative to ensure compliance.

•  Non-toxic smoke will be emitted during the paint 

curing process, to help dissipate the smoke open a 
window near the appliance.

•  Remove any dust or debris off the top of the appli-

ance before firing the appliance as the paint will 
become soft as the appliance heats up and will 
harden as the appliance cures. To cure the paint on 
your appliance burn your appliance moderately hot 
during the first few fires.

•  To keep the gasket from sticking to the appliance 

as the paint is curing, periodically open the door 
every 5-10 minutes.

•  For the first two weeks use generous amounts 

of fuel and burn the appliance for an hour as the 
appliance goes through a process of eliminating 

moisture in the steel and refractory bricks. The ini-
tial heat output will be reduced while the moisture 
is being drawn from the appliance and it will be 
necessary to build several hot fires to remove this 
moisture. DURING THIS PROCESS DO NOT OVER-
FIRE THE APPLIANCE. 

2.5 GENERAL INFORMATION

The chimney vent system used on your wood burning 
appliance should be designed with the least amount 
of restriction possible to enable the exhaust products 
to easily flow through it. Chimney vent systems that 
are too short or too long (refer to point 4.3 ”chimney 
installation”) can also have an adverse affect on the 
flow of exhaust through it. The wood burning appli-
ance and chimney vent system also require a suffi-
cient supply of combustion air not only to support the 
combustion in the combustion chamber but to replace 
the exhaust leaving it so it can flow freely up through 
the vent system and out into the atmosphere. It is the 
correct balance of combustion air and the chimney 
vent system that will ensure the appliance provides 
you with its optimum performance.

Be sure to provide sufficient combustion air. There are 
many other appliances in your home competing for 
air such as a kitchen range hood, forced air heating 
devices or a bathroom exhaust fan.

Expansion / contraction noises during heating up and 
cooling down cycles are normal and to be expected.  
 
After extended periods of non-operation such as 
following a vacation or a warm weather season, the 
appliance may emit a slight odour for a few hours. This 
is caused by dust particles on the firebox burning off. 
Open a window to sufficiently ventilate the room.

CALIFORNIA PROP 65 WARNING:
Use of this product may produce smoke which contains 
chemicals known to the State of California to cause 
cancer, birth defects, or other reproductive harm.

If you experience smoking problems, you may need 
to open a door, a window or otherwise provide some 
method of supplying combustion air to the appliance.


CAUTION:

These modules are not certified for gas log sets.

We suggest that our woodburning hearth products 
be installed and serviced by professionals who are 
certified in the U.S. by the National Fireplace 
Institute® (NFI) as NFI Woodburning Specialists or 
who are certified in Canada by 
Wood Energy Technical 
Training (WETT).

Fire chamber 

volume

Minimum Power 

Maximum power 

Efficiency*

Chimney type

Unit weight 

ideal fuel size

ZC 

FIREPLACE-600

0,95 ft

3


10 613 BTU/h

47 417 BTU/h

70.29 %

USA: 6”x2” + USA 

6”+7” HT2100

CANADA: 6”x1”

265lbs / 120kg

17"

ZC 

FIREPLACE-700

1,58 ft

3


13 129 BTU/h

49,000 BTU/h

66.77 %

USA: 6”x2” + USA 

6”+7” HT2100

CANADA: 7”x1” only

298lbs / 135kg

21"

Summary of Contents for 600-ZC

Page 1: ...t it is easy to refer to it Spartherm Feuerungstechnik GmbH Maschweg 38 49324 Melle Phone 49 5422 9441 0 Fax 49 5422 9441 14 www spartherm com The Spartherm Zero Clearnace fireplaces have been tested...

Page 2: ...grate or otherwise raise the fire At least 14 square inches 90 3 square centime ters of outside air must be admitted to the room or directly to the unit through a 5 127mm diameter pipe Failure to pro...

Page 3: ...MAINTENANCE 21 ASH REMOVAL PROCEDURES 22 CREOSOTE FORMATION AND REMOVAL 22 RUNAWAY OR CHIMNEY FIRE 22 CHIMNEY CLEANING 22 GLASS REPLACEMENT 22 CARE OF GLASS 22 CLEANING THE GLASS CERAMIC SHEET 23 CAR...

Page 4: ...erior Width depth height inches 25 5 16 19 23 5 16 29 1 4 20 25 5 16 Heating capacity at 20 C 4 F App m sq ft App m sq ft Recommended amount of wood when fueling lbs kg wood 2 3 logs of wood of app 18...

Page 5: ...infants toddlers from touching hot surfaces Even after the appliance is out the glass and or screen will remain hot for an extended period of time Check with your local hearth specialty dealer for sa...

Page 6: ...oins 9 du sol au bas de la vitre ou 4 avec une valeur R 2 957 pour le Canada ou 6 avec une valeur R 2 957 pour les USA Safety Information Informations Sur La S curit Listed by Manufactured by Sparther...

Page 7: ...n Schenkels Allgemeintoleranzen nach DIN 7168 mittel 2000 4000 1000 2000 400 1000 120 400 30 120 6 30 6 u0 2 u0 3 u0 5 u0 8 u1 2 u2 0 u0 1 Abma e Nennma Material KAMINKASSETTEN_700 Ersetz durch Zchg E...

Page 8: ...r wood burning appliance should be designed with the least amount of restriction possible to enable the exhaust products to easily flow through it Chimney vent systems that are too short or too long r...

Page 9: ...directly to the unit you need to have the right separate combustion air connector 5 Fix the connector directly to the unit Grills The combustion air ducts will be protected at the outside by a grill...

Page 10: ...let 3 INSTALLATION PLANNING WARNING WEAR GLOVES AND SAFETY GLASSES FOR PROTEC TION CAREFULLY FOLLOW THE INSTRUCTIONS FOR ASSEMBLY OF THE PIPE AND OTHER PARTS NEEDED TO INSTALL THE APPLIANCE FAILURE TO...

Page 11: ...2 9441 0 Fax 0 54 22 9441 14 A B C D IMPORTANT COMPLETE FRONT CHASE MUST BE NON COMBUSTIBLE The floor in front of the fireplace requires ember protection This protection must be non combustible Also t...

Page 12: ...he unit Use only an chimney certified as UL 103HT or ULC S 629 The dimensions and positioning of the different air inlet and outlet are available in the table in chapter dimensions ZC FIREPLACE 600 A...

Page 13: ...13 ZC FIREPLACE 700 A 29 5 8 752mm B 1 2 13mm C 1 5 8 41mm D 9 1 4 or 4 1 2 with R value 2 957 in Canada or 6 1 2 with R value 2 957 in USA...

Page 14: ...com bustible material is required In front of the unit the hearth extension must extend 6 on each side 8 in Canada The non combustible material that is used must be UL 1618 ember protection or in Can...

Page 15: ...door 18 US 457mm Canada 16 US 406mm Canada Heart extension to the side of fuel loading door 8 US 200mm Canada 6 US 152mm Canada Hearth material or R value for hearth material Non combustible material...

Page 16: ...ving the chimney supported by the supports The maximum chimney length that should be supported by the fireplace is 9 ft 2 75 m for 2 solid pack chimney and 12 ft 3 7 m for 1 sol id pack Chimney The ch...

Page 17: ...will pass At the attic level install an attic radiation shield from above 3 Follow the chimney s manufacturers instructions and place the first chimney length on the fireplace For all chimneys you mu...

Page 18: ...INSTALLATIONS fireplace chimney section radiant shield attic radiation shield flashing storm collar rain cap chimney section basement 1st floor attic elbow elbow wall radiation shield radiation shiel...

Page 19: ...19...

Page 20: ...in an unsatisfactory burn Remember it is more efficient to burn medium sized wood briskly and refuel frequently than to load the appliance with large logs that result in a smouldering inefficient fir...

Page 21: ...not used there is a risk of BURNS A Air supply open when lighting the fire or adding new wood The control lever is pushed completely to the right The firebox will now receive the maximum volume of co...

Page 22: ...d has cracks in the end grain Cut the wood so that it will fit horizontally front to back making for easier loading and less of a likelihood that the wood will roll onto the glass Manufactured firelog...

Page 23: ...n Volume of wood to add per hour 11 When the wood has been completely burnt and only embers are remaining from the initial wood added to the fire new wood can now be added as required hard wood is ide...

Page 24: ...uation and a place outside for everyone to meet Prepare to evacuate to ensure everyone s safety Close air control on appliance Call local fire department Have a fire extin guisher handy Contact local...

Page 25: ...or vinegar and towel to clean If not cleaned properly before operating for the first time the marks can cause permanent blemishes on the plating After the plating is cured the fingerprints and oils wi...

Page 26: ...aft Add more pipe Let air stabilize before opening door Ensure baffles are positioned correctly Negative pressure Open a window near the appliance Appliance emits odour Paint curing See GENERAL INSTRU...

Page 27: ...or overload the elevating mechanism If the installation instructions are not correctly fol lowed resulting in overheating of the pulleys and bearings the seals Reduced sealing due to thermal stress a...

Page 28: ...28 10 6 FOR YOUR INFORMATION...

Page 29: ...29 11 SERVICE HISTORY Appliance Service History This heater must be serviced annually depending on usage Date Dealer Name Service Technician Name Service Performed Special Concerns...

Page 30: ...PARTHERM A1 SP US CA 04 2021 THE GLOBAL BRAND FOR YOUR LIVING ROOM Your specialist dealer Spartherm Feuerungstechnik GmbH Maschweg 38 49324 Melle Phone 49 5422 9441 0 Fax 49 5422 9441 14 www spartherm...

Reviews: