background image

GB

GB

 17

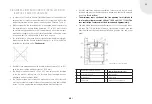
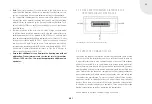
6.  Place the glass panes supplied in the bushes in the top side. (Fig. 5)
7.  Plug the mains power unit into a socket.

Important notes for assembly and setup

•  No gradients are permitted on the pipework of the drain hose.
•  The drain hose must not exhibit a U shape.
•  The ethanol canister must be set up at least 0.5 metres below the 

burner, and not more than 4 metres below it.

3.4.2 STARTING THE EBIOS-FIRE 

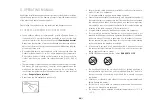
1.  Actuate the switch on top of the appliance. This establishes operational 

readiness. You can shut down the appliance at any time with this switch. 
(Fig. 6)

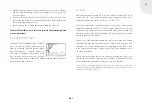
2.  To do this, press the top button on the remote control (Fig. 7). To shut it 

down, press this button once again.

3.  The red illuminated ring on the switch on the top of the burner lights 

up. The burner then beeps twice briefly, then starts the filling process. 
Initially, the ethanol collects in the middle of the burner channel. Once it 
reaches the right level, it can be ignited. Wait until the pumping action 
has stopped and for the end of the ignition interval.


  Never bend with your head directly over the burner channel, especially 

not during the ignition phase.


  Keep a safe distance of 1 metre away until the appliance has ignited 

the fuel.


  Initially, the flames are scarcely visible, especially while the fuel is 

still cold. As the burner channel heats up, the flames get higher and 
brighter.

4.  If the level when hot is significantly higher at one end of the burner 

channel than it is at the other end, it must be adjusted using an Allen 
key on the adjusting screws on the frame.


  Never perform adjustments while the appliance is lit. Never bend 

directly over the burner channel.

Fig. 6

Fig. 7

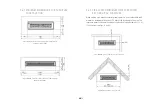
Fig. 1

Fig. 2

2

3

1

1

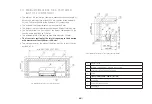
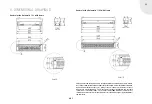
Low-voltage connector

2

Fuel connection

3

Overflow

Fig. 3

Fig. 4

Fig. 5

Summary of Contents for Ebios-Fire Quadra Inside Automatic I SL

Page 1: ...Installation and Operating Manual ebios fire Quadra Inside Automatic I II SL...

Page 2: ...s we offer you first class products that connect emotionally and will inspire feelings such as a feeling of secu rity safety and comfort To achieve this we recommend that you read the operating instru...

Page 3: ...mbly and Setup 16 3 4 2 Starting the ebios fire 17 3 4 3 Checking during initial commissioning 18 3 5 Topping up replacing fuel 19 3 6 Extended periods of downtime 19 4 Maintenance cleaning and care 1...

Page 4: ...ENERAL INFORMATION Small children older or frail persons as is the case with all naked flames it makes sense to install a safety device for these groups of people Danger of burn injuries Never leave p...

Page 5: ...n high local temperatures when burnt Please also note that the luminosity of the flame can decrease to such an extent that the flame is no longer clearly visible Make children and others in the home a...

Page 6: ...Inside Automatic I SL Quadra Inside Automatic II SL Fuel type Bioethanol ethanol content 96 Fuel consumption approx 0 5 l hr approx 1 0 l hr Combustion power 3300 W 6600 W Minimum room volume per bur...

Page 7: ...quid fires fire class B Important notice In Switzerland special specifications apply to the hourly rate of fuel consumption Please inform yourself in advance of local provisions 2 4 INSTALLATION LOCAT...

Page 8: ...e is absolutely balanced IMPORTANT Any failure to observe this point can cause the burner channel to overflow The Allen screws in the corners of the installation frame are there to level the entire ap...

Page 9: ...side Automatic I SL or II SL may only ever be installed in the top plate or table plate of a furniture item example bureau sideboard pull out cabinet table The furniture items must always be anchored...

Page 10: ...ce of 150 mm at the back and to the side The reference point is the outside edge of the Quadra Inside Automatic I SL or II SL housing see Figs 4 and 5 Fig 4 Minimum distances from the non combustible...

Page 11: ...must NOT be sealed by means of a fire door All inlet apertures and rear ventilation features must be left unob structed and must not be blocked since otherwise a heat build up would take place Risk o...

Page 12: ...frame is defined as 150 mm The minimum width of the housing area base measures 300 mm The free cross section for the inlet air opening in the housing area measures at least 200 cm2 400 cm2 The storag...

Page 13: ...ditional air can flow into the housing area without obstruction Free minimum cross section for inlet air measures 200 cm2 400 cm2 For this provide appropriate additional air apertures 2 7 2 FIRE SAFET...

Page 14: ...ed for the Quadra Inside Auto matic I SL and II SL appliances It is recommended to open a window during operation Several decorative ethanol fireplaces may only be operated together if the combined fu...

Page 15: ...om specialist dealers It is a hazardous substance as per ADR Class 3 PG II UN 1170 Under no circumstances should other fuels such as petrol spirit or similar flammable liquids be used Do not mix the f...

Page 16: ...metal suc tion grommet should be on the base of the canister to ensure that the container can be emptied as completely as possible 5 Connect the suction hoses to the filler adapters using quick releas...

Page 17: ...twice briefly then starts the filling process Initially the ethanol collects in the middle of the burner channel Once it reaches the right level it can be ignited Wait until the pumping action has st...

Page 18: ...a short period If the fuel has not burned off by then switch off the appliance wait for 10 seconds then switch it back on again This then starts a new ignition sequence This can occur during initial...

Page 19: ...ver and cleaned As time passes different deposits can form into sediment in the burner channel When cold this sediment can be removed with a paintbrush nor mal brush or cloth then a vacuum cleaner can...

Page 20: ...anol in the burner channel After a short time ethanol combustion marks can form on surrounding sur faces and on the slotted cover plate You can wipe away this residue with a damp cloth or glass cleane...

Page 21: ...r tures comply with the specifications To prevent overheating the Quadra Inside Automatic I SL and II SL shuts down when housing temperatures rise too far The red light on the switch then starts to fl...

Page 22: ...Long beep with interrup tion LED signal LED off Overheating Audible signal Longer beep with a pause LED signal LED flashes alternat ing with the beep 350 operating hours of the pump reached after swit...

Page 23: ...euerungstechnik GmbH provides 24 months of warranty cover for all ebios fire appliances standalone and inserts Spartherm Feuerung stechnik GmbH grants a 6 month warranty on wearing parts in the fire a...

Page 24: ...f any statutory provisions acknowledged as taking precedence over the terms of this warranty all necessary repair works demonstrably resulting from material or manufacturing defects shall be carried o...

Page 25: ...ons 823 826 1004 of the German Commercial Code BGB Unauthorised reproduction dissemination and copies wholly or in part shall be prosecuted in accordance with Sections 2 Paragraph Clause 7 96 ff and 1...

Page 26: ...o initial installation and before starting up the ebios Quadra Inside Automatic burner systems for the first time We recommend if you build your own fireplace systems that you meas ure operating tempe...

Page 27: ...he ebios Quadra Inside Automatic Burner and to present these instructions to the opera tor at the time of handover of the decorative fireplace The signatory undertakes to provide the operator with det...

Page 28: ...k van wereldformaat voor uw woonkamer wiatowa marka do Pa stwa salonu 1 D Ihr Fachh ndler UK Your specialist dealer F Votre revendeur sp cialis IT Il vostro rivenditore specializzato E Sus comercios e...

Reviews: