background image

GB

GB

 13

4.4.2  SPECIAL PRECAUTIONS FOR THE FIRE PRO-

TECTION OF ADJACENT COMPONENTS CON-
STRUCTED OF FLAMMABLE MATERIALS

1.  A distance of at least 5 cm has to be maintained between built-in furniture 

(e.g. cupboards) and the fireplace cladding.

2.  A clearance of at least 1 cm is recommended for components with small 

contact areas (wall, floor or ceiling cladding). Wallpapers are not considered 
to be combustible construction materials.

3.  A  clearance of at least 80 cm must be maintained between the front and 

sides of the firebox opening and all flammable fixtures or built-in furniture 
units, unless stated otherwise in component-specific safety instructions.

4.  When arranging ventilated thermal radiation protection down both sides (S), 

a distance of just 40 cm is sufficient. The ventilated distance to the radiant 
heat protecting device must be (S) at least 2 cm.

2.  A clearance of at least 1 cm is recommended for components with small 

contact areas (wall, floor or ceiling cladding).

3.  A clearance of at least 80 cm must be maintained between the front and 

sides of the firebox opening and all flammable fixtures and built-in furniture 
items, unless stated otherwise in component-specific safety instructions.

4.  When arranging ventilated thermal radiation protection down both sides (S), 

a distance of just 40 cm is sufficient. The ventilated distance to the radiant 
heat protecting device must be (S) at least 2 cm.

4.5  GLASS CLEANING CLEANING THE GLASS 

CERAMIC PANES ON SLIDING DOORS

All cleaning of the glass ceramic pane must be carried out while it is cold 
(fireplace unit not burning and cooled down, no hot ash in the combustion 
chamber).

40 cm

80 cm

2c

m

1 cm

5 cm

1

2

3

4

( S )

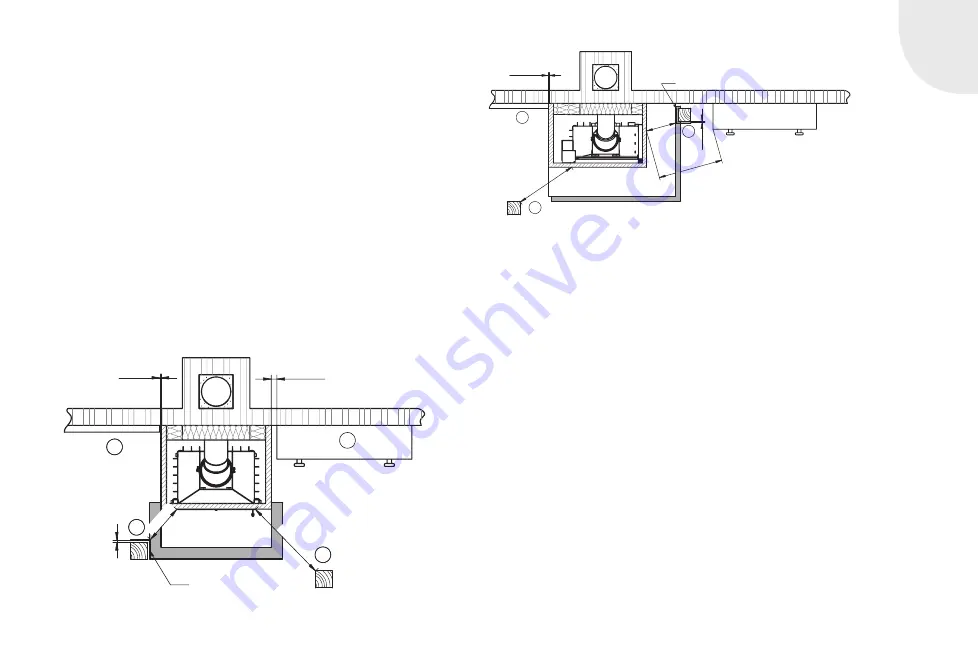
The figure illustrates a typical installation situation showing

a Varia 1V-51-4S and this applies for each fireplace unit.

2

3

4

40 cm

80 cm

1 cm

2c

m

80 cm

( S )

This Figure shows a typical installation situation for a Varia

2R-80h-4S and this applies to every fireplace insert.

Summary of Contents for PremiumEdition

Page 1: ...Operating Manual PremiumEdition Wood burning fireplace...

Page 2: ...feelings such as a feeling of security safety and comfort To achieve this we recommend that you read the operating instructions carefully in order to get a quick and comprehensive overview of your fi...

Page 3: ...doors 13 4 5 1 Glass cleaning of Premium fire places 2 sided 14 4 5 2 Glass cleaning of Premium fire places 3 sided 14 4 5 3 Glass cleaning of standard fireplaces with vertically oriented sliding door...

Page 4: ...e fire area must be connected to its own stack or chimney Note when a stack or chimney has multiple fireplaces connected to it it must be constructed and designed in the appropriate manner A distincti...

Page 5: ...ented Spartherm fireplace inserts are supplied without a self closing loading door while fireplace inserts with hinged doors are pro duced with a self closing loading door On vertically oriented slidi...

Page 6: ...ent types of wood all contain roughly the same amount of heat energy per net kg of wood mass However each type of wood has a different volume for a given weight because the cellular structure of the w...

Page 7: ...ith a Premium insert Example on Varia ASh 4S 2 with telescopically extending air adjustment lever damper Wood feed quantity based on the example of the Varia 1V 51 4S Nominal heat output 11 0 kW Wood...

Page 8: ...tom of the stack of wood Caution The important thing about this process is that it prevents rapid burn up in a downwards direction The lighting of firewood in fire areas and the correct stacking of th...

Page 9: ...ayers of initial firewood 5 Light a match and ignite the starting aids with it 6 Then close the door Depending on vacuum in the chimney it may prove helpful to leave the door on the fireplace insert a...

Page 10: ...tely to the right for a few minutes until that fresh firewood is burning brightly After adding fresh firewood never choke off the flow of combustion air Risk of explosion Never repeatedly put more tha...

Page 11: ...event a buildup of heat in the device the existing air outlet grilles or openings must be clear and open when a fire is being lit In the area of direct radiation from a fireplace insert a minimum dist...

Page 12: ...the direct radiant area from the effective combustion chamber opening must be protected out to 300 mm to left and right see Fig The figure illustrates a typical installation situation showing a Varia...

Page 13: ...at least 1 cm is recommended for components with small contact areas wall floor or ceiling cladding 3 A clearance of at least 80 cm must be maintained between the front and sides of the firebox openi...

Page 14: ...B completely by moving the levers 3 Tilt side glass for cleaning When closing proceed in reverse order 4 5 2 GLASS CLEANING OF PREMIUM FIRE PLACES 3 SIDED 1 Push door completely downwards 2 Unlock A B...

Page 15: ...d re check the upper lock to ensure that the locking mechanism is fully closed i e at its limit position Caution Whenopeningandclosingthedoor onlytouchthedoorframe Never exert pressure on the window p...

Page 16: ...irebox door replace the cold hand on the square nut close the door by pressing on the frame not on the glass and lock it by turning the cold hand fully downwards Do not forget to reset the slide rail...

Page 17: ...e with the operating instructions Closing the firebox door 1 Close the firebox door carefully lifting the door slightly while doing so and pressing it against the fixed position glass element 2 Lock t...

Page 18: ...f soot from burning in too much after approx 8 12 operating hours 5 4 CLEANING AND MAINTENANCE The fire area the hot gas draught and the flue should be cleaned at regular intervals Specifically whenev...

Page 19: ...necessary to shorten this lubrication interval Depending on the type of fireplace insert the door lock springs may be located below and or above the fire door In order to lubricate the lock you may u...

Page 20: ...ing high enough 2 1 3 The proper amount of wood per hour can be found in the technical data The chimney draught is too strong too weak Observe the situation The draught characteristics can be affected...

Page 21: ...smaller pieces of firewood The door has been opened too wide 3 3 Open the door slowly and carefully Excessively rapid burn up rate of wood consumption is too high The diameter of your stack of wood is...

Page 22: ...lling the products Our products must therefore only be installed and started up by specialist technical staff in compliance with current statutory provisions 7 2 WARRANTY PERIOD SCOPE The general warr...

Page 23: ...or ceramics Incorrect handling and or use Lack of maintenance Incorrect installation or connection of the appliance Failure to observe the installation and operating instructions Technical changes to...

Page 24: ...rmined that a product error is not covered by the warranty the costs of dispatch and transport of the product shall be borne by the consumer dealer In addition the consumer must bear the costs includi...

Page 25: ...FULFILMENT JURISDICTION AND APPLICABLE LAW This warranty is subject to German law to the exclusion of the UN Convention on the International Sale of Goods The place of performance for obligations ari...

Page 26: ...GB 26 NOTES...

Page 27: ...r wiatowa marka do Pa stwa salonu 1 D Ihr Fachh ndler UK Your specialist dealer F Votre revendeur sp cialis IT Il vostro rivenditore specializzato E Sus comercios especializados NL Uw vakhandelaar PL...

Reviews: