background image

GB

GB

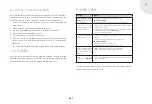
 7

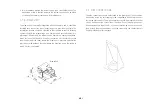
Blower  
connecting lead

Mains supply  
230 V 50 Hz

Temperature sensor with plug Control unit

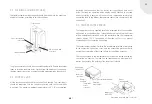
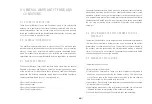
4.3. FLEXIBLE ALUMINIUM TUBES

The flexible aluminium tube supplied should be divided into the necessary 
number of sections according to on-site conditions.

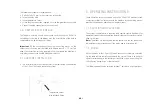
designing the covering so that the control unit is positioned near an air 
grille. That way, the operating status display can be checked at any time 
and accessibility is ensured. All the necessary components (mains plug, 
connecting lead to the blower, temperature sensor) are connected to this 
control unit.

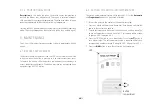
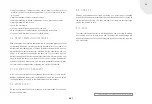
4.5. TEMPERATURE SENSOR

The temperature sensor supplied should be integrated into the convection 
air housing in a suitable position. It should be borne in mind that the blower 
will be automatically switched on by the controller when the temperature 
reaches approx. 105°C, irrespective of the mode set. This is to prevent 
overheating of the convection air housing.

The sensor length is approx. 2 metres. We recommend installing it from above 
in the convection air housing cover, near the connecting piece in order to 
ensure the accessibility of the screw fittings for installation purposes.

The connecting lead to the temperature sensor must be routed outside the 
convection air housing. The lead can be lengthened to a maximum of 4 
metres if necessary. The polarity of the lead is not relevant.

The pipe connections should be connected together with flexible aluminium 
tubes to form two separate trains. Starting from the blower unit, connect up 
two pipe connections using a separate flexible aluminium tube in each case. 

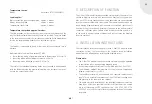
4.4. CONTROL UNIT

All the electronics are housed in the control unit housing. The control unit 
should be integrated into the fireplace covering such that accessibility 
is ensured. The maximum ambient temperature is 60°C. We recommend 

Quick-acting 
fine-wire F 2A

Acoustic signal transmitter

Temperature 
sensor 
connection

Blower 
connection

Mains plug 
connection 

Operating 
status display

Convection air

Pipe connection with 
cover plate 

flexible aluminium

Pipe connection with 

cover plate

Summary of Contents for S-Vent 100

Page 1: ...Installation and Operating Instruction S Vent 100 Modular forced convection system ...

Page 2: ... customers emo tions and speak to feelings such as security and comfort In order to be suc cessful we recommend that you read these installation instructions carefully in order to quickly become thoroughly familiar with the product In addition to information on how to install the product these instructions also contain important operating notes regarding fireplace insert safety and maintenance and...

Page 3: ...n 8 5 2 Modes 8 5 2 1 Manual Mode 9 5 2 2 Automatic Mode 9 5 2 3 Proportional Mode 10 6 Maintenance 10 6 1 Battery Replacement 10 6 2 Setting the Switch on Temperature 10 6 3 Setting the Radio Frequency 11 7 Cleaning 11 8 User Guide 11 9 General warranty terms and conditions 12 9 1 Scope Of Application 12 9 2 General Information 12 9 3 Warranty Period 12 9 4 Requirement of effectiveness for the wa...

Page 4: ...y and will carry out the acceptance test on your fireplace insert The fireplace insert must be installed connected to the chimney and oper ated in compliance with national and European standards the relevant national and local guidelines and regulations and in particular the relevant Heating Regulation FeuVO of the Federal state Germany and the Technical Rules of the Stove and Hot Air Heating Syst...

Page 5: ...enerated and either released into the room or distributed to other rooms The system can be used on any wood burning fireplace inserts with a square or chamfered convection air housing As the convection air housing is left open at the bottom natural convection still takes place Failure of the forced convection system e g in the event of a power failure or blower fault will not cause the fireplace i...

Page 6: ...rby room base ment etc near the fireplace If the hot convection air is delivered to other rooms apart from the room where the fireplace is pressure equalisation must be ensured between the room where the fireplace is and the rooms to which hot air is circulated 4 2 PIPE CONNECTIONS The pipe connections should be fastened to the lower part of the convection air housing using the self tapping screws...

Page 7: ...r length is approx 2 metres We recommend installing it from above in the convection air housing cover near the connecting piece in order to ensure the accessibility of the screw fittings for installation purposes The connecting lead to the temperature sensor must be routed outside the convection air housing The lead can be lengthened to a maximum of 4 metres if necessary The polarity of the lead i...

Page 8: ...ctioning and operation of the S Vent 100 forced convection system 5 OPERATING INSTRUCTIONS These operating instructions apply only to the S Vent 100 modular forced convection system The instructions in the fireplace insert operating manual must be followed when operating the fireplace insert 5 1 DESCRIPTION OF FUNCTION The system is operated via a separate radio remote control Readiness for operat...

Page 9: ... is reached the blower runs automatically at the preset speed The speed can be adjusted via the button as in Manual mode The blower switches off again when the temperature falls below the switch on temperature Pressing the AUT orange button on the remote control enables Automatic mode This is acknowledged by the control unit with a long audible signal The switch on temperature is factory set to ap...

Page 10: ...ry slide the battery compartment cover sideways to access the battery underneath The battery must always be replaced by an equivalent type A23 12V battery 6 2 SETTING THE SWITCH ON TEMPERATURE The switch on temperature factory set to approx 45 C for the Automatic and Proportional modes can be altered as follows 1 Turn off the power to the control unit remove mains plug 2 Press any button on the ma...

Page 11: ... display on the control unit does not light up Switch on at main switch or insert plug into socket Or call in a specialist Check the fine wire fuse and replace if necessary F2A 250V Control unit does not respond to commands from the remote control Replace remote control battery LED on remote control must light up when button is pressed Switch on at main switch or insert plug into socket The red op...

Page 12: ... galvanized surfaces caused by thermal stress or overload the elevating mechanism If the installation instructions are not correctly followed resulting in overheating of the pulleys and bearings the seals Reduced sealing due to thermal stress and hardening 9 GENERAL WARRANTY TERMS AND CONDITIONS 9 1 SCOPE OF APPLICATION These General Warranty Terms and Conditions apply to the relationship between ...

Page 13: ...ves the right either to rectify the defect or to replace the unit free of charge Remediation of defects shall take precedence This warranty undertaking expressly does not cover further compensation exceeding the statutory guarantee 9 7 EXTENSION OF WARRANTY In the case of performance in accordance with the terms of the warranty whether remediation of defects or replacement of a unit the warranty p...

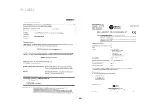
Page 14: ...GB 14 10 LABEL ...

Page 15: ...GB GB GB 15 NOTES ...

Page 16: ...kamer Światowa marka do Państwa salonu Торговая марка 1 для Вашего дома D Ihr Fachhändler UK Your specialist dealer F Votre revendeur spécialisé IT Il vostro rivenditore specializzato E Sus comercios especializados NL Uw vakhandelaar PL Państwa sprzedawca РУС Ваш дилер Spartherm Feuerungstechnik GmbH Maschweg 38 49324 Melle Germany Phone 49 5422 9441 0 Fax 49 5422 9441 14 www spartherm com D GB FR...

Reviews: