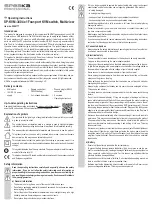
e) Hot keys
Key combination
Function
[*]+[1]
Switch to the first connected PC
[*]+[2]
Switch to the second connected PC
[*]+[3]
Switch to the third connected PC
[*]+[4]
Switch to the fourth connected PC
[*]+[5]
Switch to 4-in-1 mode
[*]+[0]
In 4-in-1 mode: Switch keyboard and mouse to sync mode
[*]+[S]
In 4-in-1 mode: Switch keyboard and mouse to through mode
[*]+[F1]
In 4-in-1 mode: Switch the keyboard, mouse and the USB2.0 inputs
to PC1
[*]+[F2]
In 4-in-1 mode: Switch the keyboard, mouse and the USB2.0 inputs
to PC2
[*]+[F3]
In 4-in-1 mode: Switch the keyboard, mouse and the USB2.0 inputs
to PC3
[*]+[F4]
In 4-in-1 mode: Switch the keyboard, mouse and the USB2.0 inputs
to PC4
[*]+[page up]
In 4-in-1 mode: Switch audio signal sources
[*]+[page down]
Switch to the next connected PC
Through/Sync mode
In 4-in-1 mode, there are 2 modes for the keyboard and mouse. The two modes work as
follows:
Through mode
In this mode, the mouse can move freely over the windows of all four connected PCs. You can
operate any of the connected PCs by moving the cursor to the corresponding window. The
keyboard and any connected USB 2.0 devices are switched to the PC on whose window the
mouse is currently located.
Sync mode
In this mode, the keyboard and mouse can work simultaneously on 4 PCs. USB 2.0 devices
remain connected to the PC which you last selected via the button.
Updating firmware
The product contains two control units (the STC and AX MCUs) that may require separate
updates.
The software and update code files will be provided by the supplier if necessary.
These contain all the necessary additional information.
If you receive updates for the product and want to upgrade the firmware, follow the steps below:
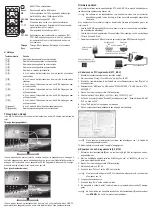
• Connect the RS232 connection (6) of the product to your PC via a serial connection cable
(see figure below).
• To do this, connect the supplied Phoenix plug (colour coding of the connections: TX=red,
G=black, RX=white)
• In addition, use a USB converter if your computer does not have a RS232 connection.
RS-232 SOCKETS ON AV-
PRO EDGE PRODUCTS
3 PIN PHOENIX
CONNECTOR
SOLDER SIDE
PLUG SIDE
* ONLY PIN 2, 3 AND 5 ARE USED
ON THE RS-232 PORT
TX
TX
RX
RX
GROUND GROUND
RS-232
RS-232 TO USB
CONTROL COMPUTER
a) Updating the STC control unit (STC_MCU)
1. Switch the function switch on the front to Up1.
2. Start the "stc-isp-15xx-v6.86i.exe" software.
3. Right-click in the title bar of the software window and select "English" from the pop-up
menu.
4. Under "MCU type", select the "STC90L" MCU mode. The MCU series is "STC-
9".
5. Select the COM connection used by the product.
6. Open the "hdmi_it6604_vs4210_dvi_hdcp_20200401_3.hex" file.
7. Click the three check boxes "Enable 6T(double-speed) mode", "Enable 6internal XRAM"
and "ALE pin used as P4.5".
8. Click "Re-Program" to access the upgrade.
9. Then connect the DC power supply and start the update.
If the update does not start, check all steps from 1-8. Reconnect the DC power
supply.
10. "complete" will be shown when the update is complete.
b) Updating the AX control unit (AX_MCU)
1. Switch the function switch (8) on the front to Up2. Connect the DC power supply.
2. Start the appropriate upgrade software "ax6800xisp_x64.exe" or "ax6800xisp_x32.exe"
depending on your current Windows version.
3. Select the COM connection used by the product.
4. Set the baud rate to 921.6 k.
5. Click the "Connect" button to connect the MCU.
If you cannot connect to the MCU, check all steps from 1-4.
6. Add the code files.
7. Click the "burn" button to start the update.
8. "Runtime firmware is programmed successfully" will be displayed when the update is com-
plete.
When the update is complete, turn the function switch (8) on the front to NORMAL.
You can now use the product again.
Care and cleaning
• Before cleaning, disconnect the product from the connected devices and disconnect the
mains adapter from the socket.
• This product does not contain any components that require maintenance. Never attempt to
open or disassemble it.
• Never use aggressive detergents, rubbing alcohol or other chemical solutions, as these
may damage the enclosure or cause the product to malfunction.
• Use a clean, dry, lint-free, soft cloth to clean the product. Do not press too hard on the
enclosure, as this can lead to scratch marks.


