This is a publication by Conrad Electronic SE, Klaus-Conrad-Str. 1, D-92240 Hirschau (www.conrad.com).
All rights including translation reserved. Reproduction by any method (e.g. photocopying, microfilming or capture in
electronic data processing systems) requires prior written approval from the editor. Reprinting, also in part, is prohibited.
This publication represent the technical status at the time of printing.
Copyright 2018 by Conrad Electronic SE.
*1587571_v1_0418_02_IPL_m_en
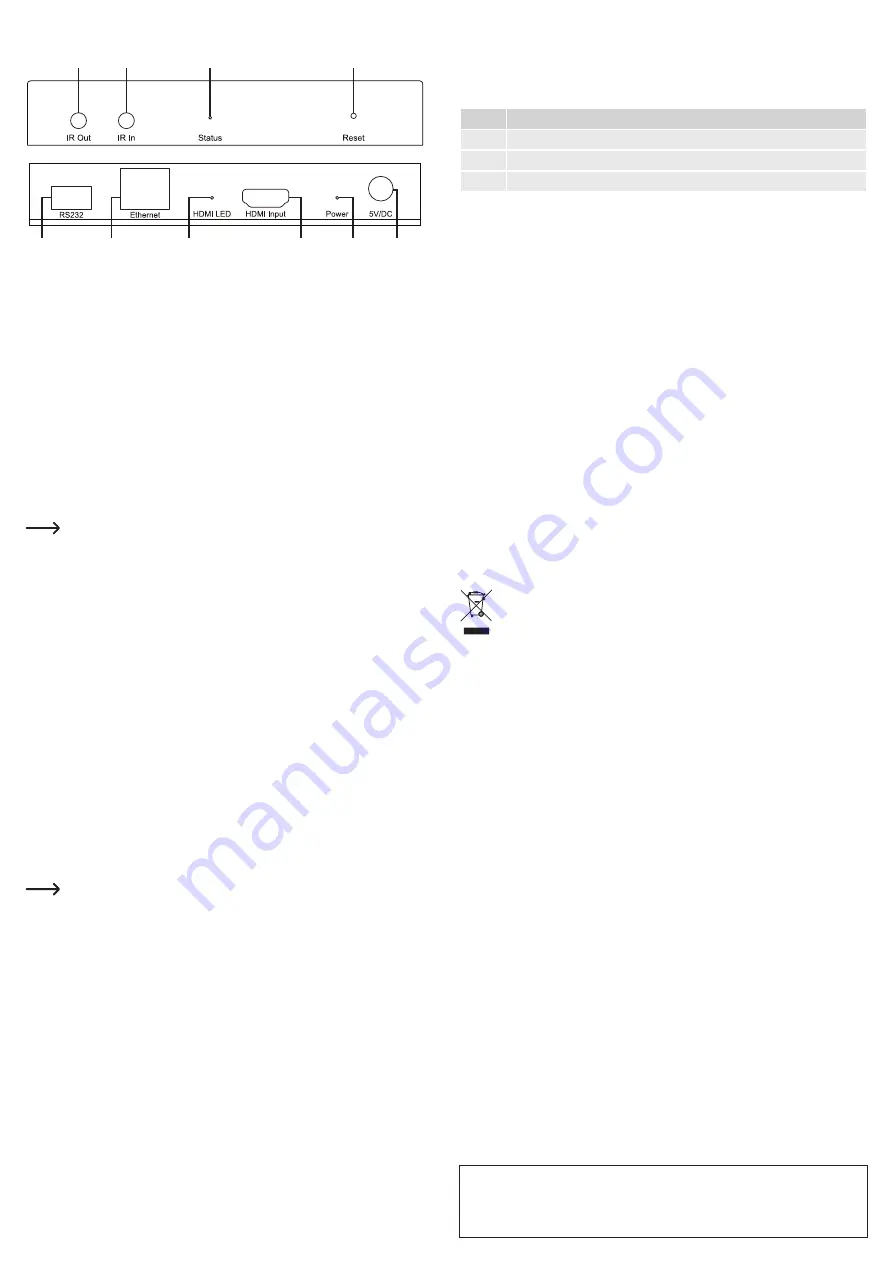
Product overview
1
10
9
8
7
6
5
2
3
4
1 IR Out socket
2 IR In socket
3 LED indicator Status
4 Reset button
5 5V/DC socket
6 Indicator LED Power
7 HDMI Input socket (transmitter)
HDMI Output socket (receiver)
8 LED indicator HDMI
9 Ethernet socket
10 RS232 interface
Installation
• If necessary, attach the mounting brackets on both sides of the product with the screws
provided. You can use the brackets to mount the product, for example, on a wall or under a
table top.
• To fasten the brackets to the mounting surface, you need additional mounting materials (e.g.
screws and plugs; not included).
Connection
Note the label on the top side to differentiate the receiver (labelled: RECEIVER) and
the transmitter (labelled: SENDER).
Use a Cat 5e or Cat 6 network cable with a length of up to 120 m.
The enclosed IR transmitter and IR receiver make it possible to transfer IR signals
via a network cable from the receiver to the transmitter and vice-versa.
If you are in the vicinity of the receiver, you can control the HDMI device connected
to the transmitter with the remote control.
If you are in the vicinity of the transmitter, you can control the HDMI device connected
to the receiver with its remote control.
• First switch off all devices to be connected.
• Connect a monitor or projector with the HDMI Output socket on the receiver.
• Connect a playback device (e.g. Blu-ray player) to the HDMI Input socket on the transmitter.
• Connect the jack plugs of both large IR receivers with the IR In socket on both devices.
• Connect the jack plugs of both small IR transmitters with the IR Out socket on both devices.
Place the IR transmitter so that the rounded tip points in the direction of the HDMI devices.
• You can connect two RS232 devices with the RS232 sockets (e.g. surveillance camera with
the transmitter, computer with receiver).
• Connect the network cable to the Ethernet socket on both devices.
• Connect the DC plug of both power supplies with the 5V/DC socket on both devices. Secure
the connection with the nut.
If you have several identical receivers, you can connect them with the transmitter via
an optional switch or router.
Operation
• Connect both power adapters with a standard household mains socket.
• Turn on the playback device (e.g. Blu-ray player).
• Turn on the monitor or projector.
• Start playback.
Reset
To reset the transmitter or receiver to factory settings, press and hold the Reset button for
10 seconds.
LED signals
LED
Meaning
Status
This LED indicates the status of the transmitter or receiver.
HDMI
This LED lights up when an HDMI device is connected.
Power
This LED lights up when the transmitter or receiver is supplied with power.
Troubleshooting
No image
• Turn all devices on.
• Check all cable connections.
• Select the correct input on the television.
• Use high-quality HDMI cables.
• Disconnect the transmitter from the power supply for a few seconds.
HDMI device does not respond to the IR remote control
• Relocate or realign the IR transmitter and IR receiver.
• The product is incompatible with the used IR transfer protocol of your IR remote control.
• Press and hold the relevant button of your IR remote control longer than usual for testing.
Care and cleaning
• Before cleaning, disconnect the product from the connected devices and disconnect the
mains adapter from the socket.
• This product does not contain any components that require maintenance. Never attempt to
open or disassemble it.
• Never use aggressive detergents, rubbing alcohol or other chemical solutions, as these may
damage the casing or cause the product to malfunction.
• Use a dry, lint-free cloth to clean the product.
Disposal
Electronic devices are recyclable waste and must not be placed in household waste.
Always dispose of the product according to the relevant statutory regulations.
You thus fulfil your statutory obligations and contribute to protection of the
environment.
Technical data
a) Transmitter/receiver
Operating voltage ......................... 5 V/DC
Supported resolution .................... max. 1080p (60 Hz)
Suitable network cable ................. CAT 5e/6, max. 120 m, RJ45 plug
IR frequency ................................. 38 – 56 kHz
Baud rate ...................................... max. 115200
Operating conditions ..................... 0 to +40 °C, 5 – 90 % RH
Storage conditions ........................ -20 to +60 °C, 5 – 90 % RH
b) Power adapter
Input voltage ................................. 100 – 240 V/AC, 50/60 Hz
Output voltage .............................. 5 V/DC
Output current ............................... 2 A


