background image

4

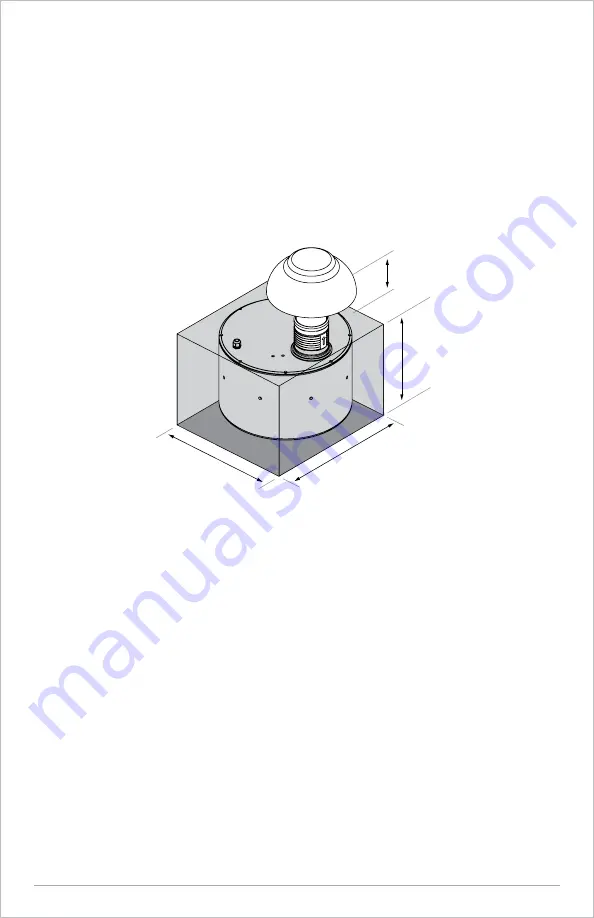
19-22”
Hole Depth

16”
Hole Depth

16”
Long

16”
Wide

40” Long

24” Wide

5-7” Above 

Ground Level

5-7” Above 
Ground Level

10” BURIAL SUBWOOFER

HOLE DIMENSIONS

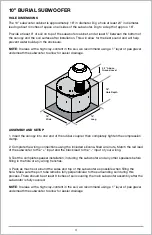
The 10” subwoofer cabinet is approximately 16” in diameter. Dig a hole at least 24” in diameter, 
leaving about 4 inches of space on all sides of the subwoofer. Dig to a depth of approx. 16”.

Provide at least 3” of soil on top of the subwoofer cabinet, and at least 5” between the bottom of 
the canopy and the soil surface after installation. This will allow for the best sound and will help 
prevent water buildup in the enclosure.

NOTE

: In areas with a high clay-content in the soil, we recommend using a 1” layer of pea gravel 

underneath the subwoofer to allow for easier drainage.

ASSEMBLY AND SETUP

1. Insert the canopy into one end of the rubber coupler, then completely tighten the compression 
clamp.

2. Complete the wiring connections using the included silicone-filled wire nuts. Match the red lead 
of the subwoofer to the “+” input and the black lead to the “-“ input of your wiring.

3. Test the complete speaker installation, including the subwoofer and any other speakers before 
filling in the hole or any wiring trenches.

4. Pack as much soil around the sides and top of the subwoofer as possible when filling the 
hole. Make sure the port tube remains fully perpendicular to the surrounding soil during this 
process. There should be at least 3 inches of soil covering the main subwoofer assembly after the 
subwoofer is fully covered.

NOTE

: In areas with a high clay-content in the soil, we recommend using a 1” layer of pea gravel 

underneath the subwoofer to allow for easier drainage

Summary of Contents for SC-BT-10

Page 1: ...4 Gauge Up to 200 ft 61m 12 Gauge Up to 400 ft 122m 10 Gauge Up to 650 ft 198m CONTENTS 10 Burial Subwoofer 1 Burial Subwoofer with Direct Burial Cable Attached 2 Silicone Filled Wire Connectors 12 Bu...

Page 2: ...akers for proper blending As a guideline each subwoofer will provide coverage for between 1500 and 2500 square feet for the 10 and between 2000 and 3000 square feet for the 12 10 subs cover a 25 radiu...

Page 3: ...bow onto the opening of the subwoofer Make sure the subwoofer port opening and elbow are free of soil so that a proper seal can be made with the compression clamp The elbow must be fully seated over t...

Page 4: ...drainage ASSEMBLY AND SETUP 1 Insert the canopy into one end of the rubber coupler then completely tighten the compression clamp 2 Complete the wiring connections using the included silicone filled wi...

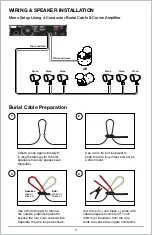
Page 5: ...Use a Wire Stripper to remove the outside protective jacket to expose the four color coded wires Separate the wire loops as shown Use a wire tie not included to keep the wire loop intact and act as a...

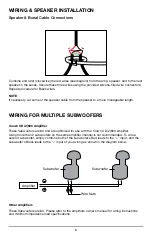
Page 6: ...eaker to a more manageable length WIRING FOR MULTIPLE SUBWOOFERS Crown CDi 2 600 Amplifier These Subwoofers are 8 and are optimized for use with the Crown CDi 2 600 amplifier Using more than 2 subwoof...

Page 7: ...damage constitutes abuse and is not covered by warranty Tone controls and equalizers can demand even more power from an amplifier lowering the point at which it produces clipping distortion Use them s...

Page 8: ...G WARRANTIES ARE EXCLUSIVE AND IN LIEU OF ALL OTHER EXPRESSED AND IMPLIED WARRANTIES Core Brands EXPRESSLY DISCLAIMS ALL SUCH OTHER WARRANTIES INCLUDING BUT NOT LIMITED TO IMPLIED WARRANTIES OF MERCHA...

Reviews: