background image

13

Helpline No: UK 0151 649 1500 / IRE 189 094 6244

around the end of the bar (Fig. 4B).

NOTE:

The saw chain may droop slightly on the lower

part of bar. This is normal.

4.

Pull the chain bar forward until the chain is closely
seated. Make sure that all the drive links are in
the groove of the bar.

5.

Fit the clutch cover and fasten it with 2 screws.
Make sure that the pivot (Fig. 3C/Item E) fits into
the chain bar (Fig. 3D/Item G). The chain must
not slip off the bar when you do this. Tighten the
two nuts by hand and then follow the instructions
for adjusting the tension in ADJUSTING THE
CHAIN TENSION. 

5.3 Saw chain tension adjustment 

Proper tension of saw chain is extremely important
and must be checked before starting, as well as
during any cutting operation.
Taking the time to make needed adjustments to the
saw chain will result in improved cutting performance
and prolonged chain life.


Warning:

Always wear heavy duty gloves when

handling saw chain or making saw chain adjustments.
1.

Before adjusting the chain tension screw you 
must slacken the 2x retaining nuts. Otherwise this 
will damage tension screw.

2.

Hold nose of guide bar up and turn adjustment
screw (D) CLOCKWISE to increase chain
tension. Turning screw COUNTERCLOCKWISE
will decrease amount of tension on chain. Ensure
the chain fits snugly all the way around the guide
bar (Fig. 5).

3.

After making adjustment, and while still holding
nose of bar in the uppermost position, tighten the
bar retaining nuts securely. Chain has proper
tension when it has a snug fit all around and can
be pulled around by gloved hand.

NOTE:

If chain is difficult to rotate on guide bar or if it

binds, too much tension has been applied. This
requires minor adjustment as follows:

A.

Loosen the bar retaining nut so they are finger
tight. Decrease tension by turning the bar
adjustment screw COUNTERCLOCKWISE
slowly. Move chain back and forth on bar.
Continue to adjust until chain rotates freely, but
fits snugly. Increase tension by turning bar
adjustment screw CLOCKWISE.

B.

When saw chain has proper tension, hold nose of
bar in the uppermost position and tighten the bar
retaining nut securely.


Caution:

A new saw chain stretches, requiring

adjustment after as few as 5 cuts. This is normal with
a new chain, and the interval between future
adjustments will lengthen quickly.


Caution: 

If the saw chain is TOO LOOSE or TOO

TAUT, the drive wheel, chain bar, chain and crank
shaft bearing will suffer premature wear. Fig. 6 shows
the correct tension A (when cold) and tension B
(when warm). Fig. C shows a chain that is too loose.

6.  Before starting the machine

6.1 Chain break mechanical test

Your chain saw is equipped with a Chain brake that
reduces possibility of injury due to kickback. The
brake is activated if pressure is applied against brake
lever when, as in the event of kickback, operator’s
hand strikes the lever. When the brake is actuated,
chain movement stops abruptly.


Warning: 

The purpose of the chain brake is to

reduce the possibility of injury due to kickback;
however, it cannot provide the intended measure of
protection if the saw is operated carelessly. Always
test the chain brake before using your saw and
periodically while on the job.

To test chain brake

1.

The Chain brake is DISENGAGED (chain can
move) when BRAKE LEVER IS PULLED BACK
AND LOCKED (Fig. 7A).

2.

The chain brake is ENGAGED (the chain is
locked) when the brake lever is pulled forward
and the mechanism (Fig. 7B/Item A) can be
seen. It should not be possible to move the chain
(Fig. 7B). 

NOTE:

The brake lever should snap into both

positions. If strong resistance is felt, or lever does not
move into either position, do not use your saw. Take it
immediately to a professional Service Center for
repair.

6.2 Fuel and lubrication

Fuel

Use regular grade unleaded fuel mixed with  50:1
custom 2-cycle engine oil for best results. 

Mixing fuel

Mix fuel with  2 cycle oil in an approved container. 
Shake gently and ensure thorough mix.

Summary of Contents for SPJCS 4040

Page 1: ...Operating instruction Petrol Chain Saw WARNING PLEASE READ THESE INSTRUCTIONS BEFORE OPERATING THIS UNIT KEEP THIS MANUAL FOR FUTURE REFERENCE SPJCS 4040 ...

Page 2: ...IRE 189 094 6244 Read and follow the operating instructions and safety information before using for the first time Always wear PPE Personal Protective Clothing Wear gloves Wear safety shoes Wear a safety helmet eye and ear protection ...

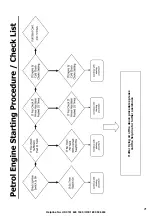
Page 3: ...throttle lever as far as it will go Note the amount of Choke will vary slightly depending on the weather conditions a small amount of experimentation is advised 6 Hold saw firmly and pull starter rapidly 4 times Engine should start 7 Let the engine run for 10 seconds to warm up Press the throttle lever briefly the engine will go to idling speed Note this quick start guide is intended for experienc...

Page 4: ...4 Helpline No UK 0151 649 1500 IRE 189 094 6244 2 10 6 7 11 14 1 9 19 20 4 3 18 16 13 17 15 12 8 1 5 2 B A D F G E 3A 3C 3D 3B 24 ...

Page 5: ...5 Helpline No UK 0151 649 1500 IRE 189 094 6244 A D B C 4A 4B B C A 6 D 5 7A 8 7B 9A B A C A I A 0 ...

Page 6: ...6 Helpline No UK 0151 649 1500 IRE 189 094 6244 10 11 A B 9B 9D B D A B C 9E 9C C 13 14 12 A B ...

Page 7: ...7 Helpline No UK 0151 649 1500 IRE 189 094 6244 16A 16B 15 17 18A 16C 19 18B 21A 21B 20 A A B C A B D C A ...

Page 8: ...8 Helpline No UK 0151 649 1500 IRE 189 094 6244 24 23 25 26 22 A 1 2 3 4 5 6 7 27 28 1 2 3 4 29 A B A A 30 A B C ...

Page 9: ...General safety instructions 10 2 Layout 12 3 Proper use 12 4 Environmental protection 12 5 Installation 12 6 Before starting the machine 13 7 Operation 14 8 Technical data 16 9 Maintenance 16 10 Storage 18 11 Waste disposal 19 12 Ordering spare parts 19 13 Troubleshooting 20 ...

Page 10: ... be carefully read before attempting to operate this unit Important Picture 1 2 3 Warns about a dangerous method of working that must not be used Picture 4 RECOMMENDED Recommended operation for safe sawing IMPORTANT 1 Beware of recoil 2 Do not hold the saw in one hand 3 Avoid contact with the tip of the rail chain return point RECOMMENDED 4 Hold the saw firmly with both hands Place your right hand...

Page 11: ... gases whether in or out of doors An explosion and or fire may result 20 Do not tank fuel oil or lubrication when the engine of chain saw is running 21 USE THE RIGHT TOOL Cut wood only Do not use the chain saw for purposes for which it was not intended For example do not use the chain saw for cutting plastic masonry or non building materials 22 The engine will create toxic exhaust fumes as soon as...

Page 12: ...l trees if you have received the appropriate training The manufacturer cannot be held liable for damage caused by improper or incorrect usage Please note that our equipment has not been designed for use in commercial trade or industrial applications Our warranty will be voided if the machine is used in commercial trade or industrial businesses or for equivalent purposes 4 Environmental protection ...

Page 13: ...in back and forth on bar Continue to adjust until chain rotates freely but fits snugly Increase tension by turning bar adjustment screw CLOCKWISE B When saw chain has proper tension hold nose of bar in the uppermost position and tighten the bar retaining nut securely Caution A new saw chain stretches requiring adjustment after as few as 5 cuts This is normal with a new chain and the interval betwe...

Page 14: ... B Fig 9B until it locks 3 Push the primer bulb C 10 times Fig 9C 4 Place saw on a firm flat surface Hold saw firmly as shown Pull starter rapidly 2 times Beware of moving chain Fig 9D 5 Push in the throttle lever B as far as it will go Fig 9B 6 Hold saw firmly and pull starter rapidly 4 times Engine should start Fig 9D 7 Let the engine run for 10 seconds to warm up Press the throttle lever D brie...

Page 15: ...to the hinge the tree should begin to fall When tree begins to fall remove saw from cut stop engine put chain saw down and leave area along retreat path Fig 11 Limbing Limbing a tree is the process of removing the branches from a fallen tree Do not remove supporting limbs A until after the log is bucked cut into lengths Fig 15 Branches under tension should be cut from the bottom up to avoid bindin...

Page 16: ...rning Activate the chain brake slowly and deliberately Keep the chain from touching anything don t let the saw tip forward 6 Chain should stop abruptly When it does immediately release the throttle trigger Warning If chain does not stop turn engine off and take your unit to the nearest Talon Authorized Service Center for service 7 If chain brake functions properly turn the engine off and return th...

Page 17: ...nose tip which is necessary for the efficient application of grease to the sprocket tip To lubricate sprocket tip Lubrication of the sprocket tip is recommended after 10 hours of use or once a week which ever occurs first Always thoroughly clean guide bar sprocket tip before lubrication Note The saw chain does not have to be removed in order to lubricate the teeth of the chain bar Lubrication is p...

Page 18: ... chain tension frequently and adjust as often as necessary to keep the chain snug on the bar but loose enough to be pulled around by hand see also point 5 3 Breaking in a new saw chain A new chain and bar will need chain readjustment after as few as 5 cuts This is normal during the break in period and the interval between future adjustments will begin to lengthen quickly Warning Never have more th...

Page 19: ...accessories are made of various types of material such as metal and plastic Defective components must be disposed of as special waste Ask your dealer or your local council 12 Ordering replacement parts Please quote the following data when ordering replacement parts Type of machine Article number of the machine Identification number of the machine Replacement part number of the part required For ou...

Page 20: ...ice Center Engine hesitates Incorrect carburetor mixture adjustment setting Have carburetor adjusted by an Authorized Service Center No power under load Incorrectly gapped spark plug Clean gap or replace plug Runs erratically Incorrect carburetor mixture adjustment setting Have carburetor adjusted by an Authorized Service Center Smokes excessively Incorrect fuel mixture Use properly mixed fuel 50 ...

Page 21: ...21 Helpline No UK 0151 649 1500 IRE 189 094 6244 If after trying all of the above procedures please call the help line for further assistance ...

Page 22: ...r for produkt j prohlašuje následující shodu podle směrnice EU a norem pro výrobek A a következő konformitást jelenti ki a termékek re vonatkozó EU irányvonalak és normák szerint X pojasnjuje sledečo skladnost po smernici EU in normah za artikel deklaruje zgodność wymienionego poniżej artykułu z następującymi normami na podstawie dyrektywy WE W vydáva nasledujúce prehlásenie o zhode podľa smernice...

Page 23: ...ional installation failure to comply with the operating instructions e g connection to the wrong mains voltage or current type misuse or inappropriate use such as overloading of the device or use of non approved tools or accessories failure to comply with the maintenance and safety regulations ingress of foreign bodies into the device e g sand stones or dust effects of force or external influences...

Page 24: ...d only with the express consent of ISC GmbH Technical changes subject to change EH 11 2007 Argos Ltd 489 499 Avebury Boulevard Saxon Gate West Central Milton Keynes MK9 2NW Helpline Numbers UK 0151 649 1500 IRE 189 094 6244 Einhell UK Ltd Unit 5 Morpeth Wharf Twelve Quays Birkenhead Wirral CH41 1LF Tel 0151 6491500 Fax 0151 6491501 ...

Reviews: