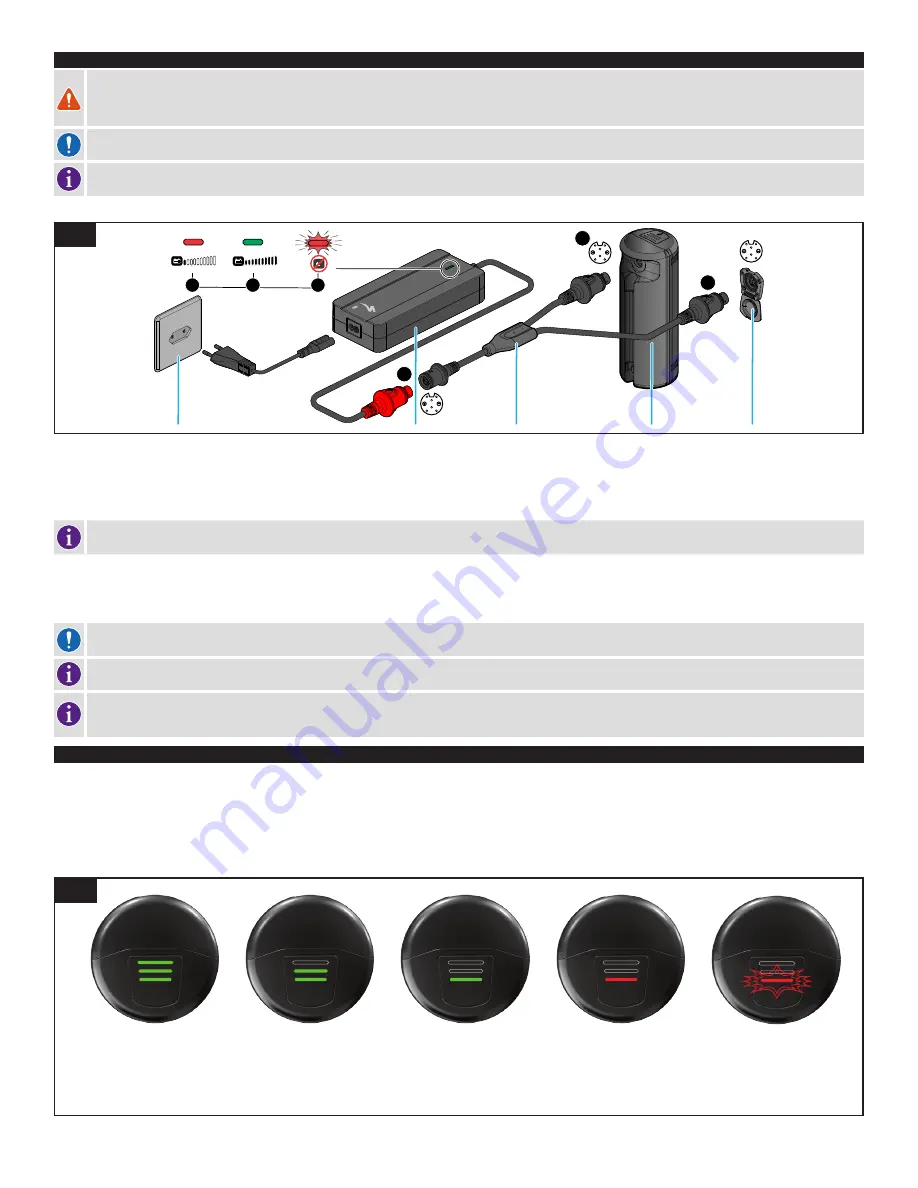
3
CHARGING THE RE
WARNING! Place the charger and RE on a stable, level surface unaffected by heat. You should charge the RE in a dry, well ventilated area and make sure the charger is
uncovered during the charging process. Ensure that the RE and charger are not exposed to any flammable or dangerous substances. Plug the charger’s plug into an outlet (100
- 240V), using the appropriate plug for the country’s standards, then connect the charging plug with the charging socket on the RE. Specialized recommends charging the RE
in an area with a smoke detector.
CAUTION: Always turn off the bicycle before plugging or unplugging the charger or RE!
Only charge the RE at an ambient temperature between 0° C and +45° C (+32° F and +113° F). If outside temperatures are too hot or too cold, charge the RE inside. For
safety reasons, if the RE is too hot or too cold, it will not charge.
110V | 220V OUTLET
1
2
3
A
C
B
RANGE EXTENDER
BICYCLE CHARGE PORT
48V CHARGER
Y-SPLITER CABLE
8
Use the standard charger supplied with your bicycle to charge the RE. If you want to charge both the internal battery and the RE at the same time, an optional Y-splitter cable can be plugged
into the charger.
Plug the charger’s plug into an outlet (100 - 240V), using the appropriate plug for the country’s standards.
Insert either the bicycle charging plug (A) or the Y-Splitter charging plug (B) securely into the RE Charge port (fig. 8).
The Y-Splitter cable (available from your Authorized Specialized Retailer) will ONLY produce a charge if it’s connected to one RE and one internal battery at the same time.
The charger will not charge if the Y-splitter cable is connected to two REs or two internal batteries, or if more than one Y-splitter cable is connected to the same charger.
When charging is complete, disconnect the charging plug from the charge port.
Unplug the charger from the wall socket.
During the charging process, the diode on the charger will glow red (fig. 8 - 1). When the RE is fully charged, the diode on the charger will turn green (fig. 8 - 2).
CAUTION: If the red diode flashes during the charging process (fig. 8 - 3), a charging error has occurred. In that case, remove the charger from the socket, discontinue use of
the motor support and contact your Authorized Specialized Retailer.
The Battery Management System (BMS) is designed to protect a fully discharged battery from damage for a period of time. However, in order to maintain the best possible
battery performance and lifespan, Specialized recommends regularly recharging the RE to at least 60% full (2 LEDs on the RE charge display fig. 9).
Please note that Li-ion batteries gradually lose capacity depending on age and use. Strongly reduced operating time after fully charging can be a sign that the RE is
reaching the end of its useful life and has to be replaced. Provided the bicycle has been used properly, approximately 75% of the RE’s original capacity should remain after
300 charging cycles or two years. Replacement batteries can be purchased from your Authorized Specialized Retailer.
CHARGE LEVEL DISPLAY
When the RE is attached to the bicycle, the charge level is displayed on the top of the RE (fig. 9), the TCU (fig. 11) located on the top tube, the optional TCD (fig. 10) and in the Mission Control
App.
The TCU, TCD and Mission Control displays adapt to show the state of charge for both internal battery and RE.
To check the state of charge when not connected to the bike, power on the RE by pressing the button on the top. If the RE has been powered off for more than 2 hours, the RE will need a long
push to wake it from deep sleep mode.
RE CHARGE LEVEL
95 % - 100 %
30 % - 94%
10% - 29%
5% - 9%
0% - 4%
9


