background image

INSTRUCTION
MANUAL

I

QWHQVLÀHU.

S

HULHV

4QFDP5FDIOPMPHJFTJTDPOTUBOUMZEFWFMPQJOHQSPEVDUJNQSPWFNFOUT
8FSFTFSWFUIFSJHIUUPNPEJGZQSPEVDUEFTJHOBOETQFDJGJDBUJPOTXJUIPVUOPUJDFBOEXJUIPVUJODVSSJOHBOZPCMJHBUJPO

3FW

HTINT70K

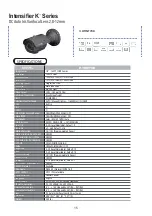
(Bullet Camera)

HTINT60K

(Turret Camera)

HTINT59K

(Dome Camera)

HTINT40K

(Miniature Camera)

Summary of Contents for HTINT40K

Page 1: ...JT DPOTUBOUMZ EFWFMPQJOH QSPEVDU JNQSPWFNFOUT 8F SFTFSWF UIF SJHIU UP NPEJGZ QSPEVDU EFTJHO BOE TQFDJGJDBUJPOT XJUIPVU OPUJDF BOE XJUIPVU JODVSSJOH BOZ PCMJHBUJPO 3FW HTINT70K BulletCamera HTINT60K Tu...

Page 2: ...ontents 1 Precautions 2 3 Safety Instructions 4 Package Contents 5 Camera Installation 6 12 Lens Adjustment 13 16 6SHFL FDWLRQV 17 20 Camera Dimension 21 22 Features 23 OSD Menu Details 24 46 Trouble...

Page 3: ...nd 50 C Be especially careful to provide ventilation when operating under high temperatures This is one of the most important parts of the camera Be careful not to leave fingerprints on the lens cover...

Page 4: ...3...

Page 5: ...semble this camera other than to make initial adjustments Use a UL approved regulated 24 volt AC or 12 volt DC power supply 8VH DSSURSULDWH ORZ YROWDJH SRZHU FDEOH WR SUHYHQW UH RU HOHFWULFDO VKRFN Pl...

Page 6: ...1 9rench q 5et 5crew 4 Tapping 5crews 4x 5 4 Hexagon 5ocket 5crews M5x10 HTINT60K q 1 8ideo Test Connector 2ower ack q 9renches q 5et 5crew Tapping 5crews 4x 5 3 HTINT59K q 1 8ideo Test Connector 2ow...

Page 7: ...N jvuulj Gwv lyGjhislG XUG oluG zpunGXYG vs zGkjGO G G WWG hPG YUG oluG zpunGY G vs zGhjGO WG Gh P ZUGjvuulj G pklvGjhislG T jvuulj GiujGjhislG vG olGiujGqhjrUG kjGXY Gw Gz w Gp Gaylk j GaGORP ishjraO...

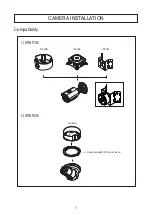
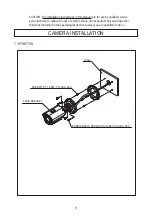
Page 8: ...7 CAMERA INSTALLATION Compatibility 1 HTINT70K HTINT60K CVCJBB INTJBS INTCM CVCJBD Adaptor plate 60PLATE with rubber...

Page 9: ...8 CAMERA INSTALLATION Compatibility 3 HTINT59K CVCJBD Adaptor plate 59PLATE with rubber...

Page 10: ...by Sualified serXice personnel only To reduce the risk of electric shock do not perform any serXicing other than that contained in the operating instructions unless you are qualified to do so 3AXIS BR...

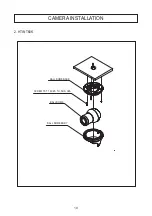
Page 11: ...CAMERA INSTALLATION 10 2 HTINT60K BALL DOME BASE BALL DOME BODY BALL DOME SCREW TS T1 4X25 TH SUS 3EA...

Page 12: ...CAMERA INSTALLATION 11 3 HTINT59K VANDAL DOME BASE VANDAL DOME BODY BODY OUTER COVER SPECO SCREW TS T1 3 5X20 PH SUS 3EA...

Page 13: ...12 1 HTINT70K LENS ADJUSTMENT Focus adjustment Open the cap Lock screw Zoom adjustment...

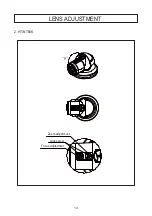
Page 14: ...13 2 HTINT60K LENS ADJUSTMENT Focus adjustment Lock screw Zoom adjustment...

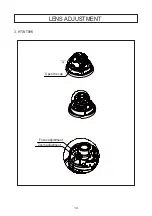
Page 15: ...14 3 HTINT59K LENS ADJUSTMENT Focus adjustment Zoom adjustment Open the cap...

Page 16: ...MAX 50P 60P CVBS 1 0Vp p 75 Ohm 0Lux Intensify x64 DC MANUAL AUTO Manual 1 60Sec 1 60000Sec FLICKER Built in O O ON LOW MIDDLE HIGH OFF ON LOW MIDDLE HIGH OFF Color BW EXTERN Auto AATW AWB AWC SET MAN...

Page 17: ...0dB MAX 50P 60P CVBS 1 0Vp p 75 Oh m 0Lux Intensify x64 DC MAN UAL AUTO Manual 1 60Sec 1 60000Sec FLICKE R Built i n O O ON LOW MIDDLE HIGH OFF ON LOW MIDDLE HIGH OFF Color BW EXTERN Auto ATW AWB AWC...

Page 18: ...p 75 Ohm 0Lux Intensify x64 DC MANUAL AUTO Manual 1 60Sec 1 60000Sec FLICKER Built in O O ON LOW MIDDLE HIGH OFF ON LOW MIDDLE HIGH OFF Color BW EXTERN Auto ATW AWB AWC SET MANUAL 0 20 Level Adjustabl...

Page 19: ...M Pixels 1312 H X 1069 V 1 40M Pixels Progressive Scan More than 50dB MAX 50P 60P CVBS 1 0Vp p 75 Ohm 0 00001Lux DC MANUAL AUTO Manual 1 60Sec 1 60000Sec FLICKER Built in O O ON LOW MIDDLE HIGH OFF ON...

Page 20: ...19 CAMERA DIMENSION 1 HTINT70K 3 94 dia 3 38 8 27 4 80 2 95 3 01 3 46 HTINT60K 4 65 dia 3 80 2 66 3 01...

Page 21: ...20 CAMERA DIMENSION 3 HTINT59K 4 HTINT40K 4 72 dia 3 35 1 82 3 23 dia 1 34 0 65 1 02 1 34...

Page 22: ...scene 5M 4T I4 No saturation image XiXid image in darkness it makes Xery sharp Xideo image in darkness This technology eliminates saturation of Xideo image of the closer object in darkness by control...

Page 23: ...IZE RETURN WEIGHT RETURN SMART IR AGC THRES AGC MARGIN DELAY RETURN SMART IR RETURN SMART IR EXTERN S W DELAY RETURN INDOOR OUTDOOR DEBLUR NORMAL DEBLUR 0 20 AUTO MANUAL FLICKER OFF X2 X64 0 20 LOW MI...

Page 24: ...8 0X OFF LOW MIDDLE HIGH OFF ON OFF ON OFF ON MTN TRACKER ALARM MODE LEVEL RETURN WEIGHT RETURN ZONE NUM ZONE DISP H POS V POS H SIZE V SIZE Y LEVEL CR LEVEL CB LEVEL RETURN ON ANTI SHIFT SHIFT SCALE...

Page 25: ...e camera menu RETURN ALARM QUICK ZOOM ANTI SHIFT SHIFT SCALE ANTI BLOCK BLOCK SCALE RETURN MOVING ZOOM IN STANDBY SYNCHRONOUS TRACKING REPEAT RETURN OFF ON 0 20 OFF ON 0 20 0 240 sec 0 240 sec 0 240 s...

Page 26: ...ndoor 1utdoor ow light Hallway obby leXator MoXe 15D joystick into left or right on IT then 4 5 T menu shows up 2ress the button for 3 seconds to reset SPECO TECH 1 PRESET 2 MAIN SETUP 3 EXIT INDOOR S...

Page 27: ...and Down button MoXe the triangular indicator 7p or Down to select the desired feature by pressing the 7p or Down button MENU SETUP MENU 1 LENS 2 EXPOSURE 3 WHITE BAL 4 BACKLIGHT 5 SPECO DNR 6 DAY NIG...

Page 28: ...ing the 7p and Down buttons on the 5et 7p menu screen 5elect the desired lens type by pressing the eft of 4ight button ixed board lens type camera is aXailable for M N7 option in N5 menu only NOTE MoX...

Page 29: ...5elect the desired mode using the eft or 4ight buttons 2 EXPOSURE NOTE 1n DC mode you can select IND114 17TD114 or D B 74 depending on the installation enXironment 1n M N7 mode you can select N14M or...

Page 30: ...al slow shutter speed in low light enXironment digital slow shutter x x64 default Xalue x16 C the brighter image can be displayed by adjusting C uto ain Control leXel C 0 0 default 15 default Xalue 15...

Page 31: ...lor temperature is from 1 00K to 10 500K 9B The function to search for the color which is matched well with the ambient enXironment This be used when the color temperature is from 3 000K to 7 000K 9C...

Page 32: ...directly or if there is a drastic lighting change The operation of 9hite balance may become unstable 4 BACK LIGHT 1n this menu back light image can be compensated by users selecting one of modes H C B...

Page 33: ...L DAY IIIIIIIIII IIIIIIIIII 10 Normal HLC BLC V POS H SIZE V SIZE RETURN 7 5 6 4 B C Back ight Compensation The camera with 3D DN4 proXides the intelligent light leXel control to oXercome strong backl...

Page 34: ...HV HYHQ XQGHU EDFN OLJKW FLUFXPVWDQFHV ZKHUH LQWHQVLW RI LOOXPLQDWLRQ FDQ YDU H FHVVLYHO QDPHO ZKHQ WKHUH DUH ERWK YHU EULJKW DQG YHU GDUN DUHDV VLPXOWDQHRXVO LQ WKH ILHOG RI YLHZ RI WKH FDPHUD To adj...

Page 35: ...des 1 19 MIDD HI H to use DN4 by pressing the 4ight or eft button MENU 1 LENS 2 EXPOSURE 3 WHITE BAL 4 BACKLIGHT 5 SPECO DNR 6 DAY NIGHT 7 IMAGE 8 SYSTEM 9 SPECIAL RETURN DC ATW OFF MIDDLE AUTO NOTE I...

Page 36: ...NI HT using the 7p or Down button on the 5et 7p menu screen 5elect one of modes T 4N 7T1 C1 14 B 9 using the eft or 4ight buttons T it can change into C1 14 or B 9 mode automatically through the conn...

Page 37: ...FLIP RETURN 0 55 OFF OFF C1 14 Making the Xideo output color always B 9 Making the Xideo output B 9 always By selecting the color signal 1n or 1ff this lets the burst signal be disappeared or not 6 DA...

Page 38: ...to adjust the Xalue to the proper one depending on a sort of image 5H 42N 55 0 10 MM amma Xalue is adjustable MM 0 45 0 65 2 D5T 2edstal Xalue is adjustable 2 D5T 0 0 C1 14 IN Color gain Xalue is adj...

Page 39: ...tons MENU 1 LENS 2 EXPOSURE 3 WHITE BAL 4 BACKLIGHT 5 SPECO DNR 6 DAY NIGHT 7 IMAGE 8 SYSTEM 9 SPECIAL RETURN DC ATW OFF MIDDLE AUTO 8 SYSTEM 8 SYSTEM VIEW ANGLE CVBS LANGUAGE RETURN VIEW ANGLE CVBS L...

Page 40: ...This can be used when you want to select the additional function control 1 9hen the 5 T72 menu is displayed select 52 CI using the 7p and Down button 5elect one of the mode using the eft or 4ight butt...

Page 41: ...ower the resolution is D 9D4 This camera which is using 3D DN4 D52 proXides intelligent light leXel control to oXercome eXen strong backlight conditions 1 19 MIDD HI H D 1 This function helps to recog...

Page 42: ...ed SHADING WEIGHT RETURN 100 PRIVACY ZONE NUM ZONE DISP H POS V POS H SIZE V SIZE Y LEVEL CR LEVEL CB LEVEL RETURN 0 OFF 12 2 3 3 IIIIIIIIII IIIIIIIIII IIIIIIIIII IIIIIIIIII IIIIIIIIII IIIIIIIIII 10 1...

Page 43: ...SIZE DET V SIZE RETURN 0 0 OFF 1 2 16 12 4M it is used to set h NTI 5HI Th or h NTI B 1CKh based on motion tracking scale leXel of these functions are adjustable ALARM ANTI SHIFT SHIFT SCALE ANTI BLO...

Page 44: ...message B 1CKIN D T CT D on monitor 3 37ICK 11M Digital h oom inh is operated to precisely detect objects when objects get in a designated motion detection area The area setting is aXailable on MTN T...

Page 45: ...TURN MENU 1 LENS 2 EXPOSURE 3 WHITE BAL 4 BACKLIGHT 5 SPECO DNR 6 DAY NIGHT 7 IMAGE 8 SYSTEM 9 SPECIAL RETURN DC ATW OFF MIDDLE AUTO 2ress h4 T74Nh button to saXe the current settings and exit the set...

Page 46: ...set to ON in the menu DV 0 5 EHHQ SURSHUO GH QHG Check that the AGC setting in the EXPOSURE menu is not set to OFF Check the EXPOSURE menu and make sure SHUTTER is set to Make sure that the camera isn...

Page 47: ...46...

Page 48: ...47 XMEMO...

Page 49: ...48 XMEMO...

Page 50: ...200 New Highway Amityville NY 11701 631 957 8700 1 800 645 5516 www specotech com...

Reviews: