XR 50
V3.1 | May 02, 2016
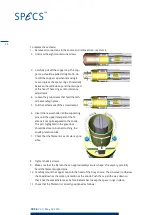
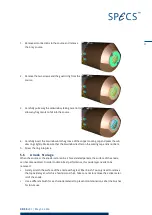
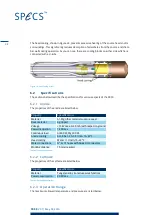
To replace the cathode:
1. Remove all connections to the source and remove the X-ray source.
2. Unscrew the eight countersunk screws.
3. Carefully pull off the copper cap. The cop-
per cap should be pulled straight off—do
not tilt the copper cap when removing it.
Leave in place the spacer rings (if installed)
between the cathode cap and the main part
of the head. These rings are for distance
adjustment.
4. Loosen the grub screws that hold the cath-
ode assembly in place.
5. Pull the cathode out of the screw clamps.
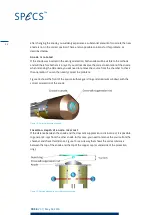
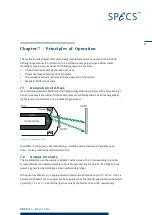
6. Insert the new cathode into the supporting
pins until the uppermost part of the fil-
ament is not quite exposed to the anode.
The part highlighted in the green box
should be close to, but not touching, the
anode protection tube.
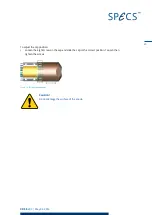
7. Check that the filament is as circular as pos-
sible.
8. Tighten the M2 screws.
9. Make sure that the filament has an approximately circular shape. If necessary, carefully
bend the filament support pins.
10. Carefully mount the copper cap onto the head of the X-ray source. The crossover rod below
the Al-window has the same orientation as the anode. Push the cap all the way down so
that it has the same distance as before. Remember to keep the spacer rings in place.
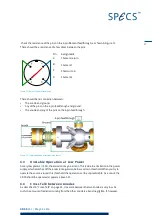
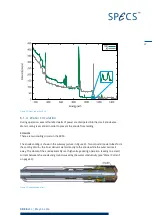
11. Check that the filament is correctly positioned as follows:
28
Summary of Contents for XR 50
Page 1: ...XR 50 XR 50 NAP X Ray Source User Manual V3 1 May 02 2016...
Page 6: ...XR 50 V3 1 May 02 2016 This page intentionally left vi...
Page 20: ...XR 50 V3 1 May 02 2016 This page intentionally left 14...
Page 30: ...XR 50 V3 1 May 02 2016 This page intentionally left 24...
Page 38: ...XR 50 V3 1 May 02 2016 This page intentionally left 32...
Page 46: ...XR 50 V3 1 May 02 2016 This page intentionally left 40...
Page 58: ......


