background image

17 


Long Term Storage Procedures 

Watermakers are best run continuously. When not in use, biological growth in the membrane is 
the  leading  cause  of  membrane  fouling.  A  warm  environment  will  cause  more  growth  than  a 
cold environment.  If the system is to be left unused for more than five days, perform the follow-
ing  storage  procedure.  The  procedure  introduces  a  chemical  compound  into  the  system  that 
prevents biological growth. This procedure requires de-chlorinated water. 

Spectra SC-1 a special storage compound used by the US Navy. It is for-
mulated  to  be  compatible  with  the  modern  engineering  plastics  and 
composites  in  the  Spectra  pumps. 

Do  not  use  any  substitute

  except 

propylene glycol. If you wish to use glycol for storage, follow the win-
terizing instructions.  SC-1 Storage Compound must be mixed at a ratio 
of 1 container to 3 gallons (12L) of fresh water to have the proper solu-
tion for up to six months storage.  

Caution! Avoid contact with skin, eyes, or lungs with the storage chem-

Aquifer 150/200/360 Storage Procedure  

The watermaker can be stored for periods up to six months using this procedure. 


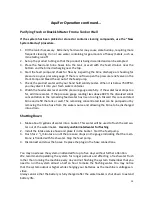
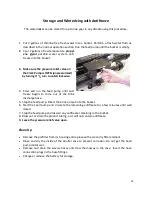
1. Make or buy 4 gallons of chlorine-free water and put it in a bucket. 
 
2. Place the end of the feed hose in the bucket and the brine hose to drain. 
 
3. Start and run the feed pump until you have one gallon of fresh water left in the bucket. 
 
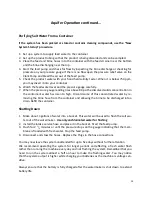
4. Mix 1 container of SC-1 storage compound with the water in the bucket and place the end 

of the brine service hose in the bucket.  

 
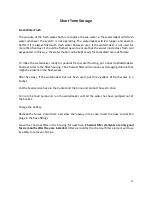
5.  

Make  sure  the  pressure  relief  valve  on  the 

Clark Pump is OPEN (unpressurized) 

     by turning 

1

/

2

 turn counterclockwise 

 
6. Turn on the feed pump. Circulate the storage 

chemical in the system for approximately 10 
minutes.  Turn  off  the  feed  pump  when  fin-
ished. 


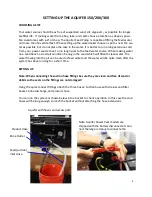
Clean Up 


 

Remove the 5 micron filter element from its housing and put in a dry one. 

 

Rinse and dry the inside of the case, being careful not to get water inside the pump motor. 

 

Charge the battery. 

 

Remove the hoses, drain them, and stow them away in the case.  Insert the hose connec-
tion plugs in the hose fittings. 

Summary of Contents for AQUIFER 150

Page 1: ...FER 150 200 360 OWNER S MANUAL Spectra Watermakers Inc 20 Mariposa Road San Rafael CA 94901 Phone 415 526 2780 Fax 415 526 2787 E mail spectra spectrawatermakers com www spectrawatermakers com Rev Jul...

Page 2: ...2...

Page 3: ...1 Normal Operation 12 Maintenance 18 Service Maintenance Short Term Storage Procedures 15 Introduction to Spectra Chemicals 16 Long Term Storage 17 Winterizing 18 Maintenance 19 Membrane Cleaning 20 S...

Page 4: ...4...

Page 5: ...ld responsible for shortages and or freight damage that are not reported within thirty days of the ship date Study the system layout diagram component photos and descriptions before beginning your ins...

Page 6: ...ocess A strainer first keeps out large debris and keeps the suction hose several inches off the bottom then the water passes through an 80 mesh screen then a 5 micron pre filter protects the Clark pum...

Page 7: ...reen 5 micron filter and housing Spectra Clark Pump and Membrane assembly Pressure Relief Valve Brine Outlet Aquifer 150 200 360 Feed Plumbing Schematic Quick Disconnect Pressure Gauge Accumulator Fee...

Page 8: ...the bottom of a tank Make sure that there is no re striction in this piping Pressure in the product tubing must never exceed 5psi 0 3bar at any time running or stopped or the membrane will be permane...

Page 9: ...in the sand which will fill with clean water The water flowing into the pit can be used as feed water and the water will be quite clean after the system has been running for a short time SETTING UP No...

Page 10: ...z Connector supplied is for US style 110V AC Other con nectors may be attached to the input On Power Pack models with solar panel in cluded the panel fits into the lid of the case and must be removed...

Page 11: ...alve is open 1 2 turn Plug in the AC power cord connect solar panel or ensure that the battery is fully charged 2 Turn on the feed water pump Check that it is primed by inspecting the brine discharge...

Page 12: ...with a clean filter ele ment and change the filter if the pressure rises more than 5 psi 0 3 bar Shutting Down 1 You will need 3 gallons of water in a container which will be used to flush the salt wa...

Page 13: ...80 PSI the dissolved solids concentration in the remaining feed water has risen too high Discard this concentrated brine and refill the tank or well The remaining concentrated feed can be pumped out b...

Page 14: ...o high Discard some of this concentrated water by re moving the brine hose from the container and allowing the brine to be discharged into a drain Refill the container Shutting Down 1 Make about 3 gal...

Page 15: ...Watermakers Charcoal Filter in the filter housing The Charcoal filter will remove any damaging chlorine that might be present in the flush water After five days if the watermaker has not been used pu...

Page 16: ...so works very well for preventing biological growth in warm climates and is good for one year See Win terizing with Antifreeze OP 1 document on the Spectra website Note Do not use metasodium bisulfate...

Page 17: ...e Caution Avoid contact with skin eyes or lungs with the storage chem Aquifer 150 200 360 Storage Procedure The watermaker can be stored for periods up to six months using this procedure 1 Make or buy...

Page 18: ...til anti freeze begins to come out of the brine discharge hose 5 Stop the feed pump Direct the brine output into the bucket 6 Start the Feed pump and circulate the remaining antifreeze for a few minut...

Page 19: ...es by soaking it in water in a bucket Occasionally lightly lube the filter housing O ring with silicone grease General Periodically inspect the entire system for leakage and chafe on the tubing and ho...

Page 20: ...throughout the system will heat as it circulates in and out of the pot An alternative is to heat the one or two gallons of initial water to 120 on a stove before mixing in the cleaner and circulating...

Page 21: ...gallons of chlorine free fresh water 2 Flush the system as shown in the Normal Operation Section Leave one Gallon of water in the bucket 3 Place the inlet service hose brine discharge service hose and...

Page 22: ...lters Offshore Cruising Kit consisting of Clark Pump seals O rings tools and membrane cleaning chemicals One replacement strainer Spectra Watermakers parts list SC 1 STORAGE CHEMICAL KIT CHEM SC1 SC 2...

Page 23: ...ainer or prefilter clogged Service prefilter and strainer Low water production Low pressure Pressure relief valve partially open Worn pump head Close valve Check flow should be 1 4 GPM Replace pump he...

Page 24: ...filters are used to ab sorb any chlorine which might be present in flush water They must be of proper specification to be suitable There is no test for chlorine damage except the process of eliminatio...

Page 25: ...overpressure cutout switch PL PMP SFPH is set to 125 PSI With the pump running close the brine service valve The feed pressure should rise to 125 PSI then the pump should shut off If the pump shuts o...

Page 26: ...s in the table above Compare the product flow to the total feed flow Product flow should be 7 of total flow for an Aquirer 150 and 9 5 of total flow for an Aquifer 200 If product percentage is low you...

Page 27: ...e ball and give it a few coats of wax If the o rings are damaged or the unit has been leaking install new o rings using a little silicone grease to ease assembly These are standard o rings and should...

Page 28: ...quality will drop and the system pressure will change dramatically If the pressure gauge was installed before the prefilters as pictured in this manual the pressure will increase If the pressure gaug...

Page 29: ...only 60 or 70 Also there are aftermarket filters which are very close to but not exactly the same dimensions that will not seal properly in the housing If you skimp on the charcoal filter you risk da...

Page 30: ...check for continuity through the switch If it is open you can make temporary repairs by wiring around it being careful that your new wiring doesn t chafe on the moving parts nor resist the springs tha...

Page 31: ...from cutting out each time the Clark pump shifts For all systems except the Gulfstream the feed pump pressure switches should be set as fol lows On the very center of the switch is a small 5 64 Allen...

Page 32: ...32...

Page 33: ...s inserted the ferrule and nut will naturally align Refer to figure 2 Insert tube fully into the fitting it should go in 0 9 23mm once tube goes past the grab ring it is locked in position Tighten the...

Page 34: ...P Part Numbers Stainless Fitting Hex Nut PL HWR 1 2HN 1 2 Stainless Ferrule PL HWR 1 2FR Connector O RING SO HPP CT 3 4 16 Straight Thread O RING SO FT STF STAINLESS STEEL HIGH PRESSURE ELBOW PL MTE 3...

Page 35: ...EL BAT AQCG AQUIFER BATTERY CHARGER HP CYL R CYLINDER END RING FT PV EP MEMBRANE END PLUG PL MTS 3 8X1 2S 3 8 NPT X 1 2 TUBE FIT TING ST SS PL HP 1 8 1 8 HEX PLUG NYLON FT PV 20 20 HIGH PRESSURE VESSE...

Page 36: ...8 NPT X 1 4 HOSE BARB ELL NYLON PL ACC TK ACCUMULATOR TANK PL BSH 1 2X1 4N 1 2 X 1 4 HEX BUSHING REDUCER NYL EL STK VTOVL VENTURA PANEL OVERLAY PL PSG LP2 5 2 5 D 1 4 NPT PRESS GAUGE 0 200PSI PL FMT 1...

Page 37: ...PL FTE 1 4X1 4P ACCUMULATOR PL ACC TK 1 2MPT X 5 8 HOSE BARB PL HBS 1 2X5 8 1 2 TEE PL TEE 1 2FN 1 2 NIPPLE PL NP 1 2N 1 4MPT X 1 4 TUBE STRAIGHT FITTING PL MTE 1 4X1 4 1 2 X 1 4 BUSHING PL BSH 1 2X1...

Page 38: ...38 HP TB VEB B HP TB VB HP TB VEB A HP TB BV HP CB CB7 HP CYL SST HP CYL R HP CYL EC HP CYL CCA Not used...

Page 39: ...39 HD CPS 5 16X3 KIT HP 10VSA HP TB AR SO HPP AR SO HPP RV HP TB BV HD CPS 5 162 75 SO HPP SP PS20 HP TB VSP VSP20 HP TB SR SO HPP VB SO HPP PLP SO HPP VP...

Page 40: ...40 Parts...

Page 41: ...41 PL MTS 3 8X1 2S HP CYL SST HP CYL CCA SO HPP ECCB HP CYL EC HP CYL R HP CYL PT Parts...

Reviews: