background image

American English–9

1 609 929 E86  •  (02.12) T

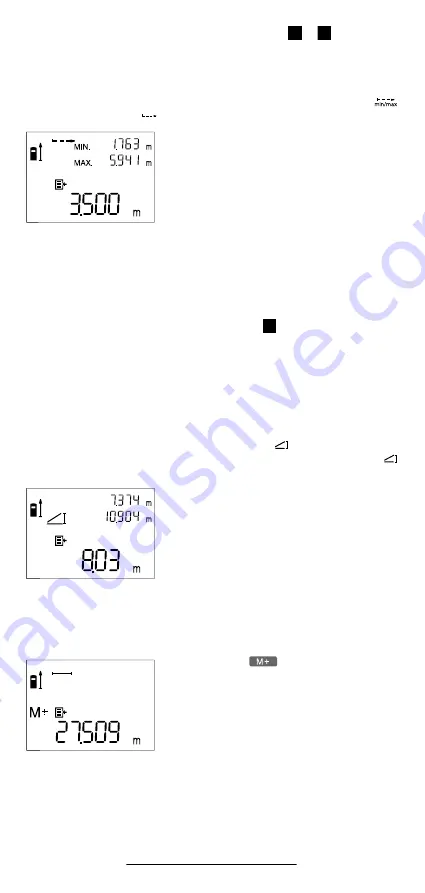
Minimum-Maximum Measurement (see Fig. 

 + 

)

The minimum/maximum measurement serves to determine the minimum
or maximum distance from a fixed reference point.  It is an aid, for exam-
ple, for the determination of diagonals (maximum value) as well as verti-
cals and horizontals (minimum value).
To switch to the minimum/maximum measuring mode, press the 
button 

1

.  The symbol 

 appears in the display.

To initiate the measurement process, press
the measurement button 

7

 completely down.

Move the laser point back and forth over the
desired target point (e.g., the corner of a
room) so that the rear end of the unit as the
reference point for the measurement remains
at the same position.
At the upper right in the display, the minimum
and maximum are shown.

By pressing the measurement button 

7

, the minimum/maximum mea-

surement is interrupted.  The current measured values are shown in the
display.  Renewed pressing of the measurement button 

7

 starts the min-

imum/maximum measurement anew.

Indirect Length Measurement (see Fig. 

)

The indirect length measuring function serves for measuring distances
that cannot be measured directly because an obstacle would obstruct the
laser beam or no target surface is available as a reflector.  The best pos-
sible results are achieved only when the laser beam and the measured
distance form an exact right angle (Pythagorean theorem).

In the illustrated example, the length 

“C”

 is to be determined. For this pur-

pose, 

“A”

 and 

“B”

 must be measured.

Press the indirect length measurement button 


13

 to switch to the

mode for indirect length measuring. The symbol for indirect measuring 
appears in the display.

As for a length measurement, measure the
distance 

“A”

.  Take care that a right angle ex-

ists between the laser beam and the distance

“C”

.  Then measure distance 

“B”

.

During the measurements, the rear end of the
unit as the reference point must remain at the
same position.

After completing the second measurement, the length 

“C”

 is automatical-

ly calculated and indicated at the bottom of the display.  The individual val-
ues are shown at the upper right.

Storing/Adding of Measured Values

By pressing the 

 button 

16

, the value at

the bottom of the display – either a length,
area or volume value depending on the cur-
rent measuring function – is stored in memory.
In the display, 

“M+”

 appears briefly and then

“M”

.

If a value is already present in the memory, the
new value is added to the memory contents,
however, only when the units of the measure-
ments are in agreement.

For example, if an area value is stored in the memory and the current mea-
surement is a volume value, the addition cannot be performed.  In the dis-
play, the “ERROR” message blinks briefly.

D

E

F

Summary of Contents for Precision HD150

Page 1: ...29 0635 3120 28 0635 1490 0600 1320 17 0600 1310 18 0600 1340 3 0600 1330 30...

Page 2: ...A B C E D F...

Page 3: ...3 16 1 2 5 7 8 4 9 11 12 14 13 15 6 4 10 17 18 19 19 a b c d e f g h i k l m...

Page 4: ...21 20 4 24 26 27 25 22 23...

Page 5: ...asuring Instrument Order number HD 150 Measuring range natural surfaces 0 3 150 m 1 500 ft Measuring accuracy Typical 0 3 30 m 1 100 ft Maximum 2 mm 3 32 in 3 mm 1 8 in Measuring time Typical Maximum...

Page 6: ...utton 3 Bubble level 4 Aligning aid 5 Area measurement button 6 on off button 7 Measurement button Two step button for sighting and measuring 8 Display 9 Display lighting button Symbols Symbol Name Me...

Page 7: ...Positioning extension 28 Laser viewing glasses 29 Target panel 30 Protective bag Accessory parts included Optional accessories not included Display Elements a Laser switched on b Measurement function...

Page 8: ...ever open the unit yourself Trimble is able to ensure perfect functioning of the unit only if the orig inal accessories intended for it are used Protect the unit from moisture and direct sunrays Dirt...

Page 9: ...For areas or volume entries only units of m or ft are possible Measuring Procedure The instrument has several measuring functions that can be selected by pressing the respective function button see M...

Page 10: ...m mea surement If possible rest the instrument on or against the measuring point The measurement takes place at the middle point of the light spot also for obliquely illuminated target surfaces The me...

Page 11: ...ece The unit takes automatically into consideration the different lengths of the end pieces when measuring measurement in both cases from the rear end of the unit Bubble Level The bubble level makes p...

Page 12: ...ed For larger values switch to the m3 unit of measure by pressing the m ft button 10 Continuous Measurement see Fig The continuous measurement serves for the transfer of dimensions for example from co...

Page 13: ...ctor The best pos sible results are achieved only when the laser beam and the measured distance form an exact right angle Pythagorean theorem In the illustrated example the length C is to be determine...

Page 14: ...ue first In the display the symbol ap pears The counter at the right next to the symbol shows the numbering of the displayed values The measured values displayed can still be entered into memory by pr...

Page 15: ...F Wait until the allowable temperature range is reached ERROR Message and m in the Display The angle between the laser beam and the target is too acute Increase the angle between the laser beam and th...

Page 16: ...e Service Center In case of repair send in the unit in the protective bag 30 Recycle raw materials instead of disposing as waste The unit accessories and packaging should be sorted for environment fri...

Reviews: