SpectraPure
SpectraPure®Inc.
480.894.5437 Call us toll-free 1.800.685.2783
2167 East Fifth St, Tempe, Arizona 85281
®
20
Reconnect the tubing to the membrane housing. Place the
flow restrictor in a safe location where it will not be accidentally
crushed or damaged.
11. Put the yellow concentrate tubing and the blue product
water tubing in the drain and turn on the system water supply.
Allow the system to flush for several minutes to remove any loose
particles.
12. Turn off the water supply to the system. Remove the yellow
tubing from the membrane tubing from the membrane housing
and replace the flow restrictor assembly as described on page 13-14.
13. Re-insert the flow restrictor end of the yellow tubing into
its push-fitting at the RO membrane and reconnect the yellow
concentrate tubing to the membrane housing.
14. Turn on the water supply to the system and check for leaks. Check,
and if necessary adjust, the Concentrate to Purified Water Ratio per
the procedures described on page 11-12.
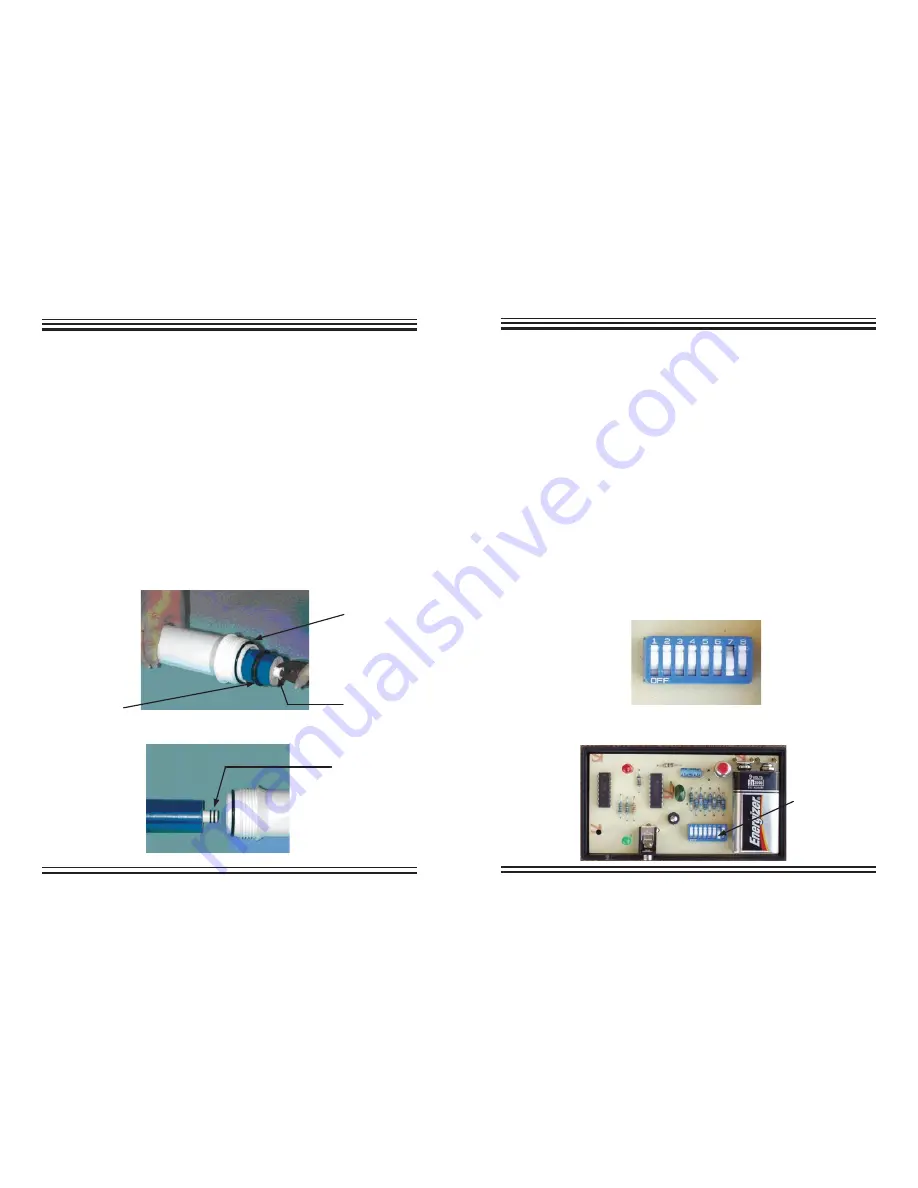
Fig. H: Removing the Membrane Element
Fig. I: Inserting the New Membrane Element
black
membrane
brine seal
black
membrane
housing
O-ring
membrane
product
water tube
double
O-ring end of
membrane
product
water stem
tube
SpectraPure®Inc
.
Fax 480.894.6109 Fax us toll-free 1.877.527.7873
E-mail: spectra@spectrapure.com Visit us on the web www.spectrapure.com
9
SpectraPure
®
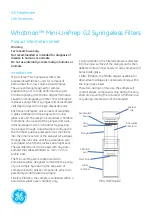
Fig. C: Purity Monitor Without Cover
Switch
Number 1 2 3 4 5 6 7 8
Setting in uS
100
50
20
10
5
2
1
0.5
Setting in ppm
67
33
13
6.7
3.3
1.3
0.67
0.33
Fig. B: Purity Monitor Switches
* If settings are changed for any reason (such as testing the quality of the RO membrane),
They should be returned to the original #7 setting after completion of the test.
Switch #7
Shown in “ON”
Position
USING THE PURITY MONITOR (EPM)
The purity monitor is typically used to monitor the condition of the DI cartridge, and with a
simple procedure, monitor the RO membrane.
1.
Before operating the monitor, allow at least 2 gallons of water to
run through the system.
2.
To test, press the red “push-to-test” button located on the front of
the monitor box. At any point, a green or “good” indication means
lower electrical conductivity (pure water), while a red or “service”
indication means higher conductivity (less pure water). A red or
“service” indication would normally imply that membrane replace-
ment and/or deionization cartridge replacement is required.
3.
If neither indicator illuminates, replace the battery with the 9 volt
ALKALINE type ONLY.
Warning!!:
The water purity monitor does not detect the presence of silica, organic
contaminants or micro-organisms, nor should it be used as a medical or scientific instru-
ment. It should be used as an indicator or guide only, and does not imply water safe for
human consumption. No application other than monitoring the electrical conductivity of
water is expressed or implied.


