background image

5

IF THE LAMP FAILS TO OPERATE

1.  Make sure that the unit is plugged into a grounded outlet with the  

appro priate  voltage.

2.  Check to see that both the LAMP and the MAIN switches are pushed to 

the ON position.

3. 


Check to see that the bulb is securely inserted between the 


spring-loaded metal contacts.

4.  If the lamp has recently been shut off, make sure that the bulb has 

cooled sufficiently before attempting to restart it. Remember that 


restarting of the lamp will 

not 

occur immediately. The restarting delay 

can range up to five minutes or longer.

OPERATOR SERVICING

The following servicing instructions are intended for limited main tenance 

of the UV-400 SuperFlood Series lamps. Do not perform any servicing 

other than that contained in these instructions. Return the lamp to the  

factory for maintenance not covered in this section.

WARNING

To avoid the risk of electrical shock, 

always

 unplug the lamp from its 

power source 

before

 cleaning or servicing.

HOUSING AND FILTER MAINTENANCE

The aluminum lamp housing is designed for protection of the 


internal parts. Using a soft cloth, immediately clean spills from the housing 

with water and a mild detergent and wipe dry. 

Do not allow any  

liquids to touch the filter when it is hot or to penetrate into the unit’s 

electrical components.

 Periodically clean the filter with a glass cleaner 

and a soft cloth.

FILTER REPLACEMENT

NOTE: Allow the unit to cool before changing the filter.

Since the filter is tempered glass, avoid exposing it to any sudden or  

drastic change in temperature. For example, immersing a hot lamp in a 

cool liquid can cause the filter to shatter.

1. Disconnect the lamp from the power outlet.

2.  Remove the unit from its mounting position. Place it filter-side up on a 

workbench with the screwlocks turned toward you.

3.  

With a flathead screwdriver, turn the right and left screwlocks 


counterclockwise 

until the filter assembly is free to swing open on  

the hinge.

4.  

With the filter assembly and reflector exposed, detach the filter 


assembly by removing the eight Phillips screws that secure the twin  

filter-retaining plates.

5. With a sharp knife or blade, cut the silicone on the twin filters.

Summary of Contents for Spectroline SuperFlood UV-400 Series

Page 1: ...OPERATOR S MANUAL SuperFlood UV 400 Series UV Lamps AM07008 9 Printed in U S A August 2012 ...

Page 2: ... protection provided by the equipment may be impaired The lamp is completely safe when used as directed see MOUNTING INSTRUCTIONS FOR SAFE OPERATION We recommend using Spectroline UV absorbing protective eye and face wear See REPLACEMENT PARTS AND ACCESSORIES for model numbers This eye and face wear also improves contrast between the fluorescent area and the background and eliminates blue haze int...

Page 3: ... avoids the restarting delay 6 Restarting of the lamp will not occur immediately as the metal halide vapor within the bulb must first cool off The restarting delay can range up to five minutes or longer 7 Any interruption in the power supply such as an excessive voltage drop will extinguish the arc Restarting will again be delayed while the metal halide vapor cools off and full voltage is again av...

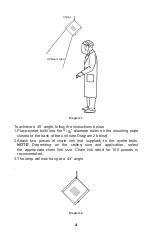
Page 4: ...late closest to the back of the unit see Diagram 2 below 2 Attach two pieces of chain link not supplied to the eyelet bolts NOTE Depending on the ceiling size and application select the appropriate chain link size Chain link rated for 100 pounds is recommended 3 The lamp will now hang at a 45 angle Diagram 2 4 UV Beam Area Chains ...

Page 5: ... MAINTENANCE The aluminum lamp housing is designed for protection of the internal parts Using a soft cloth immediately clean spills from the housing with water and a mild detergent and wipe dry Do not allow any liquids to touch the filter when it is hot or to penetrate into the unit s electrical components Periodically clean the filter with a glass cleaner and a soft cloth FILTER REPLACEMENT NOTE ...

Page 6: ...re failure If you should inadvertently touch the envelope use the alcohol treated tissue provided or other nonflaking tissue dipped in alcohol to clean the surface The bulb must be perfectly clean before it is installed in the lamp 4 Note that the bulb sits between two spring loaded metal tips that are part of a ceramic assembly To remove or replace the bulb push the bulb toward one of the spring ...

Page 7: ...h 320 400nm Dimensions W x D x H 15 25 x 12 25 x 12 in 38 7 x 31 1 x 30 5 cm Weight 29 5 lb 13 4 kg NOTES 120V units require one fuse ABC series FAST ceramic 250V P N EC 0222 05 230V units require two fuses 6 3A TD time delayed 5x20mm 250V P N 125666 Models FB Britain FA Australia and J Japan are available upon request Each unit is fitted with the proper cord set and plug for its country of destin...

Page 8: ...ork will not be performed without customer approval Use only replacement parts supplied by Spectronics Corporation Use of any other parts may damage the unit and void the warranty SHIPPING Carefully pack the unit in its original shipping container and packing materials and ship it prepaid to the factory Insure it for full value LAMP CONTAINS MERCURY Manage in Accord with Disposal Laws See www lamp...

Reviews: