background image

0118583R4 Page 2 of 4

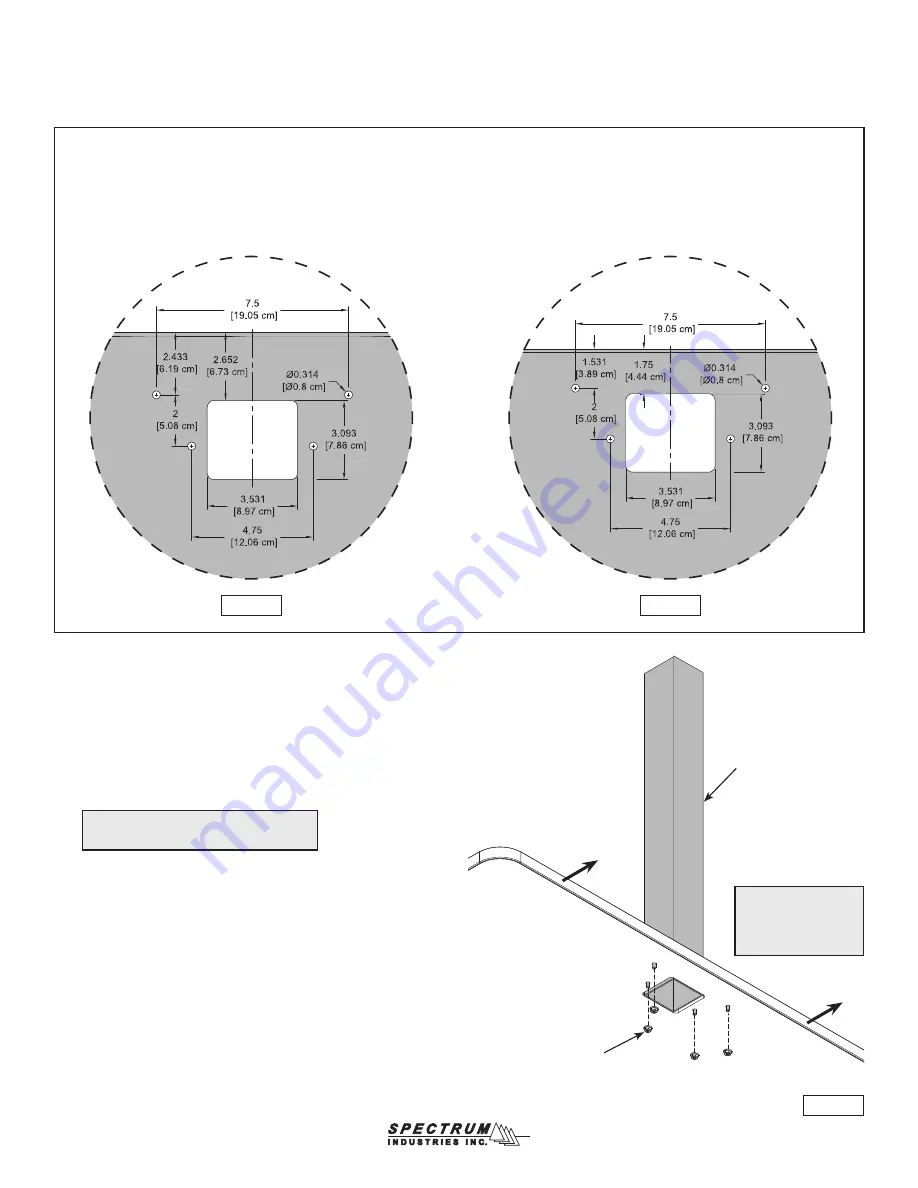
Figure 2.1

Figure 3

Upright 

assembly

Worksurface

1/4-20 Flanged 

serrated locknut

(4 required)

Mounting holes and cutout needed

(on flat end of worksurface)

2.  Be sure the worksurface being used has the cutout / hole pattern 

shown in 

Figure 2.1

, or

 Figure 2.2

.

Figure 2.2

Optio Tables

InVision / Element / Nano Tables

3.  An unattached worksurface will facilitate installation of the display 

stand fasteners.  If attached, remove the worksurface fasteners 

securing it to the base and slide the worksurface 6” over the base to 

provide access to the display stand mounting holes.  

Figure 3

.

4.  Align the studs and insert the upright into the worksurface mounting holes.

5.  With a second person holding the upright, Install (4) 1/4-20 Flanged 

serrated locknuts and tighten securely.

Note: For InVision Nano table installation, 

see p.3 for special instructions.

Pull worksurface out 

about 6” to access 

display stand mounting 

holes

Summary of Contents for 37130

Page 1: ...35 1262 715 723 6750 Thank you for purchasing Spectrum products Display Stand 37130 4mm Hex wrench included Tools Required 1 0119747 Monitor mount 4 0108896 1 4 20 Flanged serrated locknut 12 052605 1 4 20 x 15mm JC bolt 1 0118193 End cap 3 x 3 1 0118510 Upright assembly 1 0131924 Upright bracket Figure 1 Rubber thread protectors Bottom of upright assembly 7 16 or Adjustable wrench 1 025039 4mm He...

Page 2: ...ll facilitate installation of the display stand fasteners If attached remove the worksurface fasteners securing it to the base and slide the worksurface 6 over the base to provide access to the display stand mounting holes Figure 3 4 Align the studs and insert the upright into the worksurface mounting holes 5 With a second person holding the upright Install 4 1 4 20 Flanged serrated locknuts and t...

Page 3: ...g 4 1 4 20 x 15mm JC bolts and tighten securely Multiple mounting holes height positions are available on the upright assembly Figure 4 7 Refer to the instructions included with the monitor mount for complete monitor installation procedure 8 Install the monitor mounting plate to the upright bracket with 4 1 4 20 x 15mm JC bolts and tighten securely Figure 5 9 Install monitor and route wiring throu...

Page 4: ...and insert the upright into the worksurface mounting holes 4 With a second person holding the upright install the 2 inner 1 4 20 Flanged serrated locknuts Figure 7 2 5 Replace the end panel 6 Install the 2 outer 1 4 20 flanged serrated locknuts 7 Tighten all locknuts securely Figure 7 2 Upright assembly 200mm VESA adapter plate optional Attach 200mm VESA monitor using these 4 holes Hanging rail 4 ...

Reviews: