background image

0193055 Page 5 of 5


© 2022 Spectrum Industries Inc., All rights reserved.

1500 RIVER STREET, PO BOX 400, CHIPPEWA FALLS, WI 54729  /  800-235-1262  /  715-723-6750  /  WWW.SPECTRUMFURNITURE.COM

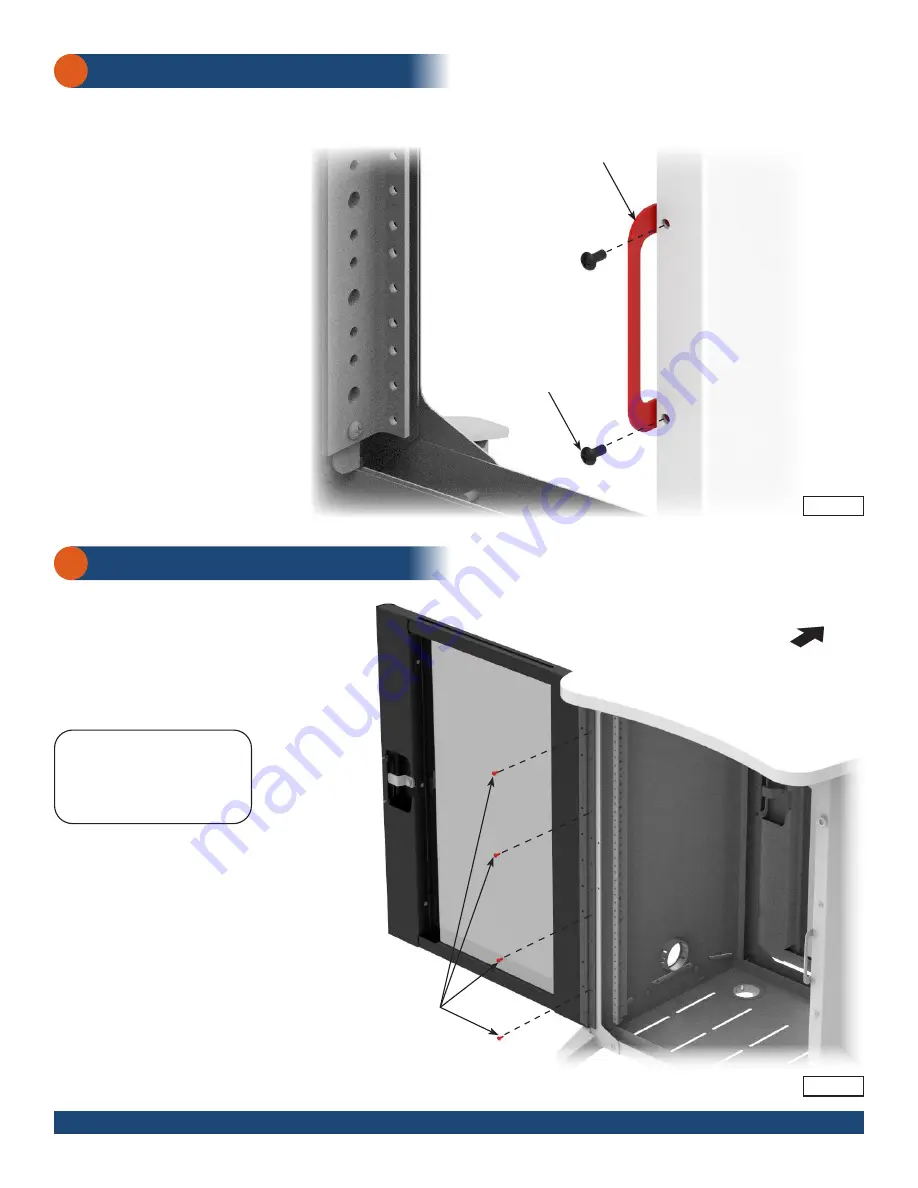
Attach door catches

1.  Attach catch to the right side of the unit with (2) #8 x 3/8” PHSM screws. 

Figure 7

.

2.  Repeat on opposite side of rack box.

7

Figure 7

#8 x 3/8” 

PHSM

Catch

X2

Right side door 

frame and side 

panel

Attach door assemblies

1.  Open hinge of the door assembly 180°. 

Figure 8

.

2.  Align the hinge mounting holes with the frame and 

secure with (4) #8 x 3/8” PHSM screws.

3.  Repeat on opposite door.

8

Figure 8

#8 x 3/8” PHSM

X4

Acrylic door

assembly

on instructor side

Note: The acrylic door assembly 

installs on the instructor-side, and 

the laminate panel door assembly 

on the audience-side.

Instructor-side

Audience-side

Summary of Contents for 55559

Page 1: ...th all safety and operating instructions and ensure all parts and correct quantities are included Companion Equipment Rack 55559 8 0106543 1 4 20 Keps nut 48 0190174 8 x 3 8 PHSM Parts Bag 2 0169174 Catch 1 0119468 Recessed bumper 3 4 Assembly tip Do not tighten component fasteners completely until all have been installed Keeping them loose will help with alignment between parts during assembly 4 ...

Page 2: ...thout the rails goes on the convex side 3 Orient and attach each frame to the worksurface as shown with 2 14 x 7 8 PHSM screws Note the flanges face inward Figure 1 1 Worksurface Frame 14 x 7 8 PHSM Attach base panel to frames 1 Align the base panel between the frames and secure with 4 8 x 3 8 PHSM screws Figure 2 2 Figure 2 Flange Flange 8 x 3 8 PHSM X4 1 Bottom panel Frame with rack rails Concav...

Page 3: ...Repeat on second side panel 3 Note Attach 2 recessed bumpers using the upper and lower holes on the right side of the panel as shown Note The base panel is secured to the frames with 2 screws installed from the inside of the rack box Figure 3 Recessed bumper Recessed bumper Side panel Side panel Base panel 8 x 3 8 PHSM X17 ...

Page 4: ...eg with the 4 threaded studs and 4 1 4 20 Keps nuts and tighten securely 4 Figure 4 Install casters 1 Install 4 casters and tighten securely with wrench Figure 5 5 Figure 5 X4 1 4 20 Keps nut Leg Leg X4 1 4 20 Keps nut X4 Slots Flip rack box upright 1 Flip the rack box upright Figure 6 6 Figure 6 ...

Page 5: ...site side of rack box 7 Figure 7 8 x 3 8 PHSM Catch X2 Right side door frame and side panel Attach door assemblies 1 Open hinge of the door assembly 180 Figure 8 2 Align the hinge mounting holes with the frame and secure with 4 8 x 3 8 PHSM screws 3 Repeat on opposite door 8 Figure 8 8 x 3 8 PHSM X4 Acrylic door assembly on instructor side Note The acrylic door assembly installs on the instructor ...

Reviews: