Page 17
For technical questions, please call 1-888-866-5797.
Item 64823 64824
NOTICE
Clean the Spray Gun and Cup IMMEDIATELY after EVERY use and when it will be idle for more
than 30 minutes. Delayed or inadequate cleaning will permanently clog the Spray Gun.
DO NOT USE LATEX PAINT IN THIS SPRAY GUN.
S
AFETY
Op
ERA
TION
M
AINTENANCE
S
ET
up
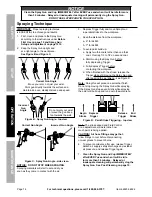
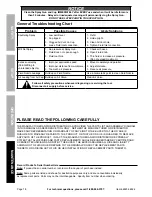
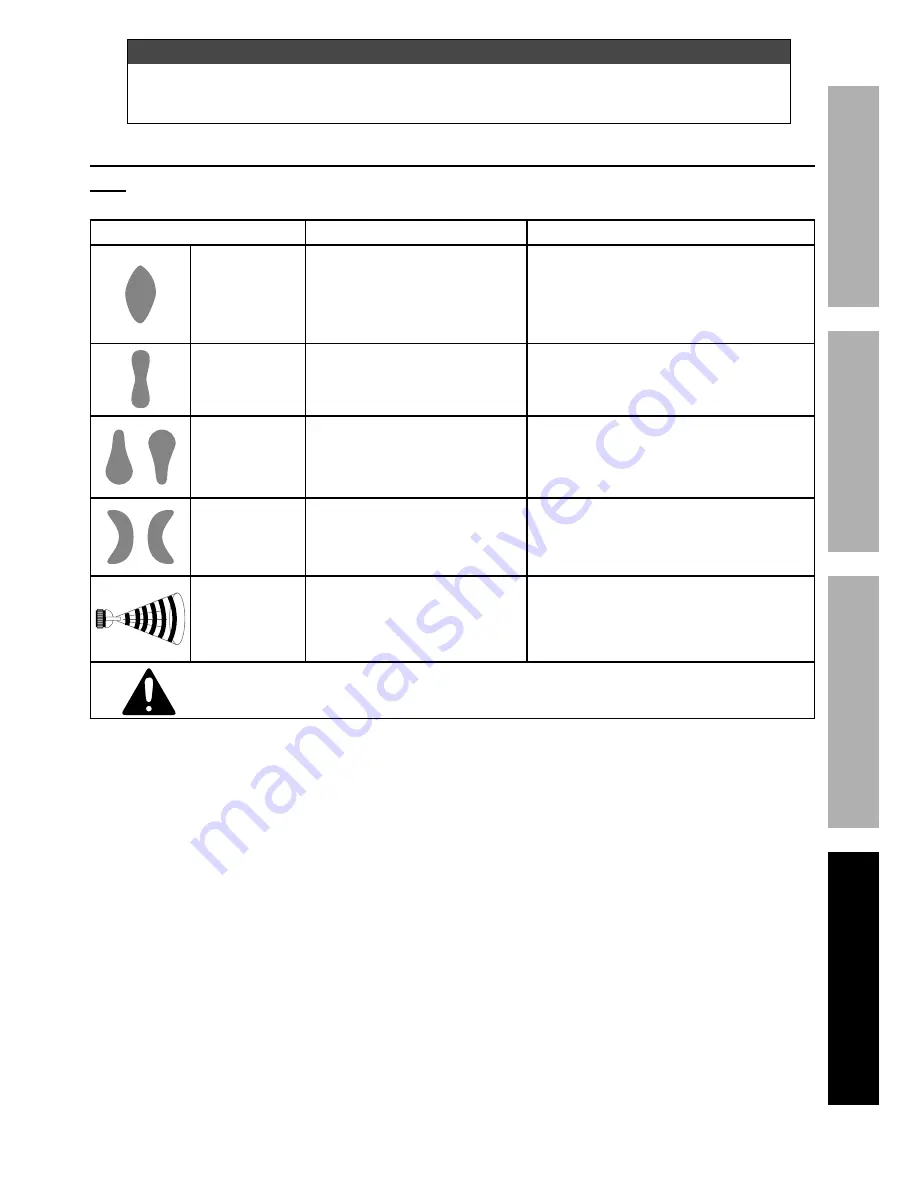
Troubleshooting - Spray pattern Diagnosis
Note:
The drawings on the left below resemble symptoms of spray pattern problems.
Refer to the accompanying possible causes and likely solutions to the right.
problem
possible Causes
Likely Solutions
Heavy center
pattern
1. Pattern Knob partially closed.
2. The paint is too thick.
3. The air pressure is too low.
1. Open Pattern Knob more.
2. Thin paint according to the
manufacturer’s instructions.
3. Increase air pressure within
the Working
Air Pressure.
Light center
pattern
1. High air pressure.
2. Fluid Knob not open enough.
3. Pattern Knob open too far.
1. Reduce air pressure.
2. Open Fluid Knob.
3. Partially close Pattern Knob.
Heavy top/
bottom pattern
1. Air Cap plugged.
2. Air Cap loose.
3. Dried paint on Fluid Nozzle.
1. Clean Air Cap.
2. Clean and tighten Air Cap.
3. Use a nonmetallic point to
clean Fluid Nozzle.
Pattern on right
or left only
1. Buildup on one side
of Fluid Nozzle.
2. Holes on one side of
Air Cap are plugged.
1. Use a nonmetallic point to
clean Fluid Nozzle.
2. Use a nonmetallic point to clean Air Cap.
Jerky or
Fluttering Spray
1. Loose or damaged Air Cap.
2. Paint level low.
3. Obstruction in Fluid Inlet.
4. Air Vent closed.
1. Tighten or replace.
2. Refill paint Cup.
3. Backflush with solvent.
4. Open Air Vent.
Follow all safety precautions whenever diagnosing or servicing the tool.
Disconnect air supply before service.

