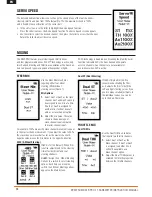
background image

5

Spektrum DX4r prO • tranSmitter inStructiOn manual

EN

DX4R PRO transmitters with part numbers that end  
in E do not have charge jacks.
All Spektrum charge jacks are center pin negative. Before using  
a charger, use a voltmeter to make sure the connector is center  
pin negative. When charging, use a charger designed for four  
cells (4.8-volt battery pack).
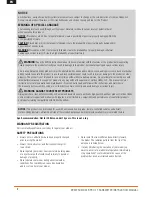
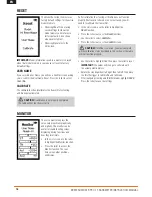
ChARGING WARNINGS

WARNING:

 Failure to exercise caution while using  

this product and comply with the following warnings could 
result in product malfunction, electrical issues, excessive  
heat, FIRE, and ultimately injury and property damage.

•  Read all safety precautions and literature prior to use of  

this product.

•  Never leave the battery and charger unattended during use.

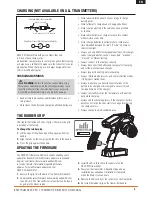
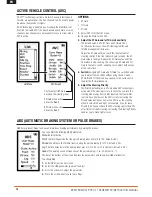
ChARGING (NOT AvAIlABlE ON All TRANSMITTERS)

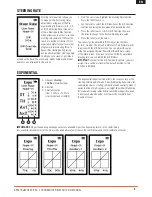
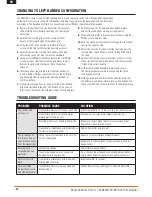
Charger Pigtail for Transmitter

Spektrum Transmitter Charge Jack Polarity

BLACK TO POSITIVE

BLACK W/WHITE STRIPE TO NEGATIVE

-

+

•  Never allow children under 14 years of age to charge  

battery packs.

•  Never attempt to charge dead or damaged batteries.
•  Never charge a battery if the cable has been pinched  

or shorted.

•  Never allow batteries or charger to come into contact  

with moisture at any time.

•  Never charge batteries in extremely hot or cold places  

(recommended between 50–80°F (10–26°C)) or place  
in direct sunlight.

•  Always use only Ni-MH rechargeable batteries. This charger 

cannot charge batteries such as “heavy duty”, “alkaline”, 
“mercury” or “lithium” battery.

•  Always connect to the charger correctly.
•  Always disconnect the battery and charger after charging 

and let them cool between charges.

•  Always inspect the battery before charging.
•  Always terminate all processes and contact Horizon Hobby  

if the product malfunctions.

•  Always make sure you know the specifications of the  

battery to be charged or discharged to ensure it meets  
the requirements of this charger.

•  Always constantly monitor the temperature of the battery 

pack while charging.

•  Always end the charging process if the charger or battery 

becomes hot to the touch or starts to change form during  
the charge process.

•  Always charge in a well-ventilated area.
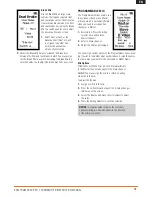
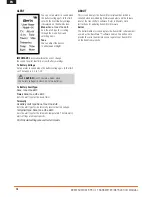
ThE RUBBER GRIP

This transmitter includes 2 sizes of grips. The small-size grip  
is installed at the factory. 

To change the rubber grip
1. 

Lift the edge of the grip and pull the grip away from the 
handle.

2. 

Align the tabs on the new grip with the slots in the handle.

3. 

Press the grip against the handle.
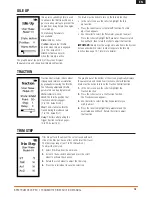
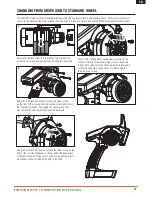
1. 

Remove the grip from the back of the transmitter handle.
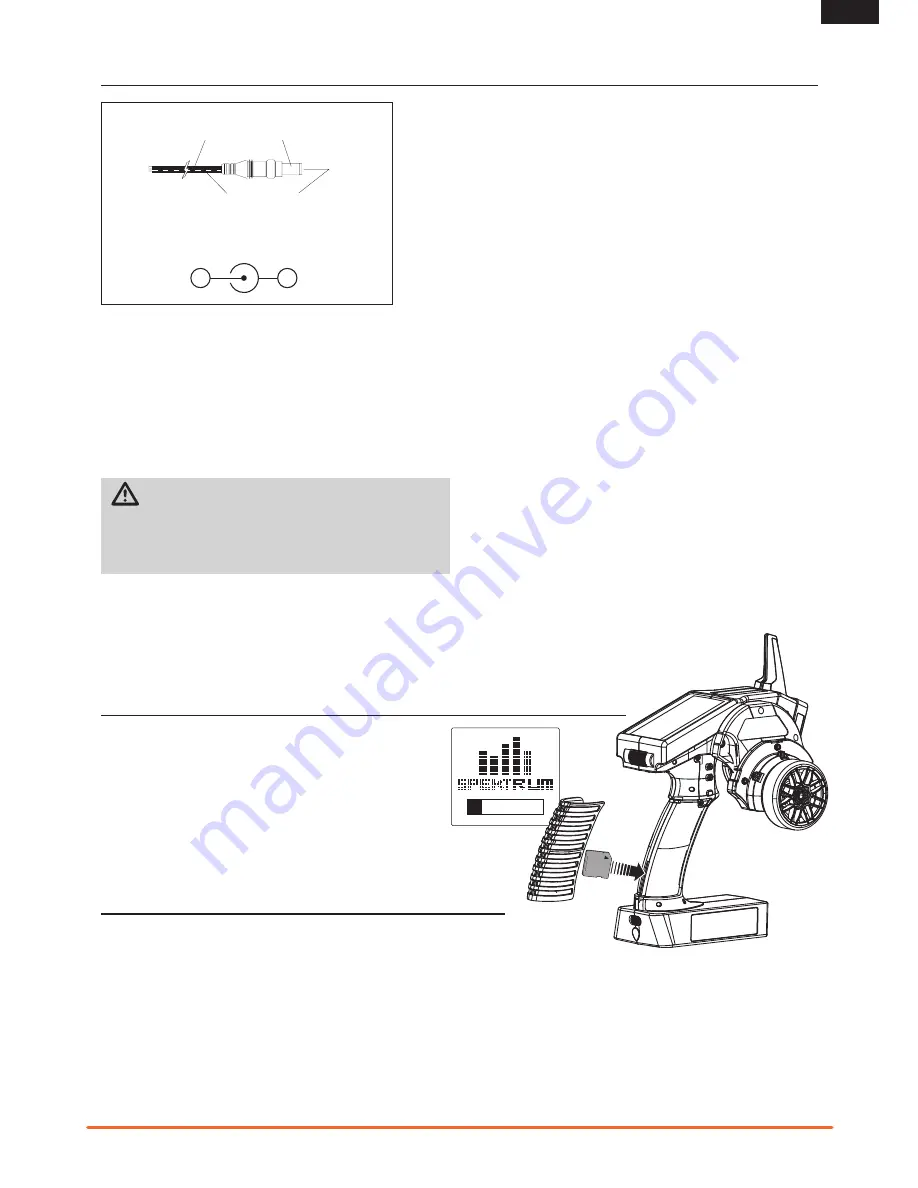
2. 

 Download the latest firmware from www.SpektrumRC.com  
to an SD card. The transmitter serial number can be found  
by going to the About screen.

3. 

Install the SD card in the card reader slot on the  
DX4R PRO transmitter.

4. 

 Power on the transmitter. A Spektrum logo and an  
installation bar will appear. Installation is complete  
when the Main screen appears.

5. 

Remove the SD card from the card slot on the transmitter.

6. 

Re-install the rubber grip on the transmitter handle.

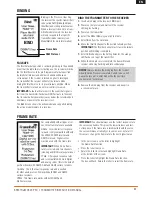
UPDATING ThE FIRMWARE

The DX4R PRO features an SD card reader, enabling you to  
update the transmitter when firmware updates are available.  
Register your transmitter at www.SpektrumRC.com  
to receive the latest information regarding firmware  
updates. To install firmware updates on your  
DX4R PRO transmitter:

Summary of Contents for DX4R Pro

Page 1: ...Instruction Manual Bedienungsanleitung Manuel d utilisation Manuale di istruzioni DX4R PRO 4 Channel 2 4GHz DSMR System ...

Page 2: ...ed prior to using the model Always check all servos and their connections prior to each run Never operate your model near spectators parking areas or any other area that could result in injury to people or damage of property Never operate your model during adverse weather conditions Poor visibility can cause disorientation and loss of control of your model Never point the transmitter antenna direc...

Page 3: ...fying Controls and Switches 3 Installing Batteries 4 ModelMatch 4 Charging 5 The Rubber Grip 5 Updating the Firmware 5 Warning Screens 6 Low Battery Alarm Inactivity Alarm Receiver Compatibility 6 Main Screen 7 Programming Guide 7 Individual Direction Adjustments List 7 Model Select 8 Travel 8 Steering Rate 9 Exponential 9 Binding 11 Frame Rate 11 Servo Speed 12 Mixing 12 Active Vehicle Control AV...

Page 4: ...ease the trigger tension Trigger Sizing You can adjust the trigger to fit your driving style To adjust the trigger 1 Loosen the screw on the back of the trigger 2 Adjust the trigger spacing as necessary 3 Tighten the screw on the back of the trigger Installing Batteries CAUTION NEVER remove the transmitter batteries while the model is powered on Loss of model control damage or injury may occur Mod...

Page 5: ... charging and let them cool between charges Always inspect the battery before charging Always terminate all processes and contact Horizon Hobby if the product malfunctions Always make sure you know the specifications of the battery to be charged or discharged to ensure it meets the requirements of this charger Always constantly monitor the temperature of the battery pack while charging Always end ...

Page 6: ...ube The SR410 has a coax style antenna The last 31mm of the antenna is the portion that receives the signal from the transmitter NOTICE Do not cut or bend the antenna or it could become damaged Aux 1 Port Aux 2 Port LED Bind Plug Bind Battery Port Steering Port Throttle Port Antenna Low Battery Alarm An alarm will sound and the voltage will flash on the main screen when the transmitter s battery p...

Page 7: ...posite direction simply move the control in that direction 4 Press the Rolling Selector to save the selection Main Screen The Main Screen displays information about the active model including the Timer when activated To return to the Main Screen at any time press and hold the Rolling Selector for at least 3 seconds A User Name B Name assigned to the Model memory C Timers when activated D Transmitt...

Page 8: ...t Copy The Copy function shares active model memory settings with a selected model memory space This is useful for saving setups for one model to adjust program ming for track conditions or model setups Choosing No returns to the List Screen Choosing Yes saves the active model settings to the selected model memory A Active or source model memory number B Destination model memory number IMPORTANT W...

Page 9: ... function by placing the box around the desired function Press the roller to access S R or S R Override then use the roller to change to the desired Steering rate value Press the roller to set the value You can assign the adjustable S R to any of the trimmers A B C D and E The default is trimmer D This trimmer works in unison with the S R Rate screen You can adjust the value using the assigned tri...

Page 10: ...gain to change the time Rotate the roller to change the time From the List screen rotate the roller to highlight the Timer function Press the roller to enter the Timer function The Timer screen will display as shown below Rotate the roller to highlight the desired Timer you choose to program Timer A or Timer B Press the roller to enter the highlighted Timer function Rotate the roller to select the...

Page 11: ...is complete 7 Scroll to Bind and press the Rolling Selector The orange LED flashes on top of the transmitter 8 When the bind process is complete the transmitter and receiver LEDs stop flashing and turn solid orange NOTICE Always remove the bind plug from the receiver when the bind Process is complete Failure to do so will cause the receiver to enter bind mode the next time you power on the receive...

Page 12: ... negative value means the mix moves in the opposite direction 4WS 4 Wheel Steering Trim Act or Inh Default When Trim is Active adjustments to the steering trim affect both front and rear steering channels Switch Assign the 4 Wheel Steering Options to a switch to select steering options Each time you move the switch the 4 Wheel Steering options appear on the Main Screen Dual ST Dual Steering Trim A...

Page 13: ...r what each mix does Assign the names the same way you would for the Username or Model Name Mix Options Trim Inh or Act When Trim is Active trim adjustments to the Master channel also apply to the Slave channel Switch You may assign the mix to a switch enabling a B Value in the mix To adjust the B Value 1 Assign a switch to the mix 2 Press the switch forward or back The A Value changes to B Value ...

Page 14: ...t wheels begin to shake the ST Gain value is too high Reduce the ST Gain value until the front wheels stop shaking You can assign ST Gain and TH Gain to the same switch enabling you to adjust both values at the same time 4 Switch Assigning ST Gain and TH Gain to a switch enables you to adjust the sensitivity without using the AVC menu ST GAIN and TH GAIN can be assigned to the same switch to adjus...

Page 15: ...acceleration by gradually increasing the throttle The following adjustable throttle parameters can be programmed State Inhibit or Active Point The throttle position that traction control disengages 5 to 100 default is 50 Step The distance the throttle travels during the reduced rate 1 to 100 default is 1 Delay The time after pulling the trigger traction control engages 0 to 25 default is 0 The gra...

Page 16: ... confirm the User Name Reset Press the roller to select Yes or No Calibrate The calibrate function recalibrates the transmitter s steering and brake potentiometers CAUTION If calibration is not properly completed the radio will not function correctly If after calibration the steering or throttle does not function properly the travel is reduced or no servo travel you will need to recalibrate the tr...

Page 17: ...l flash 3 Rotate the roller to the desired backlight mode and press the roller to select it Timeout You can adjust the amount of time the backlight is on The timeout only applies when Light is set to Timer Trims Changing the Trim values will change the bars shown at the bottom of the Main screen For example if you select ST Trim for Pos 1 the Steering Trim will appear in the first bar on the Main ...

Page 18: ...ies Tx Battery Alert Type None Tone Vibe Both Timer None Tone Vibe Both Sets the alert type for the down timer Telemetry Rx Battery Alert Type None Tone Vibe Both Sets the alert type for the telemetry receiver battery voltage Temp Alert Type None Tone Vibe Both Sets the alert type for the telemetry temperature The telemetry alert settings are model specific All of the alert settings above affect a...

Page 19: ...ring dropdown as shown Select the appropriate Left Right standard steering spacer and pass the steering wheel mechanism connector through the hole in the shell 4 Connect the steering wheel mechanism connector to the connector from the transmitter being sure the connection is tight Note correct polarity Fit the backplate in place and secure the standard steering wheel assembly using the three long ...

Page 20: ...ree long cap head screws 14 Fit the grip in place and reinstall the batteries Note that the buttons D and E now work in reverse You will need to change the direction of these switches in the System menu Changing to Left Handed Configuration The DX4R PRO comes set up for right handed use but you can easily switch it to a left handed configuration All the parts necessary to convert to left handed in...

Page 21: ...place of purchase Law These terms are governed by Illinois law without regard to conflict of law principals This warranty gives you specific legal rights and you may also have other rights which vary from state to state Horizon reserves the right to change or modify this warranty at any time without notice WARRANTY SERVICES Questions Assistance and Services Your local hobby store and or place of p...

Page 22: ...for return freight Horizon accepts money orders and cashier s checks as well as Visa MasterCard American Express and Discover cards By submitting any item to Horizon for service you are agreeing to Horizon s Terms and Conditions found on our website http www horizonhobby com content _service center_ render service center ATTENTION Horizon service is limited to Product compliant in the country of u...

Page 23: ...oduct must not be disposed of with other waste Instead it is the user s responsibility to dispose of their waste equipment by handing it over to a designated collections point for the recy cling of waste electrical and electronic equipment The separate collection and recycling of your waste equipment at the time of disposal will help to conserve natural resources and ensure that it is recycled in ...

Page 24: ...odelMatch RaceWare AVC Active Vehicle Control and the Horizon Hobby logo are trademarks or registered trademarks of Horizon Hobby LLC The Spektrum trademark is used with permission of Bachmann Industries Inc The SD Logo is a trademark of SD 3C LLC Patents pending ...

Reviews: