background image

5

Operation

6.  Remove the excess fat and wipe clean. Griddle surface is ready  

for use.

NOTE

EVEN WITH CAREFUL SEASONING, FOOD CAN STICK TO 

THE GRIDDLE COOKING SURFACE UNTIL GRIDDLE PLATE IS 

“BROKEN IN”.

Before operating the griddle, it must be checked to see that it 

is sitting level. Adjust the feet to level the griddle. Be sure the 

catch tray has been assembled correctly (see image below).

Catch Tray

Rack

NOTE

Upon first use, griddle can produce a burning metal smell. 

This is normal and smell will decrease with use.

Season the surface

1.  Clean griddle surface thoroughly. After griddle has been cleaned, it 

must be seasoned to prevent food from sticking. Follow the steps 

below for the correct heating method to season the griddle before 

use and after scouring.

2.  Switch to ON and adjust the thermostat dial knob to 350°F.
3.  Use a clean cloth (not a spatula), to spread a thick film of cooking 

oil or fat over the griddle cooking surface. Film must remain on hot 

griddle for 30 minutes.  


CAUTION

GRIDDLE SURFACE WILL BE HOT

PLAQUE SURFACE SERA CHAUD

4.  Remove the excess fat and wipe clean.
5.  Apply another film of cooking oil over hot cooking surface for 

another 30 minutes.

 
Temperature Control

Your griddle should be turned on prior to usage to allow the cooking 

surface to warm up; 5-7 minutes is sufficient.
To get efficient use from this unit, it is recommended that for 

intermittent use that the thermostat be turned down when not 

cooking. This will assist in reducing power consumption and also allow 

for quicker heat response when needed.
It is recommended that the cooking surface is lightly greased before 

each use.
The temperature is thermostatically controlled.

Be sure On/Off switch is ON, for EDG-36, and adjust 

temperature dial knob to the desired setting. 
Power for EDG-24 is activated when temperature dial knob 

is turned to desired heat setting.

The set point of each thermostat is marked on the front panel with  

"TEMP 

" in the 9 o’clock position. Griddle is equipped with one 

thermostat per various cooking surface segments.
For the 24” griddle, every 12” and for the 36” griddle, every 18”.

 
Cooking

Switch griddle to ON and adjust the thermostat dial knob to the 

desired temperature. After a short pre-heating period, the thermostat 

will automatically maintain the selected temperature. When the set 

temperature is reached, the signal light will go OFF. 
A temperature setting of between 375ºF and 430ºF will be sufficient 

for general cooking. This may vary for particular food types, individual 

needs, or experience.
Simply place the food products on the grilling surface and cook to 

manufacturer's specifications.

TO AVOID SERIOUS PERSONAL INJURY:

•  ALWAYS install equipment in an area with adequate light and space.
•  ONLY operate on a solid, level, nonskid surface that is 

nonflammable and away from sinks and water hazards.

•  NEVER bypass, alter or modify this equipment in any way from  

its original condition. Doing so can create hazards and will  

void warranty.

•  NEVER operate the griddle without all warnings attached to it.

burn hazard.

When in operation, the 

Conveyor Toaster will be hot at 

the entrance to the conveyor 

cavity. 

please take extreme caution.

Risque de brûlure.

Ne touchez pas les surfaces chaudes ou 

chauffées liguid tout appareil chauffe ou 

en fonctionnement.

use cAutIoN WheN 

touchING the uNIt.

Ne touchez pas le liquide chaud 

ou les surfaces de chauffage 

lorsque l’appareil chauffe ou en 

fonctionnement.

WARNING

AVERTISSEMENT

HOT

Summary of Contents for EGD-24

Page 1: ...l cooking equipment SPECTRUM takes pride in the design and quality of our products When used as intended and with proper care and maintenance you will experience years of reliable operation from this equipment To ensure best results it is important that you read and follow the instructions in this manual carefully It s important to save these instructions for future reference EGD 36 EGD 24 C US LI...

Page 2: ...ns warnings andoperatinginstructionsare clearlypostedneareachunitsothatanyone usingtheequipmentwilluseitcorrectlyand notinjurethemselvesorharmtheequipment ATTENTION Cesmodèlessontconçus fabriqués etvenduspourunusagecommercialseulement Sicesmodèlessontplacéspourquelegrand publicpuisselesutiliser assurez vousquelesconsignes d attention d avertissement etlesinstructions d utilisationsoientclairementa...

Page 3: ...landfree ofdamage Shouldyoufindanydamageasaresultoffreight please contactyourSPECTRUMdealerimmediately Unpacking the Equipment Dispose of all packaging materials in an environmentally responsible manner 1 Removeallpackingmaterialsandtape aswellasanyprotective plasticandcardboard fromtheunit 2 Cleananyglueresidueleftoverfromtheplasticortape 3 Placetheunitinthedesiredpositionandheight Save the origi...

Page 4: ...ubsystems andsystemstomakesurethatthefinalproductfunctions properlyandsafelyattheworksite Byidentifyingpotentialproblems i e equipmentlocation ventilation localfire electricalcodes installation operatortrainingandcertification beforeequipmentis placedintoservice costlyoutagesandpotentialdamagescanbeavoided Theseinstructionsshouldbefollowedatalltimes Failuretofollow theseinstructionscouldresultinin...

Page 5: ...ore eachuse Thetemperatureisthermostaticallycontrolled Be sure On Off switch is ON for EDG 36 and adjust temperature dial knob to the desired setting Power for EDG 24 is activated when temperature dial knob is turned to desired heat setting Thesetpointofeachthermostatismarkedonthefrontpanelwith TEMP inthe9o clockposition Griddleisequippedwithone thermostatpervariouscookingsurfacesegments Forthe24 ...

Page 6: ...burnedfatandfood griddlemustbethoroughlyscouredandre seasoned Whilethegriddleiswarm usepumiceorgriddlestonetoremoveexcessfatandfood Donotusesteel woolbecauseofthedangerofsteelsliversgettingintothefood AfterEachUse Body Useacleanclothandanon abrasivecleanertocleanthestainlesssteelbodyofgriddle Wipethepolishedareaswithasoftcloth Daily Controls GriddlemustbeturnedOFFwhennotinuse SwitchgriddletoOFFtod...

Page 7: ...allWINCOtomakeservicearrangementsthrough itsServiceProviderNetwork CookingSurfaceisheatingup slowly Carbonbuildup Makesurethattheplatesarekeptcleanandfree fromcarbonbuildup debris Thermostatsetting Makesurethermostatissetcorrectlyandmakesure dialisnotspinningonthethermostat givingthe wrongreading Faultyelements CallWINCOtomakeservicearrangementsthrough itsServiceProviderNetwork FoodSticking Carbon...

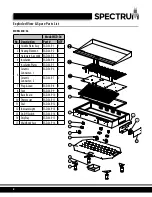
Page 8: ...EGD 36 P3 2 4 Insulation EGD 36 P4 2 5 InsulationPlates EGD 36 P5 1 6 Ceramic Connector 1 EGD 36 P6 2 Ceramic Connector 2 EGD 36 P7 2 7 Plug Lead EGD 36 P8 1 8 Feet EGD 36 P9 4 9 BaseBoard EGD 36 P10 1 10 Thermostat EGD 36 P11 2 11 Dial EGD 36 P12 2 12 IndicatorLight EGD 36 P13 2 13 On OffSwitch EGD 36 P14 2 14 DripTray EGD 36 P15 1 15 MainBodyAssy EGD 36 P16 1 ...

Page 9: ...6 Dial EGD 24 P6 4 7 On OffSwitch EGD 24 P7 1 8 Thermostat EGD 24 P8 4 9 MainBodyAssy EGD 24 P9 1 10 InsulationPlates EGD 24 P10 2 11 Insulation EGD 24 P11 2 12 HardwareAssembly EGD 24 P12 2 13 HeatingElement EGD 24 P13 2 14 GriddlePlatesAssy EGD 24 P14 1 15 Plug Lead EGD 24 P15 2 16 ConnectionBox EGD 24 P16 2 17 ConnectorBar EGD 24 P17 2 18 Connection BoxCover EGD 24 P18 1 Model EGD 24 ...

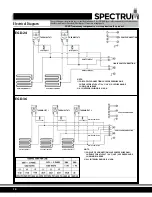
Page 10: ...MENTS 1 HEATING ELEMENTS 2 THERMOSTAT 2 THERMOSTAT 3 THERMOSTAT 1 PILOT LIGHT 2 PILOT LIGHT 3 PILOT LIGHT 1 HEATING ELEMENTS 1 HEATING ELEMENTS 2 HEATING ELEMENTS 3 NOTE 1 FOR SUPPLY CONNECTIONS USE COPPER WIRE ONLY SUITABLE FOR AT LEAST 194 F 90 C USE WIRE GAUGE SHOWN OR LARGER 2 ALL INTERNAL WIRING IS 14 GA Electrical Diagram Thecircuitdiagramsareprovidedtoassistqualifiedtechnicians OnlySPECTRUM...

Page 11: ...WHETHERINNEGLIGENCE WARRANTY STRICTLIABILITY OR OTHERWISE Thiswarrantyisgivenonlytothefirstpurchaserfromaretaildealer Nowarrantyisgiventosubsequenttransferees Warrantydoesnotcoverproductfailurescausedby failuretomaintain neglect abuse damageduetoexcesswater fire normalwear impropersetupanduse Periodicmaintenanceisnotcovered Thiswarrantyisnotinforceuntilsuchtimeasaproperlycompleted anddigitallysign...

Page 12: ......

Reviews:

Related manuals for EGD-24