background image

Page 31 


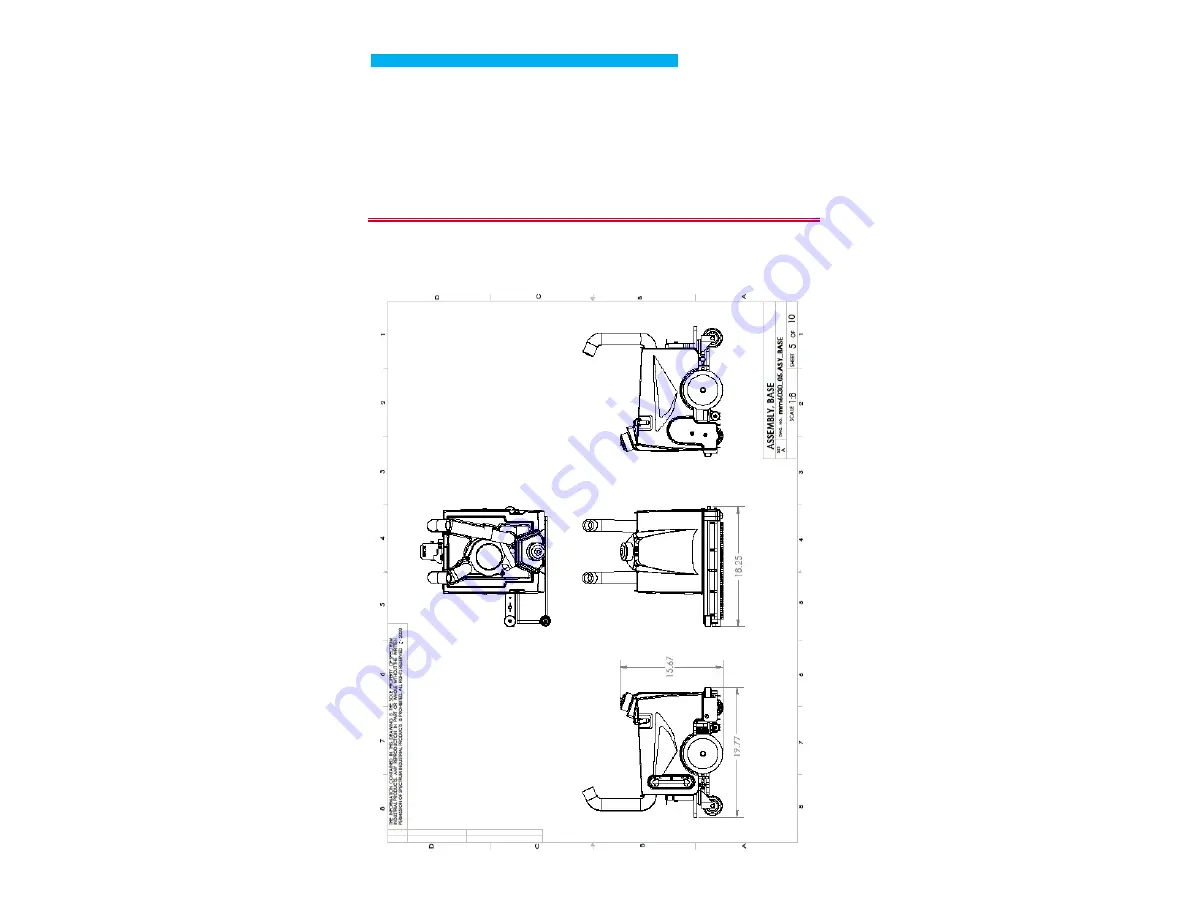
MOPIT mini PARTS DIAGRAM 

Summary of Contents for Mopit mini

Page 1: ... 2SHUDWRU V 6HUYLFH 0DQXDO ...

Page 2: ......

Page 3: ...HSODFHPHQW DQG WHQVLRQLQJ UXVK UHSODFHPHQW OHDQLQJ WKH UHFRYHU WDQN DWWHU SDFN UHSODFHPHQW UXVK PRWRU UHSODFHPHQW DWWHU FKDUJHU UHSODFHPHQW 9DFXXP PRWRU UHSODFHPHQW DWHU VROHQRLG UHSODFHPHQW DWHU GULS WXEH UHSODFHPHQW UDLQ KRVH UHSODFHPHQW GOH EHDULQJ UHSODFHPHQW ULYH EHDULQJ UHSODFHPHQW 7528 6 227 1 1RW JHWWLQJ DQ ZDWHU DWWHULHV QRW FKDUJLQJ 0RSLW LV OHDYLQJ EODFN PDUNV 0RSLW VPHOOV ZKHQ XVH LW 0...

Page 4: ... Tank This is where you fill the Mopit with water It is best to add the cleaning solution after you have filled the tank with water It is ok to let water stay in the fresh water tank for an extended period of time Using Mopit Cleaning Solution Mopit cleaning solution is very concentrated It only takes one ounce of solution per Mopit tank for normal cleaning For greasy floors you can use 2 3 ounces...

Page 5: ...leaning performance is in creased by pushing the Mopit slower Handle Bar Adjustment To adjust the handle bar height simply lift up the handle bar quick re lease lever adjust the handle and then push the quick release lever back down You can also use the Mopit mini with the quick release handle disengaged for quick height ad justment when going under tables and obstacles Water Level Gauge This is t...

Page 6: ...If the cap is not screwed on tight the ma chine will lose suction power Charging The Mopit The Mopit is battery operated Keep the Mopit plugged in whenever it is not being used You do not need to wait until the batteries are fully charged to use the Mopit You do not need to run the batteries down before you can charge the Mopit To charge the Mopit plug the Battery charger into the wall The on boar...

Page 7: ...ll on and full off Transporting The Mopit To transport the Mopit press down on the transport pedal and the Mopit will tilt back for transport Squeegee Lift Pedal The squeegee lift pedal is used for deep cleaning It allows you to make multiple scrubbing passes without picking up the water on the floor This is called double scrubbing To lift the squeegee push the pedal down and slide it to the right...

Page 8: ... lines twist the filter housing apart and remove and rinse out the filter Draining The Fresh Water Tank Occasionally you may need to drain the fresh water tank The tank will need to be drained before shipping There is no harm in leaving water in the fresh water tank for an extended period of time You will want to have the machine outside or positioned over a floor drain when you drain the tank Rem...

Page 9: ...ee blade for wear 1 Tip the Mopit on its back 2 Remove squeegee wing nut 3 Pull out the squeegee insert and remove the squeegee blade 4 Place the new squeegee blade over the squeegee insert 5 Hold the squeegee blade over the two side dowel pins and slide the squeegee insert pin into the squeegee bar receiver hole 6 Push the remainder of the squeegee insert into the squeegee bar and replace the win...

Page 10: ...s Turn the Al len wrench counterclockwise one complete turn Adjust both wheels by the same amount IMPORTANT You must adjust each wheel by the same amount Failure to do so will cause un even brush wear If you don t know if the wheels have both been evenly adjusted turn the screw as far as you can clockwise then begin again to adjust each wheel counterclockwise by the same amount It is wise with eac...

Page 11: ...back 2 Remove belt cover by removing two Allen screws with on board 5 32 tool 3 Loosen these two 1 8 Allen screws With a 3 16 Allen wrench twist the belt tensioning screw counter clockwise 4 Remove old belt 5 Installation is the above steps in reverse 6 Tension belt to 3 8 Deflection ...

Page 12: ...ar As the brush wears it can be lowered by following the in structions on page 10 For replacement follow the steps below 1 Remove the two Allen screws on the idle bearing plate by twisting them counter clockwise 2 Pull off the bearing plate 3 Pull the old brush out of the hood 4 Installation is the above steps in reverse ...

Page 13: ... a hose with a sprayer to spray out the recovery tank It may also help to back flush the drain hose Pull the Vac hose elbow out of the tank and then spray off the vacuum filter After spraying out the tank use a trigger sprayer to spray undiluted bleach all over the inside of the recovery tank Let the tank sit with the clean out cap and drain hose cap off until the inside of the recovery tank is dr...

Page 14: ...st for about 2000 charging cycles IMPORTANT It is critical that the batteries be replaced with 24Volt LiFePo4 Lithium batteries 1 Make sure all of the switches are off and Remove the 4 switch plate screws 2 Remove the charger plate thumb screw 3 pull the battery out remove quick electrical disconnect DWWHU ...

Page 15: ... is easiest to replace the brush motor with the Mopit on its back You will need a 5 32 1 8 and 3 16 Allen wrenches 1 Follow the steps on page 11 to remove the belt 2 Remove these four Allen bolts using a 5 32 Allen wrench 3 Pull the drive bearing plate off of the brush and then you can pull the motor plate out as well 4 Remove the two motor screws using a 1 8 Allen wrench Transfer the pul ley onto...

Page 16: ...gromet to the new charger Vacuum Motor Replacement 1 Drain the recovery tank per instructions on page 6 2 Pull the Vacuum and Squeegee hose out of the back of the recovery tank 3 Unlatch the three tank latches and lift the recovery tank off 4 Disconnect the quick electrical quick disconnects 5 After disconnecting the two vacuum electrical quick disconnects use a 7 16 Ratchet with an extension to r...

Page 17: ...ll out the two hoses 5 To replace follow the above steps in reverse 6 Don t forget to turn the manual water valve back on Replacing the Drip Tube Occasionally you may need to replace your drip tube it if becomes filled with debris or you can t get water consistently out of it 1 Turn off the manual water valve 2 Slide the drip tube out of the 4 clamps 3 Pull the drip tube off of the tubing at the t...

Page 18: ...lacement 1 Remove the two allen screws from the idle bear ing plate with on board tool and remove end plate 2 Use the on board 5 32 Allen tool to remove this screw 3 Replace the idle cup bearing assembly Drive Bearing Replace ment 1 Follow the instructions on pages 11 and 15 for removing the brush and brush motor 2 Pull off the bearing plate and replace with a new bearing plate assembly from spect...

Page 19: ...ng 1 Check to make sure that the charger power cord is plugged into the charger and is in good condition and that your power outlet is working 2 Call Spectrum for troubleshooting Also see page 16 on charger replace ment Mopit Is Leaving Black Marks The most common cause is not getting water onto the floor Black marks can also be caused by missing or worn squeegee wheels See above for how to fix wa...

Page 20: ...er for best cleaning If no water is getting on the floor or the water delivery is uneven the cleaning performance will be poor See page 19 Not Getting Any Water to make sure water delivery is working 2 Brush Pressure see adjusting and checking brush pressure pg 10 3 Suction and water recovery If your machine is not sucking up the water well see page 21 for help You can also lift the squeegee to do...

Page 21: ...tructions 6 Flush water down the Squeegee hose to clear any clogs Lots of water should come out of the squeegee bar during the flushing 7 Make sure the dirty water tank clean out cap is on pg 13 8 Make sure the dirty water tank is empty 9 Check the Vacuum screen inside the dirty water tank to make sure that its clean if dirty spray it off as shown in pg 13 11 Make sure the squeegee suction hole is...

Page 22: ...Page 22 MOPIT mini PARTS DIAGRAM ...

Page 23: ...Page 23 MOPIT mini PARTS DIAGRAM ...

Page 24: ...Page 24 MOPIT mini PARTS DIAGRAM ...

Page 25: ...Page 25 MOPIT mini PARTS DIAGRAM ...

Page 26: ...Page 26 MOPIT mini PARTS DIAGRAM ...

Page 27: ...Page 27 MOPIT mini PARTS DIAGRAM ...

Page 28: ...Page 28 MOPIT mini PARTS DIAGRAM ...

Page 29: ...Page 29 MOPIT mini PARTS DIAGRAM ...

Page 30: ...Page 30 MOPIT mini PARTS DIAGRAM ...

Page 31: ...Page 31 MOPIT mini PARTS DIAGRAM ...

Page 32: ...Page 32 MOPIT mini PARTS DIAGRAM ...

Page 33: ...Page 33 MOPIT mini PARTS DIAGRAM ...

Page 34: ...Page 34 MOPIT mini PARTS DIAGRAM ...

Page 35: ...Page 35 MOPIT mini PARTS DIAGRAM ...

Page 36: ...Page 36 MOPIT mini PARTS DIAGRAM ...

Page 37: ... Scrub Brush Speed 1450 RPM Brush Size 15 long 2 75 in Diameter Vacuum Motor 24 Volt 2 Stage 45 8 Water Lift Sealed Run Time per Charge Approx 60 Minutes Charger On board 24V 5 Amp Weight 70 lbs dry weight Length 18 75 Inches Height 40 inches w handle in working position 26 75 inches with handle folded Width 18 75 Inches MOPIT mini SPECIFICATIONS ...

Page 38: ...6SHFWUXP QGXVWULDO 3URGXFWV HVW 1RUWK RJDQ 8WDK 3KRQH PDLO PRSLW PRSLW FRP HE ZZZ PRSLW FRP ...

Reviews: