background image

7

SPEKTRUM DX4S • TRANSMITTER INSTRUCTION MANUAL

EN

LIST 

Individual Direction Adjustments

In some instances, you may find it necessary to independently 

adjust the control directions; for example, if you want more 

travel for left steering than right steering, perform the following 

steps:

1.  Scroll to the value you wish to change and press the Rolling 

Selector. 

  2.  When both directions are selected, move the control 

(steering or throttle) toward the control direction you wish 

to change. The selection box moves to the desired direc-

tion. You do not need to hold the control in the desired 

direction.

  3.  To change the opposite direction, simply move the control 

in that direction.

  4. Press the Rolling Selector to save the selection.
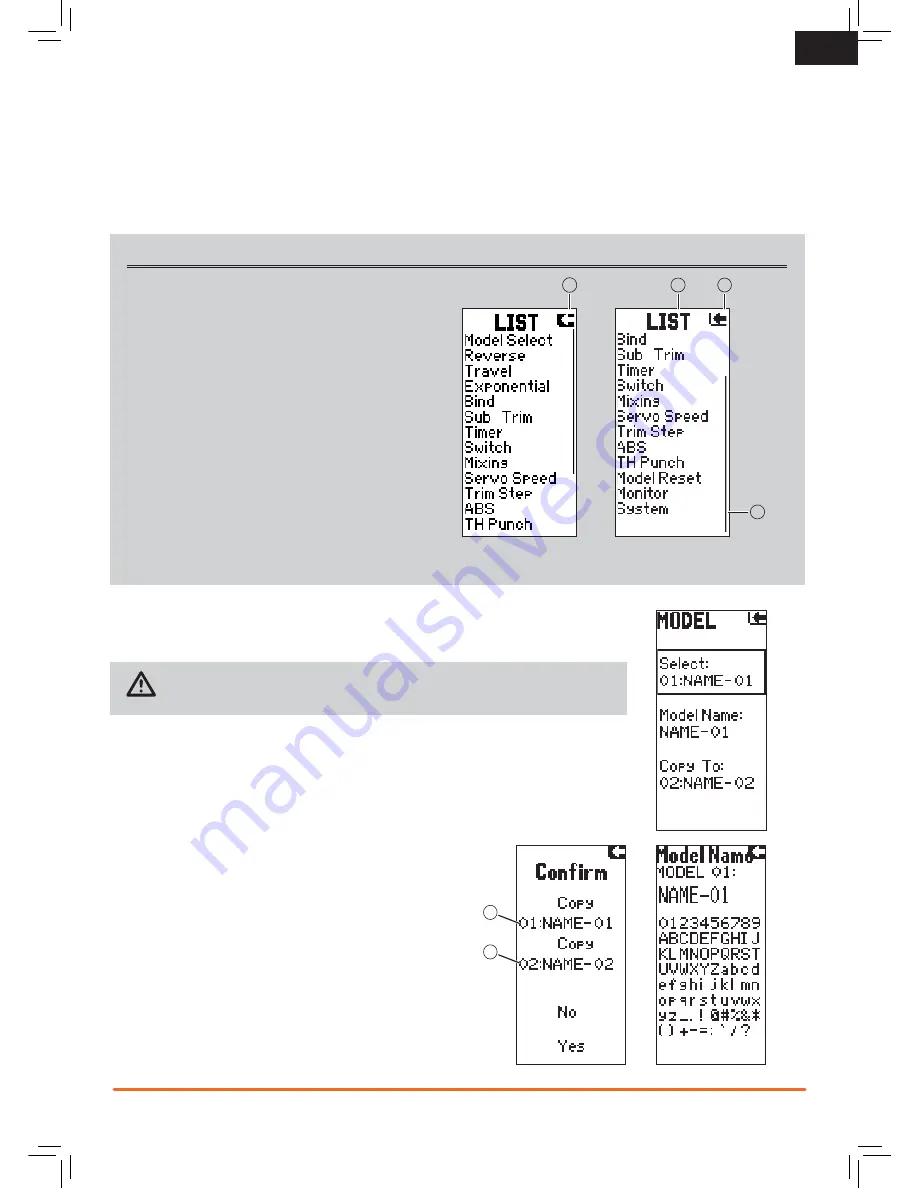
Model Select

Use the Model Select menu to change the model memory, to assign a model name or to copy a 
model. The DX4S has 30 model memories available. 

CAUTION:

 NEVER change the model in Model Select while operating a model. Changing 

the model memory interrupts the transmitter signal to the receiver and may cause loss of 

vehicle control, damage or personal injury.

Model Name

Enables you to name the selected model memory using up to eight characters. 

1. Use the roller to select a Model Name in the List.
2.  Select the character you want to change. A list of characters appear.
3. Select the character you want to use.
4.  When you are finished naming the model memory, select the arrow to save the name 

and return to the list.

Copy

The Copy function shares active model memory settings with a se-

lected model memory space. This is useful for saving setups for one 

model to adjust programming for track conditions or model setups. 


Choosing 

No

 returns to the List Screen. Choosing 

Yes

 saves the ac-

tive model settings to the selected model memory.

 Active or source model memory number

B

  Destination model memory number

IMPORTANT: 

When using the Copy function, model information  

will be permanently overwritten by the active model settings.

A

The List Screen shows other screens to set programming in the 
transmitter. 

·


A dark box (

A

) with a clear symbol or text represents the 

highlighted selection. 

· 

  The Active Screen name (

B

) is displayed at the top of 

the screen. 

·   

Choosing this arrow (

C

) will open the next higher screen, 

such as the Main Screen or List Screen. 

·

   A small bar (

D

) shows the relative position of a high-

lighted screen name in the List.

C

B

D

A

B

Summary of Contents for DX4S

Page 1: ...Instruction Manual Bedienungsanleitung Manuel d utilisation Manuale di istruzioni 4 Channel 2 4GHz DSMR System ...

Page 2: ...thereto Age Recommendation Not for Children under 14 years This is not a toy WARRANTY REGISTRATION Visit community spektrumrc com today to register your product SAFETY PRECAUTIONS Always ensure all batteries have been properly charged prior to using the model Always check all servos and their connections prior to each run Never operate your model near spectators parking areas or any other area tha...

Page 3: ...nstalling Batteries 4 Installing Optional Li Po Battery Pack 5 Changing the Rubber Grip 5 Updating the Firmware 5 ModelMatch 5 Warning Screens 6 Low Battery Alarm 6 Inactivity Alarm 6 Main Screen 6 Programming Guide 6 Individual Direction Adjustments 7 List 7 Model Select 7 Copy 7 Reverse 8 Travel 8 Exponential 8 Receiver Compatibility 9 Electric Vehicle Installation 10 Typical Nitro Vehicle Insta...

Page 4: ... J I H G F E D C B A L INSTALLING BATTERIES CAUTION NEVER remove the transmitter batteries while the model is powered on Loss of model control damage or injury may occur Press the power switch J to power ON the transmit ter The Power LED K will come on a Spektrum logo screen will show then the Main Screen will show on the LCD screen P 2 P P 1 CAUTION If using rechargeable batteries charge only rec...

Page 5: ...f the transmitter handle 2 Download the latest firmware from Community SpektrumRC com to an SD card The transmitter serial number can be found by going to the About screen 3 Install the SD card in the card reader slot on the DX4S transmitter 4 Power on the transmitter A Spektrum logo and an installation bar will appear Installation is complete when the Main screen ap pears 5 Remove the SD card fro...

Page 6: ...Press To Enter Choose or Exit a selection To move between options or change values in an option Hold for 3 seconds and release to return to the Main or Telemetry screen Roll Hold Press Using the Rolling Selector Press the Selector to enter a highlighted function Roll the Selector to highlight a function or change settings and values when selected Press and hold the Selector for more than 3 seconds...

Page 7: ...injury Model Name Enables you to name the selected model memory using up to eight characters 1 Use the roller to select a Model Name in the List 2 Select the character you want to change A list of characters appear 3 Select the character you want to use 4 When you are finished naming the model memory select the arrow to save the name and return to the list Copy The Copy function shares active mode...

Page 8: ...tivity around center normally not used Exponential The Exponential Expo function affects the response rate of the steering throttle and or brake A positive Steering Expo value for example decreases steering sensitivity around neutral to make it easier to drive at high speeds in a straight line while still allowing for maximum turning radius While sensitivity with positive Expo is decreased around ...

Page 9: ...nstall the SRS4210 receiver Using hook and loop material will affect the performance of the AVC system Mount the antenna up and away from the vehicle in an antenna tube The higher up the antenna is the better signal it will receive Aux channels The Aux channels can operate as additional servo channels or as a power supply for a personal transponder If AVC is active only two channels Steering and T...

Page 10: ... receiver battery power decreases below the recommended minimums or power to the receiver is lost The Bind Screen shows the active model and supports binding the active model memory to a receiver Bind Binding is the process of teaching the receiver the specific transmitter s code called GUID Globally Unique Identifier and storing failsafe values When a receiver is bound to a transmitter model memo...

Page 11: ...to center The orange LED flashes once 10 Remove the bind plug once the calibration and binding process is complete 11 Power off the transmitter IMPORTANT You must rebind the transmitter and receiver if you Change the servo reverse after binding Change the travel after binding Want to use the receiver with a different model memory If you change the servo reversing or travel adjust after binding AVC...

Page 12: ...ext to the name can be assigned to different directions For example ST trim causes right steering trim to trim the steering to the right ST trim trims the steering to the left Aux1 and Aux2 can only be assigned to one function at a time For example if Aux1 is assigned to 4WS Mix then it will not be available as an option on the switch screen Switch A B C D and E Inhibit Switch off AX1 Lin Ch 3 Lin...

Page 13: ...ix moves in the opposite direction 4 Wheel Steer Mix Mix options 4 Wheel Steer Front Steer Crab Steering Rear Steer 1 Scroll to Mixing then select Steer Mix 2 Select 4WS 3 Select Inh then scroll to activate the 4WS mix on Aux 1 or Aux 2 4 To inhibit a Mix Option scroll to the steering option then select Inh When a steering option is inhibited the switch ignores the option All steering options are ...

Page 14: ...rake bias between the front and rear brakes Switch You may assign the Brake Mix to a switch Assigning the Brake Mix to a switch enables you to adjust the brake bias from any screen Motor On Axle MOA Throttle Mix The MOA Throttle Mix is used to adjust the throttle bias on rock crawlers using a motor on axle configuration Mix options Rear Dig Front Dig 4WD 1 Select MOA from the Throttle Mix menu 2 S...

Page 15: ...Assigning ST Gain and TH Gain to a switch enables you to adjust the sensitivity without using the AVC menu ST GAIN and TH GAIN can be assigned to the same switch to adjust both simultaneously 5 Adjust the Steering Priority The Priority default value is 0 meaning AVC is active when the steering is close to center As you turn the steering wheel away from center neutral the transmitter controls have ...

Page 16: ... Rotate the roller to adjust the servo speed Trim Step Trim Step affects the amount the servo travels with each click of the trim but has no effect on the total trim travel The trim steps range from 1 to 20 Default is 4 To adjust the trim step 1 Select Trim Step from the List menu 2 Scroll to the desired channel and press the scroll wheel to activate the channel 3 Rotate the scroll wheel to adjust...

Page 17: ...elector IMPORTANT Throttle punch will remain active until the value is reset to zero To return to the main screen press and hold the Rolling Selector for more than three seconds Reset The Model Reset function restores factory default settings for the active model memory Choosing Yes affirms erasing saved settings for the active model memory and return of factory defaults A box shows around selecte...

Page 18: ...y Voltage Set an alarm to sound when the battery voltage reaches the limit Battery voltage options are Alkaline Ni MH or Li Po After you select the battery type you can raise the voltage limit Tx Battery Alert Type None Tone Timer None Tone Vibe Both Sets the alert type for the down timer All of the alert settings above affect all models F Rate Frame Rate Frame rate is the response rate of the rec...

Page 19: ... to be sure it is not cut or damaged Replace or contact Horizon Product Support Make sure receiver antenna is in an antenna tube and is above vehicle Receiver quits responding during operation Low battery voltage Completely recharge battery Loose or damaged wires or connectors between battery and receiver Do a check of the wires and connection between battery and receiver Repair or replace wires a...

Page 20: ...and service you in the event that you may need any assistance For questions or assistance please visit our website at www horizonhobby com submit a Product Support Inquiry or call the toll free telephone number referenced in the Warranty and Service Contact Information section to speak with a Product Support representative Inspection or Services If this Product needs to be inspected or serviced an...

Page 21: ...ration is subject to the following two conditions 1 This device may not cause harmful interference and 2 this device must accept any interference received including interference that may cause undesired operation CAUTION Changes or modifications not expressly approved by the party responsible for compliance could void the user s authority to operate the equipment This product contains a radio tran...

Page 22: ...IL USA November 20 2014 Instructions for disposal of WEEE by users in the European Union This product must not be disposed of with other waste Instead it is the user s responsibility to dispose of their waste equipment by handing it over to a designated collections point for the recycling of waste electrical and electronic equipment The separate collection and recycling of your waste equipment at ...

Reviews: