background image

7

Panther HIP-PAC

4. The air supply connection using the 1/4 inch male-
to-male  adapter  illustrated  in  Method  2  is  also  ap-
proved for use with Methods 3 and 4.

a.  Method  1  is  preferred  when  only  one  length  of 
hose is required, since it allows the hose to be dis-
connected from the air supply.

b.  Method  3  is  preferred  when  multiple  lengths  of 
hose (maximum of three) are required, eliminating 

the  cost  of  quick-disconnect  couplers  at  the  hose 

junctions.

5. Pressurize and check for leaks with a bubble-type 

leak detector. If leaks are detected:

a. Disassemble and repeat steps 3 through 5.

b. If the leaks persist, remove the hose from ser

-

vice and have repairs made by a SPERIAN-certified 

technician.

WARNING

Always  verify  that  the  swivel  nut  gas

-

kets are in place and undamaged before 

assembly.  Missing  or  damaged  swivel 

nut gaskets may allow contaminants to 

leak into the system causing illness or 

death.

C. Donning

WARNING

• Always don, remove, and fit check the 

respirator  in  a  safe,  uncontaminated 

area.

• The regulator must be attached to the 

Panther  HIP-PAC  air  cylinder  before 

connecting  the  air  line  hose  to  the  air 
supply. Using the supplied air line with-
out the regulator being attached to the 

cylinder could result in loss of air, caus

-

ing illness or death.

•  Verify  that  the  air  cylinder  valve  is 

turned off before connecting to the air 

supply. Using the Panther HIP-PAC with 

the air cylinder turned on while connect-

ed to the air supply will cause loss of air 

in the cylinder, resulting in reduced es-

cape time in case of an emergency.

• Always disengage the regulator from 

the facepiece and return it to the waist 

belt-mounted receiver when not in use. 

This  will  prevent  contaminants  from 

entering  the  regulator  outlet  port.  Dirt, 
dust, and water may enter the regulator, 

causing it to malfunction.

•  Failure  to  comply  with  this  Warning 

may lead to serious personal injury, se-
rious illness, or death.

1. Verify that the air cylinder valve is turned off.

2.  Verify  that  the  bypass  is  in  the  OFF  position  and 
that the cylinder gauge reads full.

3.  Depress  the  shutoff  button  on  the  second  stage 
regulator.

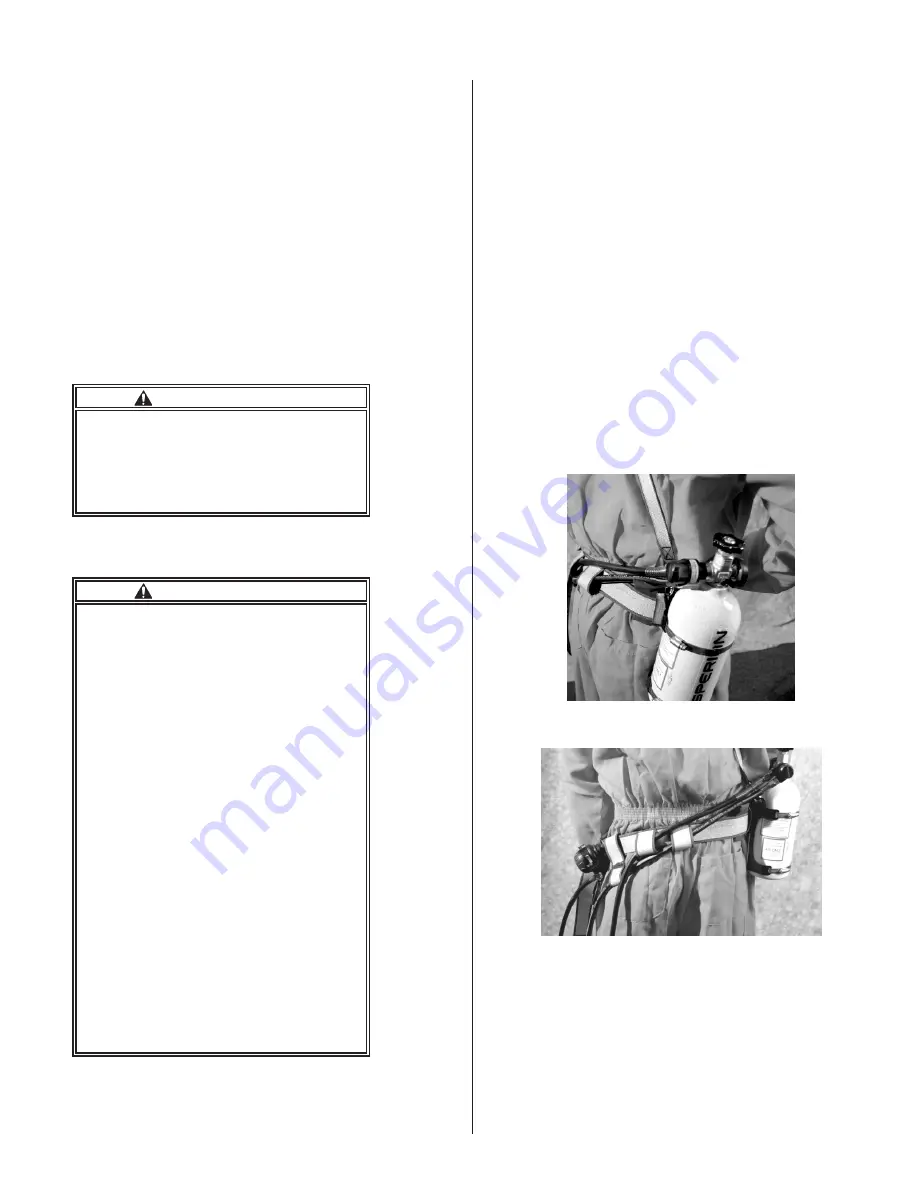
4. Ensure that the waist belt and hip pad (if used) are 

properly positioned on the tank mounting bracket belt 

loop. See Figure 3. 

5. Insert the air line hose through the first waist belt 

loop  on  the  back  of  the  waist  belt  and  the  restraint 

sleeve located on the waist belt. See Figure 4.

6. Route the second stage hose through the second 

loop on the back of the waist belt. Position the second 

stage hose so that it routes under your left arm. (If the 
hose is too tight, adjust the cylinder nearer the small 

of your back.)

NOTE

The  following  steps  7-10  do  not  apply  to 
the 5-minute and 10-minute nylon harness 
assembly, P/N 975230.

Figure 3. Waist Belt and Hip Pad Position

Figure 4. Routing of Hoses

7. Ensure that the regulator receiver is attached to the 

waist belt just behind the snap hook.

8. Ensure that the waist belt is laced properly through 

the D-ring slide and the snap hook. See Figure 5.

Summary of Contents for Panther Hip-Pac 9649

Page 1: ...D BREATHING APPARATUS P9684 SERIES 5 and 10 Minute Escape P9685 SERIES 15 Minute Escape P9686 SERIES HP 10 Minute Escape 9649 SERIES HP 10 Minute Escape OPERATION MANUAL WARNING DO NOT USE this respir...

Page 2: ......

Page 3: ...valve and pressure gauge assembly first stage regulator second stage regulator facepiece waist belt and regulator hose The cylinder stores 8 cubic feet of air at 2216 psig for the 5 minute apparatus...

Page 4: ...st cannot be obtained See ANSI Z88 2 latest edition and OSHA 1910 134 Beards and side burns will prevent good facepiece seal Do not use this respirator unless you are clean shaven WARNING Continued Th...

Page 5: ...ering the face piece and causing a severe reaction Do not use this respirator if you have been sensitized from previous exposure or believe that you may be sensitive or al lergic to any chemical until...

Page 6: ...tacles Kit all 2020 Series Facepieces Wire Frame 964044 Spectacles Kit all 2020 Series Facepieces NexSpex B140095 Lens Cover Clear Classic Facepiece 702019 Lens Cover Tinted TwentyTwenty Plus 702028 L...

Page 7: ...Classic Facepiece 702019 Lens Cover Tinted TwentyTwenty Plus 702028 Lens Cover Clear TwentyTwenty Plus 951015 Anti fog Solution 1 oz 951016 Anti fog Solution 16 oz 981805 Anti fog Wipes Box of 100 B14...

Page 8: ...rator hose This operation requires a torque wrench WARNING Carefully inspect and clean all threads to remove foreign material Foreign ma terial entering the air line can restrict or block air flow to...

Page 9: ...turned on while connect ed to the air supply will cause loss of air in the cylinder resulting in reduced es cape time in case of an emergency Always disengage the regulator from the facepiece and ret...

Page 10: ...operly on the face and the regulator installed and activated Failure to comply with this Warning may lead to serious personal injury se rious illness or death 16 There are two methods depending upon w...

Page 11: ...ens The Challenge NXT PVC lens neoprene neck seal and adhesive all may react in a different manner when exposed to chemicals or chemical mixtures You must verify that none of the components of the hoo...

Page 12: ...tons when installing the regulator WARNING Rotate and tug the regulator to ensure that both release buttons are properly engaged in the AIR KLIC Do not push the release buttons while verifying the eng...

Page 13: ...eathing exhale forcefully The regulator should return to normal flow b If the free flow continues open and close the by pass once or depress the manual override button once c If the problem persists I...

Page 14: ...water and a mild detergent 2 Fully immerse the facepiece in the solution 3 Agitate the facepiece and gently clean with a soft brush 4 Thoroughly rinse the facepiece in fresh water paying particular a...

Page 15: ...cleaning may require reapplication of anti fog coating to the facepiece lens Use only SPERIAN Anti Fog Solution P N 951015 1 oz or P N 951016 16 oz 6 After cleaning three drops of anti fog solution m...

Page 16: ...ly rinse the exterior surfaces and the interior of the outlet tube with fresh water Scrub excess soap away with the brush 5 Dry with a clean cloth or with low pressure 15 psig maximum clean breathing...

Page 17: ...F Cylinders damaged by fire or exposed to heat of 350 F must be destroyed Repainted or refinished cylinders must be hydrostatically tested before reuse WARNING Continued Do not fill a composite cylind...

Page 18: ...l be maintained at 65 F 53 9 C or lower or less than 24 0 ppm by volume moisture content UNDER NO CIRCUM STANCES SHALL AN AIR CYLINDER BE FILLED OR PARTIALLY FILLED WITH OXYGEN b Maximum Fill Pressure...

Page 19: ...cold weather problems however cold weather condi tions may also cause other problems not listed below 1 Air Supply NOTE Cold weather conditions require very dry air Moisture entering the HIP PAC may...

Page 20: ...e and regulator until the normal function of the AIR KLIC button and or the shutoff button returns j Should ice form on the regulator while the regula tor is in the regulator receiver rotate the regul...

Page 21: ...tures especially if there is ice d Use HIP PAC accessories with extreme care in cold weather conditions Visually inspect them pe riodically for ice J Storage Inspect clean and repair as required befor...

Page 22: ...placement or repair of defective parts and such other necessary maintenance and repair as may be required Normal wear and tear and parts damaged by abuse misuse negligence or accidents are specificall...

Page 23: ...k seal to tear SECOND STAGE REGULATOR AND HOSE 1 Cracks or heat damage to housing or cover 2 Faulty operation of bypass valve First Breath On AIR KLIC or override buttons 3 Dirt and debris in the outl...

Page 24: ...remove the rim nuts and screws 2 Gently separate the rims from the facepiece 3 Pull the silicone skirt away from the lens 4 Remove the old lens 5 Match one corner of the new lens with a corner of the...

Page 25: ...disconnect nipple 4 Listen to the second stage regulator it should not flow 5 Listen for leaks at all hose connections 6 Don the facepiece 7 Connect the facepiece to the second stage regulator and in...

Page 26: ...ation Specifica tion G 7 1 for Type 1 Grade D air having a moisture content expressed as dewpoint of 65 F or lower The cylinder shall be marked Fill With Compressed Air Only and shall meet applicable...

Page 27: ......

Page 28: ......

Page 29: ......

Page 30: ......

Page 31: ......

Page 32: ......

Page 33: ......

Page 34: ......

Page 35: ...www sperianprotection com...

Reviews: