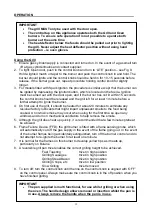
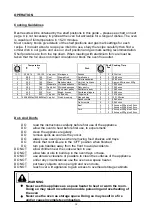
background image


OPERATION  


Cooking Guidelines 

 
Best r
page. 

s

 oven 

is capable
Most cook
recipe. If 

n find a 

imilar dish in our guide and use our shelf position and gas mark setting recommendation. 

 from the top down. When roasting with aluminium foil care must be 

ken that the foil does not impair circulation or block the oven flue outlet. 


Do

esults will be obtained by the shelf positions in this guide – please see chart on next 

It i  not necessary to preheat the oven but advisable for a range of dishes. The

 of full temperature in 15-20 minutes.  

ery books give details of the shelf positions and gas mark settings for each 

in doubt about a recipe you intend to use, study the recipe carefully the

s
Shelf positions are
ta


's And Don'ts 


DO 

read the instructions carefully before first use of the appliance 


pliance regularly. 


DO 

turn pan handles away from the front to avoid accidents 

ar the cooker when in use.  

O NOT  

allow fats or oils to build up in the oven trays or base. 


DO 

allow the oven to heat before first use, to expel smells 

DO 

clean the ap


DO 

remove spills as soon as they occur. 

DO 

always use oven gloves when removing food shelves and trays. 

DO 

check that controls are in the ‘OFF’ position when finished. 

 
DO NOT  

allow children ne

D
DO NOT  

use abrasive cleaners or powders to clean the surfaces of the appliance. 

DO NOT  

under any circumstances use the oven as a space heater. 

DO NOT  

put heavy objects onto open grill and oven doors. 

DO NOT  

reach over a lit appliance to gain access to overhead storage cabinets 


Temperature 


o

F              

o

¼ - ½  

255-275 

120-135 

Very cool  Meringues 

1 285  140 

Cool 

Stewed 

fruit 

300 

150 

Cool 

Rich fruit cake 

3 330  165 

Warm 

Baked 

custard 

4 355  180 

Moderate 

Victoria 

sandwich 

385 

195 

Fairly hot 

Whisked sponges 

410 

210 

Hot 

Short crust pastry 

7 430  220 

Hot Bread, 

scones 

445 

230 

Very hot 

Puff pastry 

465/480Max  240/260Max Very hot 

Quick browning 

Shelf  Cooking Time 

Dish 

Pos 

Scones 7 

8-15mins 

Small cakes 

15-25mins 

Victoria sandwich 

20-30mins 

Very rich fruit cake 

Approx. 60mins per 500g 

Puff pastry 

15-30mins 

Flaky pastry 

15-30mins 

Shortcrust pastry 

15-55mins 

Shortbread fingers 

25-30mins 

Ginger nuts 

12-16mins 

Rice pudding 

100-120mins 

Baked custard 

50-60mins 

Fruit crumble 

30-40mins 

Beef 3 


25min per 500g plus 25min
15min per 500g plus 20min


Pork 3 


30min per 500g plus 35
25min per 500g plus 25min 

min 

WARNING 

  Never use this appliance as a space heater to heat or warm the room. 

Doing so may result in carbon monoxide poisoning and overheating of 
the oven 

  Never use the oven as storage space. Doing so may result in a fire 

and/or cause incomplete combustion.


14

Summary of Contents for S~OH70000Y

Page 1: ... FUTURE REFERENCE MODELS S OH70000Y TRIPLEX S OH71000Y TRIPLEX DUAL FUEL SPINFLO LIMITED 19 Oakham Drive Parkwood Industrial Estate Rutland Road Sheffield S3 9QY ENGLAND TEL 44 0 114 273 8157 FAX 44 0 114 275 3094 BUILD IN APPLIANCES FOR USE WITH LIQUIFIED PETROLEUM GAS CO UN T RY L E I S U R E ...

Page 2: ...l vehicle of all occupants Turn off the gas supply tank valve s or main gas supply Immediately call your gas supplier for instructions If you cannot reach your gas supplier call the fire department Have the gas system checked and leakage source corrected by a qualified installer service agency manufacturer or dealer or the gas supplier WARNING If the information in this manual is not followed exac...

Page 3: ...3 ...

Page 4: ...4 ...

Page 5: ...5 ...

Page 6: ...6 ...

Page 7: ...7 ...

Page 8: ...110V 60Hz N A 1 x 1000W Max plate N A N A N A Grill burner heat input 4900 Btu hr 4900 Btu hr 4900 Btu hr 4900 Btu hr 4900 Btu hr Oven burner heat input 5700 Btu hr 5700 Btu hr 5700 Btu hr 5700 Btu hr 5700 Btu hr Injector size mm Hotplate Burners Sabaf 2x0 67 1x0 81 Sabaf 2x0 67 Sabaf 0 67 Sabaf 2x0 67 1x0 53 Sabaf 2x0 62 1x0 53 Grill burner Sabaf 0 62 Sabaf 0 62 Sabaf 0 62 Sabaf 0 62 Sabaf 0 62 O...

Page 9: ...use with any other gas de front of the oven compartment behind the opane This appliance is designed for use Provision of Ventilation e s o ti f heat and moi e in a ll ventilated and in accordance obstruct the flow of combustion or ventilation ir e adequate ventilation for complete combustion of gas mperature mmediate surroundings within safe limits The use of a gas cooking applianc room in which i...

Page 10: ...and is monitored by a thermocouple probe In the event of the burner flames being accidentally extinguished turn off the burner control and do not attempt to re ignite the burner for at least one minute To light Push in the control knob and turn to LITE position see Fig 6 Hold a lighted match or taper to the burner and push the control knob in and hold It is necessary to hold the knob depressed aft...

Page 11: ...til the line or pointer on the knob lines up with tplate off rotate the kn control panel he hotplate is a cy correctly sized pan with a flat heavy gauge base should be used Pa he same or slightly larger up to 1 2 5 cm oversize u g your hotplate for the first time we recommend that you prime and then it e Hotplate a r o he hotpl te fo a short period without a pan to harden and burn off m um to high...

Page 12: ...o the burner and push the control knob in and hold The burner should ignite and the control knob should be held in for 10 15 seconds before release If the burner goes out repeat procedure holding control knob for slightly longer 3 For models fitted with Spark Ignition the procedure is similar except that the burner c be ignited by depressing the ignition button which is located o must be carried o...

Page 13: ...es to eliminate any resid factory lubricants that might impart unpleasant smells to the meals being cooked non toxic smoke may occur when using for the first time so open any windows and on mechanical ventilators to help remove the smoke 5 Although the oven does heat up quickly it is recommended that a 10 minutes preheat be allowed The oven should be up to full temperature in about 15 20mins 6 To ...

Page 14: ...ne D DO NOT use abrasive cleaners or powders to clean the surfaces of the appliance DO NOT under any circumstances use the oven as a space heater DO NOT put heavy objects onto open grill and oven doors DO NOT reach over a lit appliance to gain access to overhead storage cabinets Temperature o F o C 255 275 120 135 Very cool Meringues 1 285 140 Cool Stewed fruit 2 300 150 Cool Rich fruit cake 3 330...

Page 15: ...ked flame leak investigation should be conducted according to the following instructions A of the are onside ed to be Yellow tipping of burner flame Burners not igniting properly B er h Burners exting upb a t to Any following c r abnormal operation and may require servicing Sooting of cooking utensils urn s failing to remain alig t uished by c oard doors Gas valves th t are difficul turn W O he O ...

Page 16: ...le MUS 2 2 ea between 3in and 6in 1965 to 3850mm ve rect draught to the appliance ig el rear vent directly behind the app This appliance maybe installed in a kitchen kitchen diner but NOT in a room containing a bath or a shower LP gas appliances must not be fitted below ground level e g basement Choose a location free of draughts open doors and clear of combustible materials and other fire hazards...

Page 17: ...portant that the regulator should be s ng used Excessive pressure must not be permitted e flame on either the top burners or the grill show a tendency to lift it is probabl line pressure is too great Should there be excessive yellow tips resulting in n it is probable that the line pressure is too low and in either case the burners shoul be used until the line pressure has been checked e fixed aera...

Page 18: ...lt electrical supply of the recreational vehicle is made via the spade appliance s All Models Pressure Testing The appliance and its individual shutoff valve must be disconnected from the gas sup piping system during any pressure testing of the system ply at test pressures in excess of psi 3 5kPa v the l e service provider in your area The appliance must b manual shutoff ressures equa e isolated f...

Page 19: ...ak testing of manifold f Turn all control valves to High max setting Pressurize the system max 60 ins wc 150mbar Verify all control valves are gas sound ie no pressure loss m rify the control valve and pipework to the respective burner are gas sound ie no pressure loss Repeat for each of the control valves and gas circuit In all cases if a leak is detected its location should be established by usi...

Page 20: ...a If R Disconnect from gas supply 1 and electric supply if Dual Fuel Lift off the Panrest and remove the two screws securing each burner spreader Remove front fascia by removing all push on control knobs and unscrew the two recessed fixed nuts a both two central screws securing the pressing to the rear box section Rem front retaining screws located each side and access surface from Note On Dual Fu...

Page 21: ...he two retaining screws and lift off the unit Hob burner injector No81 No67 No62 No53 see Fig 11 Lift off the panrest and remove the two screws retaining the burner spreader Lift off the burner spreader to gain access to the injector A box spanner or m socket should be used to unscrew the injector from the burner cup Grill burner injector No62 see Fig 11 Disconnect from gas supply 1 Remove applian...

Page 22: ...22 ...

Page 23: ...TED 19 Oakham Drive Parkwood Industrial Estate Rutland Road Sheffield S3 9QY ENGLAND TÉL 44 0 114 273 8157 TÉLÉC 44 0 114 275 3094 MODÈLES S OH70000Y TRIPLEX S OH71000Y TRIPLEX DUAL FUEL POUR LES ÉTATS UNIS ET LE CANADA MODE D EMPLOI ET NOTICE D INSTALLATION LIRE ET CONSERVER POUR CONSULTATION FUTURE 23 ...

Page 24: ...Ne toucher à aucun commutateur électrique Ne pas utiliser de téléphone dans votre véhicule de plaisance Faire descendre tous les occupants du véhicule de plaisance Fermer le ou les robinets d alimentation en gaz ou l alimentation principale en gaz Appeler immédiatement votre fournisseur de gaz et suivre ses instructions Si vous ne pouvez joindre votre fournisseur de gaz appeler le service d incend...

Page 25: ...25 ...

Page 26: ...26 26 ...

Page 27: ...27 ...

Page 28: ...28 ...

Page 29: ...29 ...

Page 30: ...S O S O S O Apport de chaleur du br 4900 Btu h 4900 Btu h ûleur du gril 4900 Btu h 4900 Btu h 4900 Btu h Apport de chaleur du br 5700 Btu h 5700 Btu h ûleur du four 5700 Btu h 5700 Btu h 5700 Btu h Dimension des injecteurs mm Brûleurs de Sabaf 2 x 0 67 1 x 0 81 Sabaf 2 x 0 67 s plaques Sabaf 0 67 Sabaf 2 x 0 67 1 x 0 53 Sabaf 2 x 0 62 1 x 0 53 Brûleur du gril Sabaf 0 62 Sabaf 0 62 Sabaf 0 62 Sabaf...

Page 31: ...ns p tra e C é p et ap ur ê pareil e u po d autre r êtr du gaz propane et ne doit pas être tion L utilisation d une cuis elle est installée Vous locaux et nationaux Ne pas bloquer la ventilation En général l appareil doit être combustion complète du gaz ains température de l espace environnant imm E inière à gaz eur e midité dans la e a u i n v ment a i e édiat dans les limites de sécurité mp nt p...

Page 32: ...eur moins efficace Éviter d utiliser des casseroles qui sont vieilles ou déformées car elles pourraient être instables Le couvercle doit être complètement ouvert pendant l utilisation des brûleurs de la table de cuisson U Vous assurer que l alimentation en gaz ou le cylindre à gaz est branché et ouvert Dans le cas où vous sentiriez une odeur de gaz fermer le cylindre à gaz ou l alimentation princi...

Page 33: ...m de plus re fois nous recommandons que vous Co r troi n Refroidir puis préparer ou conditionner la plaque de cuisson D a éte tou En inute Ré la plaque su que le courant électrique est allumé commande de la plaque de cuisson est numéroté de 1 à 6 Fig 8 to er le bouton dans un sens ou dans l autre jusqu à l endroit voulu La pos ég ge le plus bas Pour fermer la plaque tourner le bouton jusqu à ce qu...

Page 34: ...n gaz au cas où la flamme leur s éteindraient accidentellement te r au butane 1 an le cas où vous sentiriez une odeur de gaz fermer le cylindre à gaz ou limentation principale et prenez contact avec le fournisseur s ou allumer Ouvrir la porte appuyer sur le bouton de commande et le tou an la position LITE Fig 9 Approcher une allumette enflammée ou bouton répéter cette opération en mainten 3 Pour l...

Page 35: ...de 7 Grille la grille a été conçue pour permettre une bonne circulation à l arrière du four Elle est dotée d une barre surélevée pour empêcher que les plaques ou les récipients touchent l arrière du four Pour retirer la grille tirer vers l avant jusqu à ce qu elle s arrête soulever l avant et retirer l alimentation principale et prenez contact avec le fournisseur ur allumer Ouvrir la porte appuyer...

Page 36: ...et le centre et le fond équivaut à environ 30 0 F Utiliser les variations de températures p cuire en même temps différents plats nécessitant différentes températures De cette fa s profitez au maximum de votre consommation de gaz Prendre soin de ne p surcharger le four de façon à laisser assez d espace pour que la chaleur circule librement ectives sur la cuisson ur obtenir les meilleurs résultats t...

Page 37: ... ou du four À NE PAS FAIRE accéder aux armoires suspendues en éte Température o F o C 255 275 120 135 Très basse Meringues 1 285 140 Basse Stewed fruit 2 0 Basse Gâteau aux fruits 300 15 riche 3 330 165 Tiède Crème au four 4 355 180 Modérée Gâteau de Savoie 5 385 195 Assez chaude Gâteau éponge 6 410 210 Chaud Pâte brisée 7 430 220 Chaud Pain scones 8 aud Pâte feuilletée 445 230 Très ch 9 465 480Ma...

Page 38: ... ir nu s ites doiv v ri con men ux d tives ci d us F n onneme t anorm une ou l autre des situations suivantes sont considérés comm des n normaux et pourraient nécessiter une réparation té de la flamme du brûleur est jaune Les Les Les és L u s Les L e fo ctionnements a L extrémi ustensiles de cuisine sont couverts de suie brûleurs ne s allument pas correctement brûleurs ne restent pas allum tilisat...

Page 39: ...ctement dans l appareil Emplacement de l appareil le s les normes nationales concernant la ventilatio llé doivent être respectées DO être doté d une ventilation comme suit tro échappement de gaz au plancher directement Fig 2 Le trou DOIT évacuer le ga 2 2 et 6 po 1965 et 3850 mm et doit être muni d un lec pour empêcher les courants d air de pénétrer directement d év d aération situé en hauteur dir...

Page 40: ...s utiliser un raccord en caoutchouc ou un xible Après le raccordement vérifier toute fuite éventuelle de gaz tant que le régulateur soit réglé à la bonne pression pour le type de gaz utilisé e jamais régler à une pression excessive térales raccord fle Cet appareil peut être utilisé avec Gaz propane seulement 11 po CE 27 4 mbar Pression d entrée maximale du régulateur po psi 34 5 mbar Pression d al...

Page 41: ...nérateur de l allumeur Il est conseillé un cordon d alimentation à cosse rectangulaire gainée Le cordon d alime Le ra o par les b d utiliser ntation doit e dirigé lo odèles Vérification de la pression êtr retenu contre la tige portante à l arrière de l appareil à l aide d un clip P et in de l appareil Tous les m L it être isolé tation en gaz en rrêt t la tuyau s kP te de l appareil et que vous ave...

Page 42: ...ncer la en gaz Pour chaque test le c rte de pression 2 Vérification de fuites des vannes de régulation High max Pressuriser le système ation de fuites de chaque vanne de régulation et de la tuyauterie Régler la vanne de régulation à tester à High Pressuriser le système max 60 t d pas de perte de pression Répéter pour chaque vanne de régulation et circuit de gaz dier ê vérification d une fuite isol...

Page 43: ...la plinthe du bas pour y accéder puis débranc l 2 Enlever la table de cuisson Pour un brûleur mixte débrancher le gaz 1 et l électricité Soulever la grille et enlever les deux vis qui retiennent le diffuseu et dévisser les deux boulons fixes encastrés et les deux vis du tableau de commande bascule Enlever section rectangulaire Enlever les deux vis de fixation avant situées de chaque côté auxquelle...

Page 44: ...o 53 Fig 11 Soulever la grille et enlever les deux vis qui retiennent le diffuseur de chaque brûleur Soulever le diffuseur du brûleur pour pouvoir accéder à l injecteur Utilise une clé polygonale ou une clé à douille miniature pour dévisser l injecteur de la cuvette base du brûleur Injecteur du brûleur du gril No 62 Fig Débrancher le gaz 1 Enlever l appareil de Desserrer la vis de serrage sur le s...

Reviews: