10
Maintaining your Deckvest
For good maintenance of this product it should be allocated to a sole user. It is advised that users
trial the Deckvest before use.
The inflatable chamber and inflation system should be checked at least every three months. In
addition, we advise you adopt a 3-level checking schedule:
1.
Check buckles and other fastenings regularly during use.
2.
Before and after use examine for damage or excessive abrasion, wear, tear or contamination.
Particular attention must be paid to the stitching and webbing, including the less accessible areas.
3.
Carry out a complete inspection every three months checking:
a.
The fabric: for cuts, tears, abrasion and damage caused by heat, chemicals etc.
b.
The lifejacket: Test general leakage by orally inflating your lifejacket until firm and let stand
overnight. A leaking lifejacket will not hold its firmness and should be replaced. To check the
oral valve, fully inflate the lifejacket and hold the tube under water. If bubbles appear, deflate
and re-inflate to test. Should the leak persist, arrange for proper lifejacket servicing at your
nearest service centre.
c.
Components: Remove and inspect all components as detailed in the section titled
"Re-arming your lifejacket" page 12.
If in doubt, send it to your nearest service centre for evaluation and/or servicing - see
www.spinlock.co.uk for details.
Any modification or repair except by our production facility is forbidden.
WARNING: If you are not completely confident about undertaking the self-inspection and
servicing of your lifejacket in accordance with these instructions, you must not use your
lifejacket again until it has been professionally inspected and serviced. (For details of your
nearest service centre see www.spinlock.co.uk).
Deflating the lifejacket
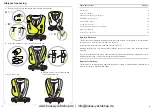
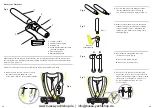
To deflate the lifejacket, reverse the oral-inflation tube cap and insert it into the valve. The cap will
not lock in the deflate position so it is necessary to hold it in place. Gently squeeze the lifejacket
until all air or gas has been expelled. Put the inflation tube cap back in its normal position.
9
Inflating your lifejacket
It is recommended that the following inflation procedures are followed:
1. MANUAL INFLATION
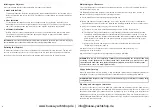
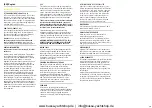
To manually inflate the lifejacket, sharply pull the rubber inflation handle on the left hand side of
the Deckvest down and across the chest. The CO2 gas cylinder inflates the chamber within five
seconds.
2. ORAL INFLATION
To orally inflate the lifejacket, locate the oral inflation tube by opening the zip at the yellow
breakout point on the wearer’s right front panel of the lifejacket. Then remove the cap from the
end of the oral inflation tube and blow into the tube until the lifejacket is fully inflated.
3. AUTOMATIC INFLATION
Inflation should occur automatically within seconds of the inflator being immersed in water.
The automatic capsule will activate the sprung piercing pin to puncture the CO2 cylinder
inflating the inflatable chamber.
INFORMATION: Over time and with changes in temperature variations in pressure may be observed. Topping up
by oral inflation may be required especially in the event of very prolonged immersion.
Usage below freezing
When the temperature is below freezing, a fully discharged cylinder may not adequately inflate your
lifejacket. Do not use your lifejacket under these conditions unless it is already partly inflated.
WARNING: CO2 inflation could over-pressurize and damage your lifejacket if already fully
orally inflated.
Cleaning and storing your lifejacket
To clean your Deckvest, remove the CO2 gas cylinder and the automatic capsule, hand wash or
sponge down in warm soapy water and rinse with clean water. Hang to dry. Be sure to replace the
automatic capsule CO2 gas cylinder and green retaining clip. (See re-arming your lifejacket after
inflation page 12). When storing your lifejacket for extended periods, keep it in a warm, dry place out
of direct sunlight. Ensure that you check your Deckvest every 3 months as outlined above and replace
the automatic capsule annually.
www.busse-yachtshop.de | info@busse-yachtshop.de


