Appendix A: Install and Configure Spirent Virtual LabServer
Spirent Virtual LabServer (vLS)
66
|
Getting Started with Spirent TestCenter
Configure System
Navigate to the first item of the top-level menu,
Configure System
, to see the following:
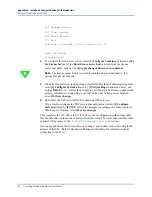
>>>>> System configuration <<<<<
[1] Networking
[2] Hostname
[3] Admin Password
[4] DNS
[5] NTP
[6] Proxy
[7] SSH
[8] SSL
[9] Exit without saving
If any configuration changes are made, an additional option
Save changes
will appear on
this menu. The changes must be saved, or they will be lost upon exiting the shell.
•
To enable/disable DHCP, select
[1]
Networking
and enter “y” or “n” at the
Use
DHCP (y/n):
prompt. If disabling, follow the subsequent prompts to set the IP
address, netmask, gateway, and any optional static routes, to configure a static IP for
the VM.
•
To set the VM hostname, select
[2]
Hostname
and enter the new name at the
Current
hostname:
prompt.
Note:
The container must be restarted for the LabServer to display the new name in
the Host
field of the Session Manager.
From the top level of the administration menu, select [2]
Configure Container
, [3]
Reset container,
and [6]
Apply change and start new container
. After the restart,
newly created sessions will reflect the new hostname.
•
To change the
admin
user’s password, select
[3]
Admin Password
and enter the new
password at the
Password:
prompt.
•
To configure DNS, select
[4]
DNS
and enter nameserver IP addresses and search
domains, as necessary.
•
To enable/disable NTP, select
[5]
NTP
and enter “y” or “n” at the
Enable NTP?
prompt. If enabling, follow the subsequent prompts to add the NTP server(s).
•
To enable/disable HTTP/HTTPS proxy, select
[6]
Proxy
and enter “y” or “n” at the
Enable HTTP/HTTPS Proxy?
Prompt, and enter the HTTP Proxy and HTTPS
Proxy addresses.
•
To enable/disable SSH, select
[7] SSH
and enter “y” or “n” at the
Enable SSH?
prompt.


