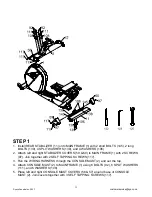
background image

Dyaco


Canada


Inc.


2017


customerservice@dyaco.ca


Thank you for your purchase of this quality stationary bike trainer from Dyaco 
Canada Inc. Your new bike was manufactured by one of the leading fitness 
manufacturers in the world and is backed by one of the most comprehensive 
warranties available. Through your dealer, Dyaco Canada Inc. will do all we can to 
make your ownership experience as pleasant as possible for many years to come. 
The local dealership where you purchased this bike is your administrator for all 
Dyaco Canada Inc. warranty and service needs. Their responsibility is to provide you 
with the technical knowledge and service personnel to make your experience more 
informed and any difficulties easier to remedy. 
 
Please take a moment at this time to record the name of the dealer, their telephone 
number, and the date of purchase below to make any future, needed contact easy. We 
appreciate your support and we will always remember that you are the reason that we 
are in business. Please complete and mail your registration card today and enjoy your 
new bike. 
 
Yours in Health, 
Dyaco Canada Inc. 


Name of Dealer______________________________________ 
Telephone Number of Dealer___________________________ 
Purchase Date_______________________________________ 


RECORD YOUR SERIAL NUMBER 

Please record the Serial Number of this fitness product in the space provided below. 


Serial Number

_______________________________________ 


REGISTER YOUR PURCHASE 

The self-addressed product registration card must be completed in full and returned to 
Dyaco 

Canada 

Inc. 


CONGRATULATIONS ON YOUR 

NEW BIKE AND WELCOME 

TO THE SPIRIT FAMILY!

Product Registration 

Summary of Contents for CR900

Page 1: ...Retain For Future Reference Owner s Manual Model No 16207789000 CR900 Assembly Operation Adjustments Parts Warranty CAUTION Read and understand this manual before operating unit ...

Page 2: ...ns 9 Operation of Your Bike 15 Program Features 18 Using Heart Rate Transmitter optional 25 General Maintenance 28 Exploded View Diagram 29 Parts List 30 Training Guidelines 34 Stretching 38 Manufacturer s Limited Warranty 40 Thank you for purchasing our product please save these instructions Please do not perform or attempt any customizing adjustments repair or maintenance that is not described i...

Page 3: ...remedy Please take a moment at this time to record the name of the dealer their telephone number and the date of purchase below to make any future needed contact easy We appreciate your support and we will always remember that you are the reason that we are in business Please complete and mail your registration card today and enjoy your new bike Yours in Health Dyaco Canada Inc Name of Dealer_____...

Page 4: ...r lifestyle Before reading further please review the drawing below and familiarize yourself with the parts that are labeled Read this manual carefully before using the SPIRIT CR900 Bike Although Dyaco Canada Inc constructs its products with the finest materials and uses the highest standards of manufacturing and quality control there can sometimes be missing parts or incorrectly sized parts If you...

Page 5: ... to use an equipment mat to prevent the unit from moving while it is being used which could possibly scratch or damage the surface of your floor Keep the bike exerciser indoors away from moisture and dust 7 No changes must be made which might compromise the safety of the equipment 8 It is recommended to have a minimum of 1 safe clearance around the exercise equipment while in use 9 Keep children a...

Page 6: ... a highly gaseous environment Never drop or insert any object into any openings Do not use outdoors Do not attempt to use your bike for any purpose other than for the purpose it is intended The hand pulse sensors are not medical devices Various factors including the user s movement may affect the accuracy of heart rate readings The pulse sensors are intended only as exercise aids in determining he...

Page 7: ... and completely understanding the results of any operational change you request from the computer Understand that changes in resistance do not occur immediately Set your desired resistance on the computer console and release the adjustment key The computer will obey the command gradually Use caution while participating in other activities while pedaling on your bike such as watching television rea...

Page 8: ...erservice dyaco ca WARNING DECAL REPLACEMENT The decal shown below has been placed on the bike If the decal is missing or illegible please call our Customer Service Department toll free at 1 888 707 1880 to order a replacement decal ...

Page 9: ...s If damaged parts are found or parts are missing contact your dealer immediately 3 Locate the hardware package Remove the tools first Remove the hardware for each step as needed to avoid confusion The numbers in the instructions that are in parenthesis correspond to the item number from the assembly drawing for reference ASSEMBLY TOOLS 122 Phillips Head Screwdriver 1 pc 126 13 15mm Wrench 1 pc 12...

Page 10: ...lat Washer 6pcs 111 Ø1 4 Split Washer 6pcs 117 3 5 12mm Sheet Metal Screw 5pcs 139 M10 55mm Hex Head Bolt 2pcs 94 M8 25m m Socket Head Cap Bolt 2pcs 97 M5 12mm Phillips Head Screw 8pcs 105 Ø5 16 Ø18 1 5T Flat Washer 2pcs 112 Ø5 16 1 5T Split Washer 2pcs 85 M10 25mm Hex Head Bolt 6pcs 86 M10 50mm Hex Head Bolt 6pcs 92 M6 12 mm Socket Head Cap Bolt 2pcs 101 M10 8T Nyloc Nut 4pcs 106 Ø3 8 Ø25 2 0T Fl...

Page 11: ...right STABILIZER COVERS 59 60 to MAIN FRAME 1 with 2 SCREWS 97 Join together with 2 SELF TAPPING SCREWS 117 3 Run the WIRING HARNESS through the CONSOLE MAST 2 and out the top 4 Attach CONSOLE MAST 2 to MAIN FRAME 1 using 6 BOLTS 92 6 SPLIT WASHERS 111 and 6 WASHERS 108 5 Place left and right CONSOLE MAST COVERS 56 57 around base of CONSOLE MAST 2 Join covers together with 3 SELF TAPPING SCREWS 11...

Page 12: ... CONSOLE MAST 2 with 2 BOLTS 94 2 SPLIT WASHERS 112 and 2 WASHERS 105 2 Connect WIRING HARNESS CABLES 74 131 to CONSOLE 68 3 Attach CONSOLE 68 to CONSOLE MAST 2 with 4 SCREWS 97 Ensure all cables do not become pinched 4 Attach CONSOLE BRACKET COVER 64 to CONSOLE MAST 2 using 4 SCREWS 97 ...

Page 13: ...FRAME 5 using 4 long BOLTS 86 4 shot BOLTS 85 12 WASHERS 106 and 4 NUTS 101 And connect the WIRING HARNESS CABLES between REAR HANDLEBAR 6 and SEAT CARRIAGE FRAME 5 4 Loosen 2 SCREWS 97 to remove SEAT COVER RETAINING BRACKET 41 from SEAT BACK COVER 3 5 Attach REAR HANDLEBAR COVER 61 to REAR HANDLEBAR 6 using 2 SELF TAPPING SCREWS 116 6 Attach CUP HOLDERS 120 121 to REAR HANDLE BAR 6 using 4 SELF T...

Page 14: ...17 customerservice dyaco ca STEP 4 1 Install the PEDALS 26L 26R onto the CRANK ARMS 22 23 The left pedal has a reverse thread and will be screwed in counterclockwise 2 Attach SEAT 42 to SEAT CARRIAGE FRAME 5 with 4 BOLTS 90 ...

Page 15: ...daling and the display will light up Once powered on the Message Window will be scrolling the start up message You may now begin your workout program You can select a program or press start to begin C SAFE FEATURE Your console is equipped with a C SAFE feature The Power POWER port can be used for powering a remote controlled audio visual system by connecting a cable from the remote to the Power po...

Page 16: ...on On the left of the Message Window is a button labeled Scan When the Scan button is pressed the next set of information will appear METs Time Remaining Calories Hour and Speed Pressing the Scan button the Scan mode is activated and the Message Window will show each set of data for four seconds then switch to the next set of data in a continuous loop Pressing the Scan button again will bring you ...

Page 17: ...eading Although we cannot provide an exact calorie count we do want to be as close as possible CALORIE NOTE Calorie readings on every piece of exercise equipment are not accurate and tend to vary widely They are meant only as a guide to monitor your progress from workout to workout The only way to measure your calorie burn accurately is in a clinical setting connected to a fit test monitoring equi...

Page 18: ...the Enter key to accept the new number and proceed on to the next screen 4 You are now asked to enter your Weight You may adjust the Weight number using the Up and Down keys or the numeric key pad then press enter to continue 5 Now you are finished editing the settings and can begin your workout by pressing the Start key You can also go back and modify your settings by pressing the Enter key NOTE ...

Page 19: ...2 3 of the workout This program will challenge your ability to sustain your energy output for an extended period of time CARDIO This program presents a quick progression up to near maximum resistance level default or user input level It has slight fluctuations up and down to allow your heart rate to elevate and then recover repeatedly before beginning a quick cool down This will build up your hear...

Page 20: ...ork 8 During the program you will be able to scroll through the data in the Message Window by pressing the Scan key next to the Message Window 9 When the program ends the Message Window and data windows will show a summary of your workout The summary will be displayed for a short time then the console will return to the start up display HIIT PROGRAM The HIIT or High Intensity Interval Training pro...

Page 21: ... and the workout summary will be displayed CONSTANT WATT PROGRAM The Watts program maintains a constant work load The resistance Level adjusts when the speed is changed To start the Constant Watt program follow the instructions below or just press the Watt key then the Enter button and follow the directions in the Message Window 1 Press the Watt key then press the Enter key 2 The Message Window wi...

Page 22: ...nd proceed on to the next screen 4 You are now asked to enter your Weight You may adjust the weight number using the Up and Down keys then press Enter to continue 5 Now press Start to begin the test or Enter to modify your settings BEFORE THE TEST Make sure you are in good health check with your physician before performing any exercise if you are over the age of 35 or persons with pre existing hea...

Page 23: ...35 30 31 26 28 below average 37 41 35 39 31 34 29 31 26 29 22 25 poor 30 36 30 34 26 30 25 28 22 25 20 21 very poor 30 30 26 25 22 20 VO2max Chart for females and de conditioned males 18 25 26 35 36 45 46 55 56 65 65 years old years old years old years old years old years old excellent 56 52 45 40 37 32 good 47 56 45 52 38 45 34 40 32 37 28 32 above average 42 46 39 44 34 37 31 33 28 31 25 27 aver...

Page 24: ... and press Enter to continue 5 Now you are asked to adjust your target Heart Rate This is the heart rate level you will try to maintain during the program Adjust the value and then press Enter 6 Now you are finished editing the settings and can begin your workout by pressing the Start key You can also go back and modify your settings by pressing the Enter key Note At any time during the editing of...

Page 25: ...t generally stay close enough to the console to maintain good strong reliable readings Wearing the transmitter immediately against bare skin assures you of proper operation If you wish you may wear the transmitter over a shirt To do so moisten the areas of the shirt that the electrodes will rest upon Note The transmitter is automatically activated when it detects activity from the user s heart Add...

Page 26: ...s calculated 220 40 180 maximum heart rate 180 x 6 108 beats per minute 60 of maximum 180 x 8 144 beats per minute 80 of maximum So for a 40 year old the training zone would be 108 to 144 beats per minute If you enter your age during programming the console will perform this calculation automatically Entering your age is used for the Heart Rate control programs After calculating your Maximum Heart...

Page 27: ...llows Rating Perception of Effort 6 Minimal 7 Very very light 8 Very very light 9 Very light 10 Very light 11 Fairly light 12 Comfortable 13 Somewhat hard 14 Somewhat hard 15 Hard 16 Hard 17 Very hard 18 Very hard 19 Very very hard 20 Maximal You can get an approximate heart rate level for each rating by simply adding a zero to each rating For example a rating of 12 will result in an approximate h...

Page 28: ... on the monitor A mild liquid soap may be added if needed MAINTENANCE MODE MENU The console has built in maintenance diagnostic software The software will allow you to change the console settings from English to Metric and turn off the beeping of the speaker when a key is pressed for example To enter the Maintenance Mode pedal the bike and press and hold down the Start Stop and Enter keys Keep hol...

Page 29: ...29 Dyaco Canada Inc 2017 customerservice dyaco ca EXPLODED VIEW DIAGRAM ...

Page 30: ...dwer metallurgy Sleeve 1 15 7890015 Ø10 Ø25 0 8T_Nylon Washer 2 16 7890016 Bearing Bracket 1 17 7890017 M50 P1 5 11T_Nut 1 18 7890018 Ring 1 19 7890019 Core 16 20 7890020 Plate 2 21 7890021 Ø15 7T_Magnet 1 22 7890022 Crank Arm L 1 23 7890023 Crank Arm R 1 24 7890024 M20 P1 0 6T_Nut 2 25 7890025 M8 P1 0 25L_Arbor Screw 2 26 7890026 Pedal L R 1 27 7890027 PU Wheel 16 28 01 7890028 01 Release Lever 1...

Page 31: ...hroud R 1 53 7890053 Rear Shroud L 1 54 7890054 Rear Shroud R 1 55 7890055 Electronic Module 1 56 7890056 Console Mast Cover L 1 57 7890057 Console Mast Cover R 1 58 7890058 Front Stabilizer Cover 1 59 7890059 Rear Stabilizer Cover L 1 60 7890060 Rear Stabilizer Cover R 1 61 7890061 Rear Handlebar Cover 1 62 7890062 Seat Back Cover 1 63 7890063 Beam Cover 1 64 7890064 Console Bracket Cover 1 65 78...

Page 32: ... 94 7890094 M8 25m m_Socket Head Cap Bolt 2 95 7890095 M5 P0 8 12L_Flat Head Countersink Bolt 8 96 7890096 M8 80m m_J Bolt 1 97 7890097 M5 P0 8 12L_Phillips Head Screw 47 98 7890098 6203_Bearing 2 99 7890099 M8 6 3T_Nut 6 100 78900100 5 16 6T_Nyloc Nut 2 101 78900101 M10 8T_Nyloc Nut 4 102 78900102 M6 19L_Nut 16 103 78900103 M8 1 25 6 5T_Square Nut 10 104 78900104 M10 1 5m m_Hex Blind Nut 6 105 78...

Page 33: ...78900125 17m m_Wrench 2 126 78900126 13 15m m_Wrench 1 130 78900130 Handle Interface Board 2 131 78900131 2300m m_Computer Cable 1 132 78900132 1200m m_Generator Wire Harness 1 133 78900133 1000m m_Wire Brake Coil Harness Red 1 136 78900136 Nylon Board 1 138 78900138 Ø10 1 5T_Split Washer 4 139 78900139 M10 P1 5 55L_Hex Head Bolt 2 140 78900140 Ø1 4 13 1 0T_Flat Washer 26 141 78900141 Ø5 16 16 1 5...

Page 34: ...ange of motion about a joint Improving flexibility involves the stretching of muscles and tendons to maintain or increase suppleness and provides increased resistance to muscle injury or soreness Cardio Respiratory Endurance is the most essential component of physical fitness It is the efficient functioning of the heart and lungs AEROBIC FITNESS The largest amount of oxygen that you can use per mi...

Page 35: ...ould be gentle and preferably use the muscles to be involved later Stretching should be included in both your warm up and cool down and should be performed after 3 5 minutes of low intensity aerobic activity or callisthenic type exercise Warm Down or Cool Down This involves a gradual decrease in the intensity of the exercise session Following exercise a large supply of blood remains in the working...

Page 36: ... target is not a magic number but a general guide If you re above average fitness you may work quite comfortably a little above that suggested for your age group The following table is a guide to those who are keeping fit Here we are working at about 80 of maximum Age 25 30 35 40 45 50 55 60 65 Target heart Rate 10 Second Count 26 26 25 24 23 22 22 21 20 Beats per Minute 156 156 150 144 138 132 13...

Page 37: ...l A confirmation that you are on the correct program is a very slight soreness in most major muscle groups This is quite normal and will disappear in a matter of days If you experience major discomfort you may be on a program that is too advanced or you have increased your program too rapidly If you experience PAIN during or after exercise your body is telling you something Stop exercising and con...

Page 38: ...ext rotate your head back for one count stretching your chin to the ceiling and letting your mouth open Rotate your head to the left for one count and finally drop your head to your chest for one count SIDE STRETCHES Open your arms to the side and continue lifting them until they are over your head Reach your right arm as far upward toward the ceiling as you can for one count Feel the stretch up y...

Page 39: ...as close into your groin as possible Gently push your knees towards the floor Hold for 15 counts CALF ACHILLES STRETCH Lean against a wall with your left leg in front of the right and your arms forward Keep toward your toe your right leg straight and the left foot on the floor then bend the left leg and lean forward by moving your hips toward the wall Hold then repeat on the other side for 15 coun...

Page 40: ...external causes such as corrosion discoloration of paint or plastic alterations modifications abuse misuse accident improper maintenance inadequate power supply or acts of God 4 Products with original serial numbers that have been removed or altered 5 Products that have been sold transferred bartered or given to a third party 6 Products that do not have a warranty registration card on file at Dyac...

Page 41: ...er brands and products manufactured and distributed by Dyaco Canada Inc www dyaco ca www dyaco ca www dyaco ca www dyaco ca www spiritfitnesscanada ca www spiritfitnesscanada ca www dyaco ca www dyaco ca www solefitness ca www trainorsports ca www dyaco ca www dyaco ca www xterrafitness ca www dyaco ca ...

Page 42: ......

Reviews: