background image

                                                                                                            XE100  /  XE200  /  XE300  Elliptical


23 

Console Operation 


Quick Start 

 
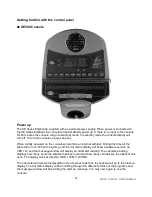
This is the quickest way to start a workout. After the console powers up you just press the Start 
key to begin, this will initiate the Quick Start mode. In Quick Start the Time will count up from zero 
and the workload may be adjusted manually by pressing the Up or Down buttons. The dot matrix 
display will have only the bottom row lit at first. As you increase the work load more rows will light 
indicating a harder workout. The elliptical will get harder to pedal as the rows increase.   
 

Basic information 

The 

Message Window

 will initially be displaying Speed information. Each time the Enter button is 

pressed the next set of information will appear, four windows in all. In order: Speed in RPM and 
MPH, Work Level and Watts. If the Enter button is pressed during the Level and Watts display the 
Scan light will come on and the message window will show each set of data for four seconds then 
switch to the next set of data in a continuous loop. Pressing the Enter button again will bring you 
back to the beginning. 
 
The Elliptical has a built in heart rate monitoring system. Simply grasping the hand pulse sensors 
on the stationary handle bars, or wearing the heart rate transmitter, will start the 

Heart Icon


blinking (this may take a few seconds). The Pulse Display Window will display your heart rate, or 
Pulse, in beats per minute.   
 
The 

Stop/Reset

 button actually has several functions. Pressing the Stop/Reset key once during a 

program will 

Pause

 the program for 5 minutes. If you need to get a drink, answer the phone or 

any of the many things that could interrupt your workout, this is a great feature. To resume your 
workout during Pause just press the Start key. If the Stop/Reset button is pressed twice during a 
workout the program will end and the console will return to the start up screen. If the Stop/Reset 
key is held down for 3 seconds the console will perform a complete 

Reset. 

During data entry for a 

program the Stop/Reset key performs a 

Previous Screen

 function. This allows you to go back 

one step in the programming each time you press the Stop/Reset key. 
 
The 

Program Keys

 are used to preview each program. When you first turn the console on you 

may press each program key to preview what the program profile looks like. If you decide that you 
want to try a program, press the corresponding program key and then press the Enter key to 
select the program and enter into the data setting mode. 
 
The program keys also act as a 

Number Key Pad

 when you are in the data setting mode. Under 

each program key is a number. If you are setting new data, such as Age, weight etc., you can use 
these keys to enter the numbers quickly. 


The E series consoles include a built-in fan to help keep you cool. To turn the fan on, flip the 
switch on the right side of the console case. 

Summary of Contents for Spirit SPT0001

Page 1: ...LWAYS CONSULT A DOCTOR BEFORE STARTING AN EXERCISE PROGRAM PLEASE CAREFULLY READ THIS ENTIRE MANUAL BEFORE OPERATING YOUR NEW ELLIPTICAL Z100 Z300 Z500 Z700 OWNER S MANUAL XE 100 Elliptical XE 200 Ell...

Page 2: ...n Instructions 4 Assembly Instructions 5 Features 21 Operation of Your New Elliptical 22 Maintenance 43 Manufacturer s Limited Warranty 44 ATTENTION THIS ELLIPTICAL IS INTENDED FOR RESIDENTIAL USE ONL...

Page 3: ...e take a moment at this time to record the name of the dealer and the date of purchase below to make any future needed contact easy We appreciate your support and we will always remember that you are...

Page 4: ...ignite a highly gaseous environment Never drop or insert any object into any openings Do not use outdoors To disconnect turn all controls to the off position then remove the plug from the outlet Do n...

Page 5: ...om the computer Understand that changes in resistance do not occur immediately Set your desired level on the computer console and release the adjustment key The computer will obey the command graduall...

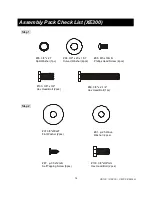
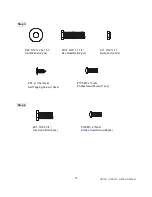
Page 6: ...olt 2pcs 60 3 8 x 2 1 4 Hex Head Bolt 1pc 96 3 8 x 2T Split Washer 1pc 84 3 8 x 23 x 1 5T Curved Washer 2pcs 79 5 16 x23x1 5T Flat Washer 2pcs 59 5 16 x15m m Hex Head Bolt 2 pcs 83 17 Wave Washer 2 pc...

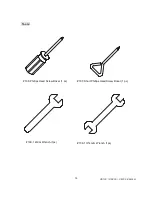
Page 7: ...tical 6 87 3 5x12m m Self Tapping Screw 10pcs 105 M5 x 15m m Phillips Head Screw 17pcs 108 Phillips Head Screw Driver 1 pc 107 Short Phillips Head Screw Driver 1 pc 109 12m m Wrench 1pc 106 13 14m m W...

Page 8: ...03 3 8 x 3 4 Hex Head Bolt 2pcs 60 3 8 x 2 1 4 Hex Head Bolt 1pc 96 3 8 x 2T Split Washer 1pc 84 3 8 x 23 x 1 5T Curved Washer 2pcs 97 3 8 x30x2T Flat Washer 2pcs 103 3 8 x3 4 Hex Head Bolt 2 pcs 81 2...

Page 9: ...tical 8 Tools Step 4 87 3 5x12m m Self Tapping Screw 18pcs 105 M5 x 15m m Phillips Head Screw 21pcs 108 Phillips Head Screw Driver 1 pc 107 Short Phillips Head Screw Driver 1 pc 109 12m m Wrench 1pc 1...

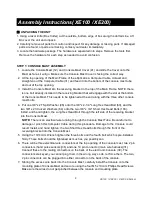
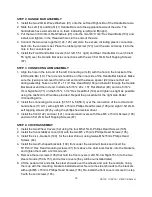
Page 10: ...to the 3 8 x 2 1 4 Long Hex Head Bolt 60 and the two 3 8 x 23 Curved Washers 84 onto the two 3 8 x 3 4 Short Hex Head Bolts 103 Install and hand tighten the Long Hex Head Bolt through the left side of...

Page 11: ...left Handle Bar 10 The rod end should be on the inner side of the Handle Bar bracket Make sure the ty wrap is removed from the rod end and the sleeve spacer 22 does not fall out during assembly Take...

Page 12: ...Stabilizer Covers 19 20 for the Rear Rail Assembly and install with four M5 x 15m m Screws 105 Then install front stabilizer cover 49 with two M5 x 15m m Screws 105 5 Install the Front Handle Bar Cove...

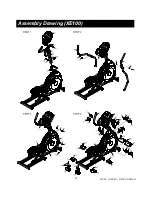
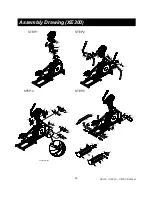
Page 13: ...XE100 XE200 XE300 Elliptical 12 Assembly Drawing XE100...

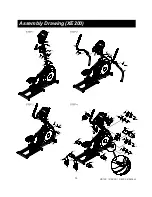
Page 14: ...XE100 XE200 XE300 Elliptical 13 Assembly Drawing XE200...

Page 15: ...lips Head Screw 4pcs 103 3 8 x 3 4 Hex Head Bolt 2pcs 60 3 8 x 2 1 4 Hex Head Bolt 1pc 96 3 8 x 2T Split Washer 1pc 84 3 8 x 23 x 1 5T Curved Washer 2pcs 97 3 8 x30x2T Flat Washer 2pcs 103 3 8 x3 4 mm...

Page 16: ...Self Tapping Screw 10pcs 105 M5 x 15m m Phillips Head Screw 11pcs 104 5 16 x 1 1 4 Hex Head Bolt 2 pcs 80 5 16 x 20x 1 5T Flat Washer 2 pcs 71 5 16 x 7T Nylon Nut 2 pcs Step 4 105 M5 x 15m m Phillips...

Page 17: ...XE100 XE200 XE300 Elliptical 16 Tools 108 Phillips Head Screw Driver 1 pc 107 Short Phillips Head Screw Driver 1 pc 109 12m m Wrench 1pc 106 13 14m m Wrench 1pc...

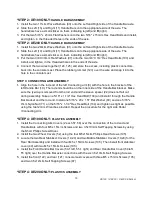
Page 18: ...6 onto the 3 8 x 2 1 4 Long Hex Head Bolt 60 and the two 3 8 x 23 Curved Washers 84 onto the two 3 8 x 3 4 Short Hex Head Bolts 103 Install and hand tighten the Long Hex Head Bolt through the left sid...

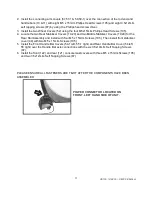
Page 19: ...16 x 7mm Nylon Nut 71 on the 5 16 x 1 1 4 Hex Head Bolt 104 and tighten as tight as possible using the two12m m Wrenches provided Repeat the procedure for the right side Pedal Connecting Arm 2 Install...

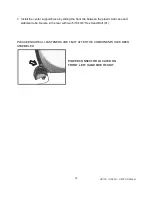
Page 20: ...by sliding the front tab between the plastic side case and stabilizer tube Secure in the rear with two 5 16 x3 4 Hex Head Bolt 91 PLEASE ENSURE ALL FASTENERS ARE TIGHT AFTER THE COMPONENTS HAVE BEEN...

Page 21: ...5 105 80 71 81 97 103 81 10 11 97 103 22 22 31 41 60 96 66 12 103 84 66 36 30 87 57 105 57 1 105 58 1 105 87 58 105 105 87 127 105 126 31 124 124 125 123 105 58 87 105 58 1 87 105 57 105 57 1 STEP 4 S...

Page 22: ...and hips The second solution was to make the foot pedal adjustable to the user s style of pedaling the elliptical We achieved this by adding an adjustment that allows the angle of the foot pad to be c...

Page 23: ...During this time all the lights will turn on When the lights go off the dot matrix display will show a software version i e VER 1 0 and the message window will display an odometer reading The odomete...

Page 24: ...e Display Window will display your heart rate or Pulse in beats per minute The Stop Reset button actually has several functions Pressing the Stop Reset key once during a program will Pause the program...

Page 25: ...tering new settings then just press the Start key This will bypass the programming of data and take you directly to the start of your workout If you want to change the personal settings then just foll...

Page 26: ...LL The Hill program simulates going up and down a hill The resistance in the pedals will steadily increase and then decrease during the program To start the Hill program follow the instructions below...

Page 27: ...the Max Level This is the peak exertion level you will experience during the program The factory setting is level five Adjust the level and then press enter 6 Now you are finished editing the settings...

Page 28: ...ily increase in resistance to a high level and then keeps you there This is designed to strengthen and tone your legs and gluteus To start the Strength program follow the instructions below or just pr...

Page 29: ...will only affect the workload for the present position in the profile When the profile changes to the next column it will return to the preset work level 8 During the Interval program you will be able...

Page 30: ...you finish adjusting the first segment or if you don t want to change then press enter to continue to the next segment 8 The next segment will show the same level as the previously adjusted segment Re...

Page 31: ...4 beats per minute 80 of maximum So for a 40 year old the training zone would be 108 to 144 beats per minute If you enter your age during programming the console will perform this calculation automati...

Page 32: ...ng Perception of Effort 6 Minimal 7 Very very light 8 Very very light 9 Very light 10 Very light 11 Fairly light 12 Comfortable 13 Somewhat hard 14 Somewhat hard 15 Hard 16 Hard 17 Very hard 18 Very h...

Page 33: ...mitter strap doesn t affect performance 6 Your workout must be within range distance between transmitter receiver to achieve a strong steady signal The length of range may vary somewhat but generally...

Page 34: ...u may adjust the Time and press enter to continue 14 Now you are asked to adjust the Heart rate Level This is the heart rate level you will experience during the program Adjust the level and then pres...

Page 35: ...an internal self test During this time all the lights will turn on When the lights go off the dot matrix display will show a software version ie VER 1 0 and the message window will display an odomete...

Page 36: ...tton again will bring you back to the beginning To the right of the Dot matrix display is a Heart Icon and a Bar graph that shows your heart rate as a percent of maximum The XE Series Elliptical has a...

Page 37: ...different and burns calories at a different rate Some good news is that you will continue to burn calories at about the same rate as during exercise for 20 30 minutes after you have finished exercisi...

Page 38: ...ends you may press Start to begin the same program again or Stop to exit the program or you can save the program you just completed as a custom user program by pressing a User key and following the in...

Page 39: ...n workout To start the Fat Burn program follow the instructions below or just press the Fat Burn button then the Enter button and follow the directions in the message window 10 Press the Fat Burn key...

Page 40: ...top key to go back one level or screen 16 If you want to increase or decrease the workload at any time during the program press the Up or Down key This will only affect the workload for the present po...

Page 41: ...efficiently this way To start the Interval program follow the instructions below or just press the Interval button then the Enter button and follow the directions in the message window 18 Press the In...

Page 42: ...ou are now asked to enter your Weight You may adjust the Weight number using the Up and Down keys or the numeric key pad then press enter to continue 16 Next is Time You may adjust the Time and press...

Page 43: ...ut by pressing the Start key You can also go back and modify your settings by pressing the Enter key NOTE At any time during the editing of Data you can press the Stop key to go back one level or scre...

Page 44: ...ipe off any excess 3 If squeaks or other noises persist check that the unit is properly leveled There are 4 leveling pads on the bottom of the rear rails use a 14mm wrench or adjustable wrench to adju...

Page 45: ...rranties or spare parts must be directed to our Freecall 1800 465 070 For efficient processing of your enquiry please have relevant date of purchase retailer name you purchased the item from and the b...

Reviews: