background image

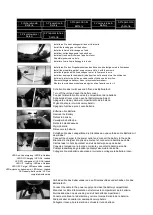
Installation der Propeller: 
10A: 

Stecken Sie die Propeller auf die Achse. 

10B

:  Stecken Sie die Befestigung auf die Achse. 

10C

:  Installieren Sie die Welle an der Achse und schrauben Sie die Befestigung im 

Uhrzeigersinn fest. 

10D

:  Schrauben Sie die Propellerabdeckungen im Uhrzeigersinn fest. 

Entfernen der Propeller: 
10E

:  Schrauben Sie die Propellerabdeckungen gegen den Uhrzeigersinn ab. 

10F

Schrauben Sie die Befestigung gegen den Uhrzeigersinn ab und entfernen die Welle. 

10G

:  Entfernen Sie die Befestigung. 

10H

:  Entfernen Sie die Propeller. 

English 

Introduction


Many thanks for purchasing a product of company 

SPL Technik

 GmbH. Please read this manual 

instruction carefully and keep it safety for future reference

General safety Information


This product is not a toy and not suitable for children under 14

The user of this device should use it properly in order to prevent accident

Choose a location where playing is legally allowed. Avoid obstacles and crowd.  It should be
played in a place away from crowd, high building and high-voltage line.

Avoid also bad weather

Do not play when you are tired as the control requires full concentration.

Manufacturer and sales agents are not responsible for any damage caused by improper use

This model is fitted with a Lithium-Polymer Battery. Please do not charge the battery while the
battery is connected to the model. Otherwise fire could emerge and damage your flying item

The model is high tech device which contains precise technical elements. Therefore please
keep the model away from moisture and water. Also condensed water could damage your
item. Please store the model at room temperature and normal humidity

Please use for your own safety only original parts of the company Rayline for repairing
purposes

Keep away from running motors. Users and other person should always keep away from
running rotors.  The rotors reach a high speed which can be dangerous

Beginners should obtain detailed instructions by an experienced person for the use of an
airplane model construction. This is the best way to learn how to use a model aircraft
appropriate

Please make sure there is enough space to fly the model aircraft riskless. Following room
space is recommended: 8 Meter (w), 8 Meter (l), 5 Meter (h). Please make sure that the
remote controller and your aircraft model are fully charged. Before using the remote controller
please make sure the left lever and the others for vernier adjustment are all down.

Please note that battery and motors are connected properly

Never charge and store Li-Po batteries in the near of heat or fire. This could cause an
explosion

Flugmodell hat zu wenig
Energie

Laden die den Akku des
Flugmodells auf

Flugmodell landet plötzlich 

Ziehen des Rückwärts-
/Abwärts Hebel zu schnell

Üben Sie kontrollierte
Bewegungen des
Rückwärts-/Abwärts Hebel

10. Propeller

Safety information Battery


Summary of Contents for Skytech TK109

Page 1: ...Skytech TK109 Bedienungsanleitung Instruction Manual...

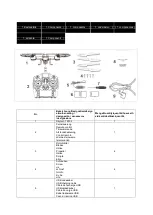
Page 2: ...eveelh eid cantidad ilo quantit 1 Skytech TK109 1 2 Fernsteuerung Remote control T l commande Afstandsbediening Control remoto zdalne sterowanie telecomando 1 3 Rotorbl tter Blades H lice Propeller H...

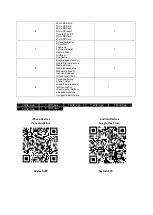
Page 3: ...g Operating instructions Mode d emploi Gebruiksaanwijzing Manual de usuario instrukcja obs ugi Istruzioni per l uso 1 9 Telefonhalterung phone holder support de t l phone telefoonhouder soporte para t...

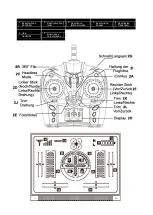
Page 4: ...Beschreibung Controller DescriptionCont roller Description t l commande Beschrijving Zender Descripci n Transmisor Opis nadajnik Descrizione Telecomando 2 2 2 2 2 2 2...

Page 5: ...rie Schakel de stroom uit en open het batterijcompartiment Apague la unidad y abra el compartimiento de la bater a Wy cz zasilanie i otw rz komor baterii Spegnere l unit e aprire il vano batterie Schl...

Page 6: ...Sie Batterie nach dem Flug Remove the Battery after flight Retirez la batterie apr sle vol Verwijder de batterijna de vlucht Retire la bater adespu s del vuelo Wyjmij bateri po locie Rimuovere la batt...

Page 7: ...5 Steuerung 5 Control 5 Contr le 5 Controle 5 Control 5 kontrola 5 Controllo 5A 5B 5C 5D 5E 5F 5G 5H...

Page 8: ...t 6 2 Kamera 6 2 Camera 6 2 Cam ra 6 2 camera 6 2 c mara fotogr fica 6 2 kamera 6 2 macchina fotografica 6 4 Headless Mode 6 4 Headless Mode 6 4 Headless Mode 6 4 Headless Mode 6 4 Headless Mode 6 4 H...

Page 9: ...tzteile 9 Spare Parts 9 Pi ces de re hange 9 Wisselstukken 9 Piezas de repuesto 9 cz ci zamienne 9 i pezzi di ricambio 10 Propeller 10 Propeller 10 Propeller 10 Propeller 10 Propeller 10 Propeller 10...

Page 10: ...it einer sehr hohen Geschwindigkeit diese k nnen Ihnen oder Ihrer Umgebung erheblichen Schaden zuf gen Seien Sie sehr vorsichtig mit dem Umgang der sich drehende Rotorblatter halten Sie diese unbeding...

Page 11: ...Copter fangen an zu blinken Dr cken Sie bitte erneut diese Taste um den Headless mode zu verlassen 4A Das Flugger t sollte sich auf eine ebene Fl che befinden Die Li Po Batterie wird wie abgebildet i...

Page 12: ...der Flugh he bleibt der Quadcopter auf der selben Flugh he stehen Dr cken Sie den Knopf erneut um den Modus zu verlassen 6 3B M chten Sie die H he des Copters einstellen wenn der Altitude Hold Modus a...

Page 13: ...p LED am Copter blinken dann schalten Sie die 2 4GHz Fernbedienung ein und verbinden Sie mit dem Copter indem Sie den linken Hebel einmal nach oben und nach unten dr cken LED am Copter leuchtet dauerh...

Page 14: ...attery is connected to the model Otherwise fire could emerge and damage your flying item The model is high tech device which contains precise technical elements Therefore please keep the model away fr...

Page 15: ...you can also see on the display position 13 CF Mode Make sure that the copter is in front of you and facing forward Bind now the device Press the Headless mode in order to get there You will hear a s...

Page 16: ...Press the button again to stop recording video the LED stops flashing and the green LED will stay constant Note Use the altitude hold mode during the photo or video recording to capture better pictur...

Page 17: ...e information about the controls read the Instructions of the app 3 Control of Copter Live View When you connect your smartphone to the copter as described above you will see the live image from the c...

Page 18: ...en oder im Handel unentgeltlich zur ckgeben Sie k nnen die Batterien auch per Post an den Verk ufer zur cksenden Der Verk ufer erstattet Ihnen auf jeden Fall das Briefporto f r den R ckversand Ihrer A...

Page 19: ...Fernmeldebestimmung Bitte beachten Sie das g ltige Recht in Ihrem Land f r die Verwendung einer Fernsteueranlage DE AT BE CH CZ DK FI GB HU IE IS IT LI LU NL NO PL PT RO SE SI TR EE SK LV LT GR BG...

Reviews: