background image

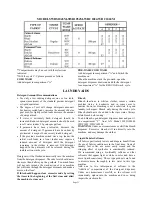
Nail Polish 
Treat while fresh, scraping or wiping off as much as  
possible, before it dries. Place stain face down on white 
paper towels. Sponge back of stain acetone (nail polish 
remover) or sponge with denatured alcohol and a few 
drops of household ammonia. Sponge stain frequently. 
Launder with water at temperature suitable for fabric. 
Note: Do not use acetone on acetate, arnel, dynel or 
rayon. 
Paint 
Sponge or soak in turpentine or solvent recommended as 
a thinner on label. Launder. 
Perfume 
Rinse in cold water. Rub undiluted liquid detergent or a 
detergent paste into stain. Rinse. If stain remains, bleach. 
Perspiration 
Wash or sponge stain thoroughly with warm water and 
detergent paste. If perspiration has changed the color of 
the fabric, restore it by treating with ammonia or vinegar. 
Apply ammonia to fresh stains; rinse with water. Apply 
vinegar to old stains; rinse with water. 
Rust and Iron 
Apply commercial rust remover, according to manufac-
turer's directions. Rinse. Or, if safe for fabric, boil stained 
article in solution of 4 teaspoons of cream of tartar to 1 
pint water. 

  Scorch 

Rinse or soak in cold water. Work detergent into stain. 
Rinse. Bleach, if necessary. Stain may be impossible to 
remove. 
Shoe Polish 
Scrape off as much as possible. Pre-treat with a detergent 
paste; rinse. If stain persists, sponge with rubbing alcohol 
(1 part to 2 parts water) or turpentine. Remove turpentine 
by sponging again with warm detergent solution or with 
alcohol. Bleach if necessary. 
Soft Drinks 
Sponge with cold water, some stains are invisible when 
they have dried, but turn brown when heated and may be 
impossible to remove. 
Tar and Asphalt 
Act quickly before stain is dry. Sponge with grease  
solvent or turpentine. Launder. 
Urine 
Soak in cool water. If stain is dry, work a detergent paste 
into the spot then rinse. If necessary, bleach.


Page 13 

CARE AND CLEANING 

Cleaning The Exterior 
As you use the washer, occasionally wipe the cabinet 
with a damp cloth or sponge; wipe dry with a soft cloth. 
Do not use polish or any kind on the plastic trim. Some 
polishes contain agents which may damage plastics. 
 
Cleaning The Interior 
If you live an area where phosphate detergents are 
banned, it may be necessary to recondition the washer 
periodically. Because a non-phosphate detergent must be 
used, body oils and detergent may accumulate in the 
washer tub. This is particularly evident in hard water  
areas  or  in  homes,  where  heavily  soiled  garments  are            
regularly laundered. 
To remove this build-up, run the washer through a    
complete cycle using hot water and 2 cups of a non    
precipitating water conditioner. Do not add any clothes, 
laundry detergent or other laundry aids. 
Once all accumulation has been removed, your laundry 
should be satisfactory if you follow the preventive     
suggestions in this guide-book. 

  General Maintenance 

After washing is complete, the water faucets should be 
turned off to relieve water pressure on the hoses. 
Wipe the inside of the washer door with a soft cloth to 
remove any remaining moisture. Periodically, a thin coat 
of paste wax should be applied to the inner door of the 
washer; especially to the area which is immediately next  
to the door window. 
This will protect the door finish from laundry aid spills 
and any discoloration which may results from these 
spills. 
The interior of the machine should be cleaned periodi-
cally by qualified service personnel.  
A internal condenser cleaning kit is available to improve 
drying time when needed (Part # 100A). 
 
Cleaning The Drain Screen 
Clean the drain screen frequently. For instruction please 
refer to page 7 of this manual.


Summary of Contents for WDC1024M

Page 1: ...3 fax 503 656 8829 web www westlandsales com www splendide com e mail splendide westlandsales com OWNERS MANUAL When Technology Meets Ecology CAUTION Before operating this appliance it is recommended that you read this manual and follow all Safety Rules and Operating Instructions COMBINATION WASHER CONDENSER DRYER MODEL WDC1024M WDC1025M ...

Page 2: ...paration 6 Wash Table 10 11 Sorting 6 Laundry Aids 11 Inspection 6 Detergent Recommendations 11 Pre Treating 6 Bleaches 11 Pre Washing 6 Liquid Fabrics Softeners 11 Laundry Aids 6 Stain Removal Chart 11 12 Washer Features 7 Care and Cleaning 13 On Off Button 7 Cleaning the Exterior 13 Medium High Spin Button 7 Cleaning the Interior 13 High Heat Half Heat Button 7 General Maintenance 13 Wash Timer ...

Page 3: ...anship or materials covered by this warranty To avoid a charge for an unnecessary service call and before calling a serviceman please refer to the Avoid Service Check List for situations that you can remedy This list is included at the back of this Use and Care Book This appliance is an automatic washer dryer It is front loading with an extra large door opening for easier access It has 5 wash cycl...

Page 4: ... 4 holes on the cabinet with the plastic blanking plugs that you will find in the accessories bag Fig 3 MODELS WDS1043M SWD1054M WDC1024 WDC1024M 1 Remove fixing screws and respective spacers from the two brackets to cross bearing Fig 4 and remove brackets 2 Close the 7 holes on the cabinet with the plastic blanking plugs that you will find in the accessories bag Fig 5 LEVELING After selecting a p...

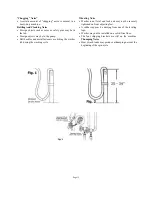
Page 5: ...ully position the drain hose to avoid kinks and ensure proper drainage of the water The outlet end of the drain hose must be at least 20 50 cm above the base of the machine At this point it is possible for the water to be discharged into a sink standpipe or drainpipe No more than 6 of the drain hose should insert into a stand pipe Assure an air break is available to prevent the machine from siphon...

Page 6: ...ng the following Read all instructions before using the appliance Do not wash or dry articles that have been previously cleaned washed or spotted with gasoline dry cleaning solvents or other flammable or explosive substances as they emit vapors that could ignite or explode Do not allow children to play on or in the appliance Close supervision of children is necessary Before the appliance is remove...

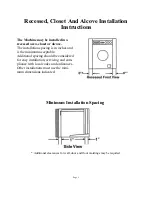
Page 7: ...acing is in inches and is the minimum acceptable Additional spacing should be considered for easy installation servicing and com pliance with local codes and ordinances Other installations must use the mini mum dimensions indicated Minimum Installation Spacing Additional clearances for wall door and floor moldings may be required Page 5 ...

Page 8: ...me laundry Using too little detergent results in poor washability while using too much causes over sudsing and poor rinsing Detergents not only remove soil but also hold it in suspension in the wash water to prevent redepositing it on the wash load The amount to use de pends on wash load size amount of soil Water hardness and detergent type ALWAYS measure the amount of detergent The amount of suds...

Page 9: ...u just how much drying time to allow to get the effect you want Drain Screen The removable drain screen which protects the pump from lint and foreign matter needs to be cleaned periodi cally How often will depend on your wash load e g cotton towels cause more lint to collect than nylon loads Open the service door by pressing on the left hand side Turn drain screen counter clockwise and pull the dr...

Page 10: ...Page 8 ...
Page 11: ...and the wash cycle will start Wash time will be approximately 60 minutes upon completion the machine will automatically start to dry the load When the dryer has completely finished it s cycle the machine will automatically stop After washing and drying are complete the hot and cold water faucets should be turned off and push the ON OFF switch Wipe the inside off the washer door and rubber boot wit...

Page 12: ...require Open the door load the articles to be dried into the cylinder and close the door Press the On Off button in and the machine will then start the drying cycle Door may be opened during drying cycle TO RINSE SPIN AND TUMBLE DRY It is possible to rinse spin and tumble dry articles which have not been previously washed in the machine The dry weight of the load must not exceed load size previous...

Page 13: ...he suds level should never rise more than halfway up the porthole Too much foam will not only impede the wash action of your machine but will rinse through the detergent dispenser and make a mess on the floor If this should happen clear excessive suds by setting the timer to the beginning of the first rinse and allow the machine to rinse out Bleach Bleach functions to whiten clothes remove certain...

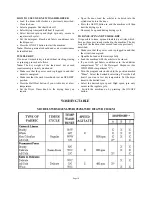
Page 14: ...aunder You may be able to restore fabric color by sponging with ammonia Rinse thoroughly Dye Rinse or soak in cold water Work detergent into stain Rinse If necessary bleach Stain is not always possible to remove A commercial color remover may also be used Egg or Meat Juice Rinse in cold water If stain remains sprinkle with meat tenderizer let stand 15 to 20 minutes If stain still remains sponge wi...

Page 15: ...vent or turpentine Launder Urine Soak in cool water If stain is dry work a detergent paste into the spot then rinse If necessary bleach Page 13 CARE AND CLEANING Cleaning The Exterior As you use the washer occasionally wipe the cabinet with a damp cloth or sponge wipe dry with a soft cloth Do not use polish or any kind on the plastic trim Some polishes contain agents which may damage plastics Clea...

Page 16: ...or the inlet hoses are not turned completely on Water is being used elsewhere in the house when the washer is running Water inlet hose filter are clogged Fig 3 Water inlet hoses are kinked Wash And Rinse Water Temperatures Are Incorrect The hot water hose and cold water hose are connected to the wrong faucets Water Is Entering Washer But Tub Does Not Fill Standpipe for the drain hose is not the co...

Page 17: ...al fasteners are hitting the washer tub during the washing cycle Vibrating Noise Washer is not level and lock nuts may not be securely tightened on front adjusting feet A rubber cap may be missing from one of the leveling legs Washer may not be installed on a solid firm floor The four shipping brackets are still on the machine Thumping Noise Heavy wash loads may produce a thumping noise at the beg...

Reviews: