background image

2

DISPLAYING CALLS RECEIVED

......................................................................................... 22

To store a Call memory to Directory Memory

.......................................................................... 22

To store a Call Memory to Direct Access memory

.................................................................... 23

Deleting the Calls memory

...................................................................................................... 23

REDIAL MEMORY

................................................................................................................. 24

Viewing the Redial memories

.................................................................................................. 24

SERVICE

.................................................................................................................................. 25

HEARING AID COMPATIBLE

............................................................................................... 25

WARRANTY TERMS & SERVICE/RETURNS PROCEDURE

............................................ 25

Summary of Contents for PCS 10

Page 1: ...12 SpliceCom PCS 10 Operating Instructions User Guide ...

Page 2: ...General Note When power is switched on or batteries are inserted the display will be blank until the Handset is lifted or the Handsfree button is pressed ...

Page 3: ...Figure One ...

Page 4: ......

Page 5: ...16 SETTING THE CLOCK 17 MEMORY FUNCTION 18 DIRECTORY 18 Programming Directory memory 18 Dialling a Directory memory 19 To delete a Directory memory 19 DIRECT ACCESS MEMORY 19 Programming Direct Access memory buttons 20 Dialling Direct Access memory buttons 21 Pre programmed Direct Access memory buttons 21 CALLS MEMORY 22 ...

Page 6: ... Call memory to Directory Memory 22 To store a Call Memory to Direct Access memory 23 Deleting the Calls memory 23 REDIAL MEMORY 24 Viewing the Redial memories 24 SERVICE 25 HEARING AID COMPATIBLE 25 WARRANTY TERMS SERVICE RETURNS PROCEDURE 25 ...

Page 7: ...mory and it is possible to scan through these calls and dial someone back by simply pressing one button There is an independent directory for you to store the telephone numbers and names of 100 entries If one of your directory Names calls you then the display will show not only the number calling you but the name as stored in your directory or the maximiser business telephone system memory As well...

Page 8: ...system Declaration of Conformity SpliceCom declares that this product SpliceCom PCS 10 is in conformity with the following harmonised standards Health Safety EN60950 Electromagnetic Compatibility EN55022 1998 EN55024 1998 Telecom EN301437 1999 TBR38 1998 Following the provisions of Council Directive on radio equipment and telecommunications terminal equipment October 2004 ...

Page 9: ...tions marked on the telephone This telephone can be hazardous if immersed in water If you suspect a natural gas leak report it immediately but use a telephone away from the area in question Never push objects of any kind into the equipment through housing slots To reduce the risk of electric shock do not disassemble this telephone There are no user serviceable parts Avoid using the telephone durin...

Page 10: ...in here 20 A headset plugs in here 21 The jack labelled is used to connect a device such as a modem to your Telephone 18 A 3 position switch is used to control the volume of the ring tone Select from loud ring quiet ring or ringer off 19 Turn the pitch control to adjust the pitch of the ringer 17 Wall mounting An additional wall bracket is required Using the template supplied with the bracket posi...

Page 11: ... moment in time see detailed instructions on page 16 2 Use this button to delete a Directory memory Access the Directory memory to be deleted and press this button TWICE in quick succession ERASE will appear on the display and the memory will be deleted 3 To adjust the volume of the Handset Headset and Handsfree Press the and volume buttons Note The and can also be used as Scroll Up or Down button...

Page 12: ...The Direct Access memory buttons have been pre programmed with the 10 most frequently used maximiser System Access Codes These are accessed via the one touch memory buttons A further 10 memory locations have been provided and can each be programmed with a maximum of 32 digits and 16 alpha characters These can be accessed by pressing the memory keys twice see detailed instruction on page 20 12 Pres...

Page 13: ...he button when in Handset mode will switch to Handsfree allowing you to replace the Handset in the cradle without disconnecting the call in progress When a Headset is plugged in to the Headset socket 20 the Handsfree function is disabled to allow the button to operate the Headset 16 A standard telephone keypad with the number 5 having a raised dot for visually impaired users 26 RESET If the teleph...

Page 14: ...l calls The call will remain on hold until you press the again or hang up Transferring a call Answer the call then press the button you should hear the dial tone Dial the internal external number required If you hear ringing you can then replace your handset and the caller will be immediately connected to the destination this is known as blind transfer OR For an announced transfer You hear ringing...

Page 15: ...ur telephone when you are busy or unavailable Typically your voicemail will answer any call that has rung for 20 seconds Using Voicemail If you have new voicemail messages the envelope icon will be shown on the caller display of your PCS 10 To check or listen to your messages press Direct Access memory button 1 or dial 1571 using the PCS 10 keypad messages are then played in the order recorded Mes...

Page 16: ...ssages can be collected by pressing Direct Access memory button 1 dialling 1571 from your PCS 10 keypad dialling a general number configured by your administrator dialling the external DDI number for the Voicemail or dialling your extension number then pressing during the greeting Dependent on your system configuration you may be prompted for an account extension number and or access code pin pass...

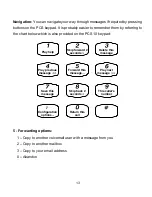
Page 17: ...also provided on the PCS 10 keypad Play help Skip forward 2 seconds Play previous message Forward this message Play next message Save this message Configuration options Return this call Skip back 2 seconds This caller s number Delete this message 5 Forwarding options 1 Copy to another voicemail user with a message from you 2 Copy to another mailbox 3 Copy to your email address 0 Abandon ...

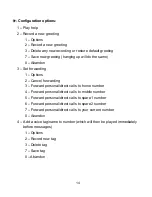
Page 18: ...ions 2 Cancel forwarding 3 Forward personal direct calls to home number 4 Forward personal direct calls to mobile number 5 Forward personal direct calls to spare1 number 6 Forward personal direct calls to spare2 number 7 Forward personal direct calls to your current number 0 Abandon 4 Add a voice tag name to number which will then be played immediately before messages 1 Options 2 Record new tag 3 ...

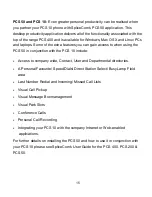
Page 19: ...the PCS 50 in conjunction with the PCS 10 include Access to company wide Contact User and Departmental directories A Personal Favourite Speed Dials Direct Station Select Busy Lamp Field area Last Number Redial and Incoming Missed Call Lists Visual Call Pickup Visual Message Box management Visual Park Slots Conference Calls Personal Call Recording Integrating your PCS 10 with the company Intranet o...

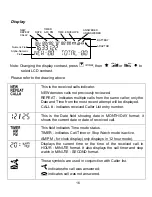
Page 20: ...ecent attempt will be displayed CALL indicates received Caller List entry number This is the Date field showing date in MONTH DAY format it shows the current date or date of received call This field indicates Time mode status TIMER indicates Call Timer or Stop Watch mode is active AM PM for clock display only displays in 12 hour mode Displays the current time or the time of the received call in HO...

Page 21: ...C adaptor to the power socket or insert 3 AA alkaline batteries 1 Key in the year month and day 2 Press 1 for 12HR or Press 2 for 24HR 3 If 12HR selected Press 1 for AM or Press 2 for PM 4 Enter time hour minute 5 The display will show CLOCK STORED NOTE You do not need to perform this operation if you wait for your first call to be received clock will be set automatically to the correct time by th...

Page 22: ...tory then that name will appear on your display together with the incoming callers telephone number Programming Directory memory To store a Directory memory Press the button then press the button follow the screen prompts at ENTER NUMBER prompt key in the number to be stored Press the button at ENTER NAME prompt key in the name to be stored using the numeric keypad press the appropriate button a n...

Page 23: ...buttons When you find the memory you require press the button to dial To delete a Directory memory Access the Directory memory to be deleted as described above Press the button TWICE in quick succession ERASE will appear on the display and the memory will be deleted Direct Access memory The Direct Access memory buttons have been pre programmed with the 10 most frequently used maximiser System Acce...

Page 24: ...here you wish the memory to be stored At the prompt dial the number to be stored It is possible to store the Handsfree function as the first character In this case when a memory button is pressed the telephone will automatically seize the line and make the call in Handsfree mode Press the button at ENTER NAME prompt key in the name to be stored using the numeric keypad press the appropriate button...

Page 25: ... the number Pre programmed Direct Access memory buttons The following maximiser system features have been pre programmed into the 10 one touch Direct Access memory buttons 1 Voicemail Access Press this button for direct access to your voicemail box 2 Change your Voicemail Greeting Press this button to listen to your current greeting and then record a new one 3 Call Park Press this button to park t...

Page 26: ...our personal or maximsier Contacts directory date and time of call whether the call was answered or not Displaying calls received If the is flashing then there are new calls in the Directory that you have not viewed before Press the button to display the last call to be received on the screen Using the button you can move up and down through the memories to see who has called If you wish to make a...

Page 27: ...he button and then press a two touch memory button Follow the screen prompts at ENTER NUMBER prompt key in the number to be stored Press the button at ENTER NAME prompt key in the name to be stored Press the button Deleting the Calls memory Press the button Press the and button to select desired number from the Caller list that is to be erased Press the button twice the call is erased There may be...

Page 28: ...numbers that were called from the telephone either from the keypad or from a Direct Access memory Viewing the Redial memories Press the button The last number called on the telephone will be displayed with the telephone number and the message REDIAL 1 Using the and buttons you can review the last five numbers called To call any of the numbers make sure that the entry required is on the screen and ...

Page 29: ...s designed to cover either manufacturing faults or component defects It is not designed to cover fair wear and tear the Handset Cord and Line Cord are NOT covered by this guarantee The warranty is no exception We look to you our customer to be reasonable and sensible over the warranty We will endeavour to repair any telephone returned within the warranty period but we reserve the right to charge f...

Page 30: ...le discretion replaced with a similar telephone In the event that a model may have been discontinued any replacement will have similar or enhanced features In the event that you have to return a faulty unit please contact the Accredited SpliceCom reseller you purchased your PCS 10 from This warranty is in addition to any statutory rights ...

Page 31: ......
Page 32: ... telephone is approved to EEC directive 1999 5 EC SpliceCom Limited The Hall Business Centre Berry Lane Chorleywood Hertfordshire WD3 5EX Tel 01923 287700 Fax 01923 287722 Email info splicecom com Website www splicecom com ...

Reviews: