background image

14


www.spokey.eu


www.spokey.pl 

USER’S GUI

D

NOTES 

Please keep this operation manual for future use. This exercise machine is intended for home use only. 


TECHNICAL SPECIFICATIONS 

Net weight 

– 25 kg, Flywheel – 5 kg 

Dimensions of the assembled exercise machine 

– 116.5 x 50 x 161 cm 

Maximum weight of the user 

– 120 kg 

The equipment is designed for full body exercise


  Prior  to  the  assembly  of  the  device  and  training,  read  carefully  this 

instruction  manual.  Safe  and  effective  use  of  the  device  can  be 

guaranteed only if it is assembled, maintained, and used appropriately, 

in  a  manner  described  in  the  manual.  If  you  are  not  the  user,  please 

provide  all  the  users  with  this  instruction  and  inform  them  about  all 

possible hazards and precautions. 

  Prior to starting  with  any  exercises,  please consult  a  doctor in  order to 

make sure that there are no mental or physical conditions that could be 

harmful to your health and safety. The consultancy with a doctor may also 

protect  you  against  an  inappropriate  use  of  the  device.  A  doctor  will 

specify whether taking drugs that would have an effect on pulse, pressure 

or cholesterol level is justified. 

  Pay  attention  to  your  body  signals.  Inappropriate  or  excessive  training 

may  have  a  negative  influence  on  your  health.  Immediately  stop 

exercising  if  any  of  the  following  symptoms  occurs:  pain,  chest 

constriction,  irregular  pulse,  exceptional  shortness  of  breath,  faints, 

vertigo,  nausea.  If  any  of  the  above  symptoms  occurs,  contact  your 

doctor immediately and give up training until then. 

  Children and animals should be kept away from the device. The device 

is intended only and exclusively for adults. 

  The  device  should  be  placed  on  a  straight,  stable  and  tough  surface, 

protected with a mat or a carpet. For the sake of safety, 2 m of free space, 

needed for a safe usage, should be left to each side around the device. 

Prior to starting any exercises, make sure that all the bolts and nuts are 

tightly fitted. Please, pay special attention to the parts that are prone to 

wearing out the most. 

  An appropriate safety level of this device may by guaranteed only if it is 

subject to regular service and inspection. 

  The  device  should  be  always  used  in  accordance  with  its  purpose. 

Should during the assembly or use any of the parts appear to be faulty 

or make alarming sounds, stop using the exerciser and have it serviced . 

You must not use a damaged device.  

  During training, wear appropriate clothes. Avoid loose clothes that could 

get  caught  in  the  device  or  such  that  could  restrict  or  even  make 

movement impossible. It is also advised to exercise in appropriate sport 

shoes.  At  the  beginning,  set  a  slow  pace.  During  exercises,  hold 

handgrips and do not leave the saddle. 


The  bicycle  is  intended  for  home  use.  Maximum  allowed  user’s  body 

weight amounts to 120 kg. 

  Take special precautions while lifting and moving the device. The device 

should  be  always  moved  by  two  persons.  While  lifting  or  moving  the 

equipment,  maintain  an  appropriate  posture  so  as  to  avoid  backbone 

damage. 

  The  equipment  was counted  among class H  and  C  and is intended for 

home use exclusively. It cannot be used as a therapeutic or rehabilitation 

equipment. 

  While assembling the device, strictly follow the enclosed instruction and 

use  only  the  parts  included  in  the  set.  Prior  to  the  assembly,  check 

whether the set contains all the parts that the enclosed list includes. 

  It  is  advised  against  leaving  control  devices,  which  could  restrict 

movement, in such a position that any of the elements sticks out. 

Warning:  prior  to  starting  a  training  on  this  device,  read  the  instruction 

manual  carefully.we  do  not  hold  responsibility  for  injuries  or  damages  to 

objects caused by an inappropriate use of this product. Body injuries may 

happen due to an inappropriate or too intensive training 

WARNING!  Heart  rate  monitoring  system  May  be  inaccurate.  Over 

excercising  May  result  In  serious  injury  Or  death..  If  you  feel  faint  stop 

excercising immediately. Health injury may result from the incorrect or too 

intensive training. 


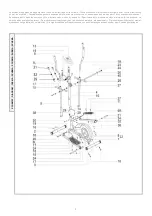
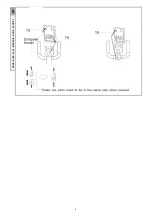
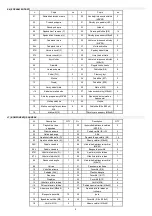
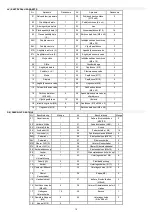
PARTS OF THE TRAINER THAT REQUIRE INSTALLATION (DIAGRAM 

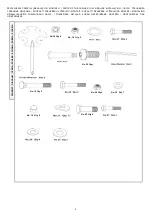
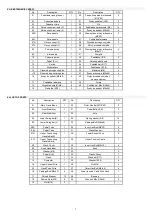
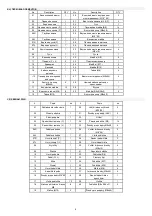
– P. 1), FULL LIST OF PARTS P. 7-10 


PREPARATIONS 

1. Before assembly make sure there is enough space. 
2. Use the recommended tools.  
3. Before assembly check if there are all the parts in the box.  

It is recommended that product should be assembled by at least two people 
to avoid injuries.  


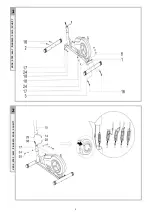
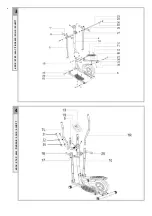
ASSEMBLY INSTRUCTIONS (

Drawings 

– p. 3-5

STEP1:

Attach the Rear Stabilizer (3) to the Frame (1) with two  Carriage 

Bolts (16), two  Curved Washers (17), and two Spring Washer(24),and two 
Domed  Nuts(18);  start  both  Carriage  Bolts,  and  then  tighten  the  Domed 
Nuts.  The  front  Stabilizer  (2)  is  installed  in  the  same  way  as  the  Rear 
Stabilizer (3). 

STEP2:

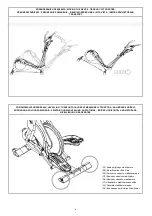
While  a  second  person  holds  the  Upright  (2)  near  the  Frame 

(1),turn the tension to the maximun section (level-8), connect the Upright 
Sensor Wire (14) to the Lower Sensor Wire (28). Next, connect the Upper 
Tension    Cable  (29)  to  the  Lower  Tension    Cable With  Hook  (38)  in  the 
following way: See drawing A. Pull upward on the metal bracket (A) on the  
Lower  Tension    Cable  With  Hook  (38),  and  insert  the  tip  ofthe  Upper 
Tension  Cable (29) into the wire clip inside the metal bracket. See drawing 
B. Firmly pull the Upper Tension  Cable (29) upward and slide it into the top 

of the metal bracket (A).          See drawing C. Using pliers, squeeze the 
prongs on the upper end of the metal bracket (A) together Insert the excess 
wire  and  cable  into  the  Frame  (1Tip:  Avoid  pinching  the  wires  and  the 
cables. Slide the Front Stabilizer (2) onto the Frame (1). Attach the  Front 
Stabilizer (2) with four Curved Washer (17), four Spring Washers (24), and 
four Inner Hex Bolt (30); start all the Screws, but do not fully tighten them 
yet. 

STEP3: 

Attach the right pedal tube (06R) and left tube (06L) to the crank (12), using 
two sets of pedal bolts (21) (L&R) washers(34) and  Nuts (36). Please use 
Allen Wrench to make it very tight. 
Attach the right pedal tube (06R) and left tube (06L) to the swing bar (4 & 
5) using two sets of  bolts (20), nuts (19) and 4pcs of washers (35). Please 

EQUIPMENT SPECIFICATION  

SAFETY REMARKS

ASSEMBLY, SETUP AND MAINTENANCE 

EN 

Summary of Contents for 926203

Page 1: ...OOGIE2 926205 BOOGIE3 926206 SCHEMAT DIAGRAM SCH MA SCHEMA SH MA 1 PL TRENA ER ELIPTYCZNY 11 EN ELLIPTICAL TRAINER 14 RU 17 CZ MAGNETICK TRENA R 20 SK ELIPTICK TRENA R 23 LT ELIPSINIS TRENIRUOKLIS 26...

Page 2: ...ifikace tohoto produktu se mohou li it od ilustrace nebo mohou b t zm n ny pecifik cia tohto produktu sa m e minim lne l i od uvedenej na obr zku alebo pod ahn prav m io produkto specifikacijos gali i...

Page 3: ...ST TRENA RU VY ADUJ C MONT S AST TRENA RA VY ADUJ CE MONT MONTAVIMO REIKALAUJAN IOS TRENIRUOKLIO DALYS TRENA IERA DETA AS KUR M NEPIECIE AMA MONT A MONTAGETEILE DES HEIMTRAINERS SCHEMAT DIAGRAM SCH MA...

Page 4: ...3 1 KROK STEP INGSNIS SOLIS SCHRITT 2 KROK STEP INGSNIS SOLIS SCHRITT...

Page 5: ...4 z 3 KROK STEP INGSNIS SOLIS SCHRITT 4 KROK STEP INGSNIS SOLIS SCHRITT...

Page 6: ...5 5 KROK STEP INGSNIS SOLIS SCHRITT...

Page 7: ...Paka j stabilizatora tapas DE Endkappen am hinteren Stabilisator PRZENOSZENIE URZ DZENIA MOVING THE DEVICE P EN EN ZA ZEN PREN ANIE ZARIADENIA RENGINIO PERK LIMAS KIT VIET IER CES P RVIETO ANA TRANSP...

Page 8: ...38 Dolny przew d czujnika z zamocowaniem 1 17 Podk adka falowana 12 39 Tuleja 1 18 Wypuk e nakr tki M8 8 40 Podk adka 8x 28x2 2 19 Nakr tka M10 2 ruby do podp r M8x40 EN LIST OF PARTS No Description...

Page 9: ...P rov podlo ka 8 14 05 Spodn st ramene L 1 25 rouby pro podp ry M8x40 4 06R Ped lov trubka 1 26 Vnit n imbusov rouby M8 20 2 06L Ped lov trubka 1 27 Vlnit podlo ka 2 07R Horn rukoje P 1 28 Spodn kabel...

Page 10: ...2 2 19 Matica M10 2 Skrutky pre podpery M8x40 LT KOMPONENT S RA AS Nr Description QTY Nr Description QTY 01 Pagrindinio r mo pagrindas 1 20 I orinis e iabriaunis var tas M10 60 2 02 Priekin atrama 1 2...

Page 11: ...1 17 Vi ot papl ksne 12 39 Uzmava 1 18 Izliektie uzgrie i M8 8 40 Papl ksne 8 x 28 x 2 2 19 Uzgrieznis M10 2 Skr ves balstiem M8 x 40 DE BERSICHT DER TEILE Nr Beschreibung Menge Nr Beschreibung Menge...

Page 12: ...ga u ytkownika wynosi 120 kg Nale y zachowa szczeg ln ostro no podczas podnoszenia i przenoszenia urz dzenia Przenosi urz dzenie powinny zawsze dwie osoby Podczas podnoszenia lub przenoszenia sprz tu...

Page 13: ...uby nakr tki i pokr t a s dokr cone Do czyszczenia urz dzenia nie nale y u ywa agresywnych rodk w czyszcz cych U ywaj mi kkiej wilgotnej ciereczki do usuw ania zabrudze i kurzu Usuwaj lady potu gdy kw...

Page 14: ...y w o y w wiczenie Czym d u ej i ci ej trenujesz tym wi cej kalorii stracisz Sukcesem b dzie uzyskanie takiej samej efektywno ci jak przy treningu kondycyjnym Obliczanie wydajno ci treningu jest opar...

Page 15: ...e equipment maintain an appropriate posture so as to avoid backbone damage The equipment was counted among class H and C and is intended for home use exclusively It cannot be used as a therapeutic or...

Page 16: ...ting Aggressive cleaning products must not be used to clean the device Use a soft damp cloth to remove dirt and dust Clean sweat traces since acidic pH may damage the upholstery The device should be k...

Page 17: ...burn It will be a success to obtain the same efficiency as for fitness training Intensive training which helps you to lose your weight should be carried out more frequently for at least approx 45 50 m...

Page 18: ...17 www spokey eu 25 5 116 5 x 50 x 161 120 2 a 120 H C C 1 C 7 10 1 2 3 P c 3 5 1 3 1 16 17 24 18 2 3 2 2 1 8 14 28 29 38 A A 38 29 B 29 A C RU...

Page 19: ...06L 12 21 L P 34 36 06P 06L 4 5 20 19 4 35 20 06P 06L 12 L P 11 L P 6P 6L 37 32 36 4 P L 4 5 23 26 24 40 27 4 5 L R 7 L R 25 17 18 9 10 31 32 39 5 2 1 5 AAA 2 14 14 15 2 2 15 10 2 o c 11 1 8 1 5v AAA...

Page 20: ...TIME TMR SPEED SPD DISTANCE DST CALORIES CAL TOTAL DISTANCE ODO SCAN 6 MODE SCAN PULSE RATE 4 TIMER 0 00 99 59 MIN SEC SPEED 0 0 999 9 KM H DISTANCE 0 0 999 9 KM CALORIES 0 0 9999 KCAL ODO 0 0 999 9...

Page 21: ...erapeutick nebo rehabilita n za zen Za zen nen ur eno pro rehabilita n ely Dodr ovat zvl tn ostra itost b hem p en en a zved n za zen Za zen mus p en et v dy dv osoby B hem zved n anebo p en en za zen...

Page 22: ...py potu proto e to m e v st k po kozen aloun n Za zen je nutn skladovat na such ch m stech aby bylo chr n no p ed vlhkem a koroz Pokud po tadlo nefunguje spr vn je t eba se ujistit zda jsou dob e spoj...

Page 23: ...a 30min Intenzivn tr nink napom haj c hubnut by m l b t provozov n ast ji alespo cca 45 50 min JAK TR NOVAT Dodr ov n tr ninkov ho cyklu p in pozitivn efekty pro fyzickou kondici utv en svalstva a spo...

Page 24: ...ateg rii H a C a je ur en v lu ne pre dom ce ely Nem e by pou van na terapeutick a rehabilita n ely Po as zdv hania a pren ania zariadenia postupujte v nimo ne opatrne Zariadenie by mali v dy pren a d...

Page 25: ...behom tr ningu DR BA Pred ka d m po it m zariadenia sa najsk r presved te i s v etky skrutky matice a oto n matice dobre dotiahnut Na istenie zariadenia nepou vajte agres vne istiace prostriedky pinu...

Page 26: ...avanie TR NINGOV HO CYKLU prin a ve a zdravotn ch v hod tak ch ak mi s fyzick kond cia tvarovanie svalov a v spojen s kontrolou konzumovan ch kal r i stratu hmotnosti Rozcvi kov f za T to etapa zaru u...

Page 27: ...tos viet b kite ypatingai atsarg s rengin turi perne ti du mon s Pakeliant ir perne ant rengin b tina atsiminti apie teising k no poz kuri apsaugos nuo stuburo pa eidimo renginio montavimo metu b tina...

Page 28: ...pa eisti apmu im Prietais reikia laikyti sausose vietose norint j apsaugoti nuo dr gm s ir korozijos Jeigu spidometras neveikia taisyklingai pra ome patikrinti ar visi laidai gerai prijungti ypa vir...

Page 29: ...kartus per savait apie 30min Intensyvi svor ma inanti treniruot turi b ti atliekama da niau ne ma iau kaip apie 45 50 min TRENIRAVIMO INSTRUKCIJA TRENIRAVIMO CIKLO laikymasis duoda daug naudos sveika...

Page 30: ...s k anas j p rbauda vai visas sast vda as kas nor d tas saist t sarakst atrodas komplekt Neieteicams palikt regul anas ier ces kas var tu trauc t lietot ja kust b m t d st vokl lai k ds to elements iz...

Page 31: ...ometru Gad jum kad spidometrs v l nedarbojas j p rbauda vai pieg d t ja vads vai dak a nav saboj ta Gad jum kad nav pretest bas regul cijas l dzam p rbaud t vai aug jais sensora vads ir pareizi savien...

Page 32: ...u saboj anas risku Ieteicams paveikt da us izstiep an s vingrojumus k att lots zem k Katra poz cija j saglab ap 10 15 sekundes nav j sasprindzina vai j velk musku i vingro anas laik Ja izjut sit k da...

Page 33: ...Ger tes ist auf die richtige Haltung zu achten damit die Wirbels ule nicht besch digt wird Das Ger t ist der Klasse H und C angeordnet und ist ausschlie lich f r den Hausgebrauch bestimmt Es darf wede...

Page 34: ...umfang enthalten Installation der batterie 1 Legen Sie Batterien an der R ckseite des Z hlers ein 2 Vergewissern Sie sich dass die Batterien korrekt eingelegt sind 3 Wenn das Display unleserlich ist o...

Page 35: ...en gem den nachfolgenden Abbildungen auszuf hren Jede Stellung soll ca 10 15 Sekunden lang gehalten werden die Muskel sollen bei den bungen nicht berm ig angestrengt und gezerrt werden Bei Schmerzen s...

Page 36: ...34 www spokey eu www spokey eu 2 3 1...

Reviews: